Sunday, January 30, 2011

GM Fridge and Snowfest Photos

Last Thursday was spent with my sister and niece. We basically ate our way across the small town of Frankenmuth, Michigan. We ate crepes for lunch, then tasted olive oils and balsamic vinegars, and later drank specialty coffee drinks. There was also popcorn and cupcakes to take home.

On our way from Clio to Frankenmuth we crossed paths with an antique store that called our name as we drove by. I purchased a small vase and my niece purchased several vintage books.

I noticed several interesting items while browsing the antique shop. Isn't this refrigerator cool? I love that it has the General Motors logo.
This Coca Cola cooler was nifty but I bet it would use a heap of electricity.
Frankenmuth was celebrating the first day of their annual Snowfest.The snow and ice sculptures were in the process of being carved but I think you can tell what this is suppose to be when completed.
Large eagle with it's talons around a very large fish.
Ice sculpture of a very thin train.
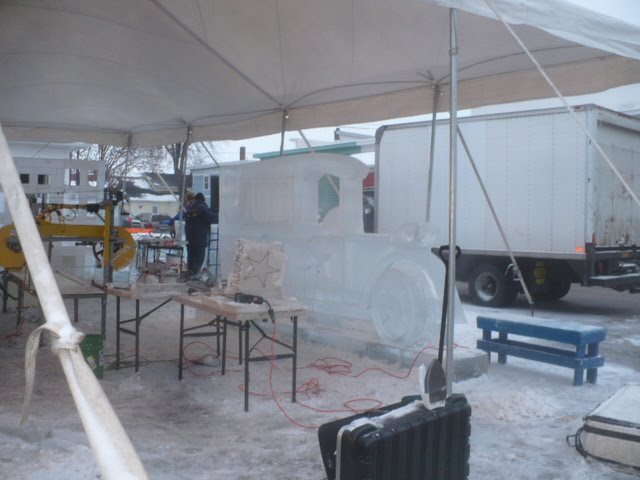
Looks like a gun and a piggy bank.
And of course, what would any festival be without a beer tent?

Friday, January 28, 2011

Newest Craigslist Find

This is the Craigslist find that I had my sister pick up for me. Needs a little TLC but nothing major.
Now before anyone asks....no, I do not own a piano nor do I play the piano. I just liked the bench and thought it would work perfect to sit on, as do most benches. The bench will probably end up in the foyer so we can sit to put on our shoes.I am still talking with the sellers of the other Craigslist find. Hopefully that will work out but if not, we are looking at an alternative. I am being vague because it seems to amuse Yvonne.

Valspar Free Sample Update

Valspar Paint made a change in their free giveaway. Seems they have changed the time from 12am CST to 10am EST. Same deal though, 1,000 freebies every day for 100 days. See my previous post for full details.

Just go to the Valspar Paint page and click on "Power in Color" tab. Hopefully, you will be one of the 1,000 lucky people. I would assume as the giveaway continues, that less and less people will be online and in your way. I would also think that during the week would be easier than on the weekends.

Thursday, January 27, 2011

Here's Another Freebie for You

Staples currently has the 50 count Carnation Coffee-Mate French Vanilla flavored coffee creamer selling for $6.99. This makes for a great deal if you work in an office or have a house full of coffee drinkers.
To get this item free, go to Staples.com and enter item #424961 into your shopping cart. Then proceed to checkout and enter coupon code 69486 to receive the item free. Select free shipping to store to eliminate the shipping cost.

You will be required to enter your credit card information for verification purposes but you will not be charged.

I printed out a receipt after ordering to insure that I had proof in case my credit card is charged. Better safe than sorry.

You can also order over the phone, 1-800-378-2753.

Today, I picked up my free creamer. The sales clerk asked me why so many people were ordering this item because they had a stack of 20 boxes waiting for pick up. She understood after I explained that the item was free.

To save even more $$$$$, first go to Ebates and let Ebates direct you to the Staples site. You should get 2% of the cost of the creamers in cash back. If you are signing up for the first time, you will also receive a $5.00 gift card for signing up.

Enjoy your coffee!

Wednesday, January 26, 2011

Free from Valspar

Recently, I sent away for a free paint sample from Valspar. Along with the paint sample, I was promised a $5.00 off a gallon of Valspar paint coupon and a small roller and paint tray.

It arrived today and I was pleasantly surprised!!!Just as they promised......one small roller with extra roller cover, 1 small paint tray, 1 $5.00 off coupon, and a very generous paint sample (7.2 Oz).The paint sample is large enough to use on a small project such as a picture/mirror frame, maybe a door if it has a large window or windows (use a brush instead of roller to extend the coverage), or maybe one of many colors on a painted chest of drawers...think Mackenzie Childs.For a free sample of Valspar paint and a $5.00 off coupon visit this site. Each day the site gives away a preset number of samples. the sample giveaway restarts every day at 12:00am CST...that's 1:00am for us here in Michigan.

Good luck. In the meantime, you might want to browse through the color choices and decide ahead of time which paint color sample you wish to try.

Tuesday, January 25, 2011

We have a level kitchen ceiling!

Today saw a lot of progress being made on the ceiling in the kitchen. The first several boards took FOREVER!
But as we moved along and fine tuned our process we started to make faster progress.When I stood back and looked at the ceiling I couldn't believe it.....it was level!!!! When I mentioned to R that it was great that the ceiling was now level, he said, "what about the rest of the $%^&ing house? The rest of the house is a half bubble off. The level ceiling is going to stick out like a sore thumb."

Tomorrow, after I get home from a doctor's appointment, we will relocate the electrical boxes for the ceiling lights and then insulate the ceiling.

Thursday is an off day from home construction and we should be back at it on Friday. Back at what? I have a whole list of stuff and we will just have to see what strikes our fancy.

Thursday, January 20, 2011

We have lumber!!!

Lumber is bought and we should be on our way to a kitchen ceiling in no time. Ha Ha!!

In the meantime, Craigslist has been calling my name. Today's item was luckily in my sister's stomping grounds, so I was able to get her to pick up the item for me. I am currently waiting to hear back from a seller about an another item, that I will be seriously disappointed if someone beats me to it.

Wednesday, January 19, 2011

Ready to buy lumber for the ceiling....finally!

Today was a very productive day despite the fact that it started out with a 2 1/2 hr medical appointment. Once I was back home we got right to the job of removing the remaining partition wall.

Here is what it looked like when we started.
Removing the 2X4's and such was the easy part. The hard part was some plaster and wire mesh that needed to also be removed. We also ran across some unused wire in the wall that we pulled out. Ironically, it was capped off with wire nuts on both ends. I guess they didn't want any remaining electrons to leak out of the wire.

Here is how it looked when we ended the work day.
Tomorrow, after R returns home from a dentist appointment, we make a run for Home Depot to buy our lumber and insulation for the ceiling.

Tuesday, January 18, 2011

Demo Continues

When will the demo end? I haven't a clue.

Our intention is to correct, upgrade, or restore anything that we can gain access to before we paint and decorate. So the demo continues.

We were back in the kitchen today. We have all the undersized ceiling joists removed and will upgrade to 2X8's. The ceiling joists will only need to hold the weight of the bead board but we want to make sure they do not bow like the previous 2X4's that held an old plaster ceiling covered with a layer of dry wall.

Old electrical wires that are no longer in use have been removed. What a mess of wires. We eliminated quite a few and found several second generation wires that were live but not in use. These wires originally went to ceiling lights that were long ago removed before the knotty pine was installed. Rather than remove the wires, they just capped them off and laid them on the old rock wool insulation. Both the wires and the insulation are gone now. New batt insulation and rigid foam is in the plans for two reasons. First and foremost the insulation was old and smelly. Second it was doing very little to insulate anything.

The kitchen, as I have commented on before, is very dark. To help remedy this problem, we started to remove a short non load bearing wall. This partition wall is located at the end of the counter. Rather than leave the end of the counter open they ended it with a wall. This wall is adjacent to a large window but because of the wall sunlight is blocked from coming in. I would have preferred the remaining wall to be slightly shorter but there is an electrical outlet located on each side of the wall so that limited me on how low I could take the wall.Notice how dark it is in the kitchen? That is R looking at the wall and deciding where to start. I scribed a line on the wall and he used the oscillating saw to cut through just the knotty pine. We then pried off the pine leaving us with the old plaster wall. He then used a reciprocating saw to cut through the plaster and wire. That left us with the 2X4's which we will remove tomorrow.

Notice how much light can come into the kitchen. This photo was taken 2 hours after the first photo was taken. Look at those ugly windows. I can't believe they removed the original double hung windows and replaced them with these Anderson windows. All the Anderson replacement windows have wood rot, unlike the remaining original 75 year old windows that are still functioning just fine. These windows will need to be replaced with double hung windows that match the remaining windows in the house.
Removal of the wall also visually widens the room. The kitchen tends to feels long and narrow and the extra LARGE island doesn't help. We have to leave the island 'as is' because the cook top is currently located there.

Sunday, January 16, 2011

Another Excuse

This is yet another reason WHY we are making such slow progress here at The Gear.

Saturday found us at a lecture and book signing at the Flint Institute of Arts. The lecture started at 4PM which made it too early to start a project before the lecture and too late to start a project after we returned home. Basically, all that was accomplished was snow removal which is an ongoing battle at this time of year.

The lecture was great and I should finish the book tonight. The book signing was perfect because we had a plan. The plan was to sit towards the top of the FIA theater at the end of an aisle. This would give us rapid egress out the door and at least towards the front of the book signing line.We were shocked when we realized we were first in line. The museum shop was packed with people buying the book. There again we planned ahead.....I bought several copies online the week before.While we were waiting for the author, Laney Salisbury to show up, we were approached by several people trying to take cuts. The most common maneuver was to just step in front of us. Finally, R told one mink wearing lady, that the "line is back there" while he pointed with his thumb over his shoulder. She muttered something and headed to the back of the line. R then leaned over and said to me in a hushed toned....."nice try, B**ch." The people behind us started laughing and said to us, "What? She couldn't see the 30 or 40 people standing here in a line?" Leave it to R to tell it like it is.

Seriously, line cutting at a book signing? At an art museum? This is the type of behavior you would see on a Black Friday or while waiting in line for Superbowl tickets, not at an art gallery with a one of a kind Chihuly hanging over our heads. The English say that Americans don't know how to queue up and I have to agree. I am always amazed at how poorly we, as a people, line up and how we conveniently fail to see the line of waiting people in front of us. No wonder we need velvet ropes at the bank to keep people zig zagging their way to the teller. Thanks to those velvet ropes, our trips to the bank are not only free of passbook dividends but also free of people who try to take cuts.

Friday, January 14, 2011

I've Got the Whole World in my Hand

Remember that song?

The world I have in my hand are actually marble sized glass replicas of earth. Cool, huh?

R and I attended, a members only, showing of the new show at the Longway Planetarium. If you live in the Flint region of the mitt, you should make plans to see the show. We loved it.
Inside the dome before the show began.

I had to chuckle, though, on the way to the car. During the show they mentioned that Pluto is no longer classified as a planet but is now a dwarf planet or planetoid. Out of all the astronomical facts that were given during the show, the fact that Pluto is no longer a planet is the one fact that R felt the need to comment on as we walked to the car. In 2006 he didn't agree with it and his stance remains unchanged to this day. Of course I don't think the astronomers who made this decision could care less what one guy, who on a good day can barely find the Big Dipper, thinks.

R's feeling is that if Pluto was good enough to be a planet all those years...it still should be a planet. And further more he says that they should have bigger fish to fry than reclassifying planets that have already been classified. It amazes me how personally people take the reclassification.

One article I read said that Pluto was not demoted just reclassified. Really, it's not like Pluto had to take a pay cut and now cannot afford to feed it's moons. R likes everything to stay the same. From his planets to where the furniture is placed. Once it is assigned a place that is where it will remain until the end of time.

I, on the other hand like things to change except the seasons. We could reclassify winter anytime. We could call it "the white and gray months". White snow and gray skies. I keep telling myself spring is right around the corner. Who am I kidding.....it's not coming for another 3 months.

Sunday, January 9, 2011

Where to Start?

The kitchen ceiling is down and only a small pile of debris is left to discard. We still have not done a really good cleaning. I will wait until all the debris is gone before I haul out the shop vac and suck up all the little debris that is caught under the base board.

Today we took a close look at the ceiling rafters and second story exposed floor joists . We decided that as long as the floor joists are currently visible we would use this time to install joist hangers on the portion that has a second story above it. There are also some areas where the ceiling rafters connect to a header that may get some added support from some hangers.

We also looked at the knob and tube that is still there and checked to make sure it was not currently live and as suspected it was dead. Also on the list to remove is some second generation wiring that was installed on the kitchen addition and is no longer in use. I cannot understand why when they upgraded to the new electrical in the 90's that they did not remove the old wiring.

Since we decided that our next step was the joist hangers we did a quick count and drove to Home Depot before they closed. Once at Home Depot we found the hangers we needed but two were of heavy duty design and when we asked for more, the sales clerk said they were not Home Depot hangers and were accidentally taken back for a refund. But we bought the two odds ones anyway.

The storm door I stripped is back together again. I didn't glue it together because I may need to pull apart the side pieces when I fix the bottom. But all in all the door looks to be in far better condition than when it was covered in peeling chipped paint.

I reassembled the door by starting on one side and assembling across the door. The center triangular pieces are not glued in place but float so that they can expand and contract with the humidity.
These are two of the new dowel pins that I needed to make to replace the rotted dowel pins that I removed. You can also see the broken piece that I need to glue back in place underneath the dowels.
Here is the completely reassembled door. Notice the bottom of the door and where the repairs need to be made. This door was given to me by a carpenter who removed it from a 1940's era house in Flint.
The door also came with the screen insert and a glass insert. Both with the traditional scalloped border around the edges. It is rare to find both inserts when you find an old wood storm door.

Wednesday, January 5, 2011

Dust Dust Everywhere

Tomorrow should wrap up the ceiling removal. What a dusty mess. All that remains is a strip of plaster and wire mesh about 5 feet long and 3 inches wide along the east wall.

This photo was taken yesterday when there was more plaster left around the edges. Also note all the knob and tube (non functioning) that we will remove.While R was busy with the ceiling, I was busy stripping the paint off the wood storm door. I decided to dismantle the door after I finished with the paint removal. The bottom of the wood storm door was pulled apart and at some time they installed little brackets to hold it together. After the door was apart, I found that the dowel pins holding the bottom of the door to the side pieces were rotted and falling apart.
Here is what a good dowel pin should look like.
Once I sand all the parts of the door, I will reassemble using new dowel pins in the bottom portion of the door. I'll wait to prime and paint until after I install it on the barn loft door...just in case I need to trim it to fit properly. Plus I have not decided it I am going to paint it the trim color or the color of the exterior door.

Saturday, January 1, 2011

Ring In the New Year With Demo

Happy New Year!!

Nothing like ringing in the new year with a little demolition. Today we finished removing the remaining knotty pine on the ceiling. We then moved on to taking down the wall cabinets with the leaded glass doors. The door s will be reused on the other side of the room when we build cabinets on the wall where the sink is located.We needed to remove the cabinets for several reasons. #1 The cabinets were ugly and constructed poorly. #2 The cabinets made the area feel closed in and narrow. #3 The cabinets blocked the view into the kitchen from the main hallway. #4 The cabinets blocked sun light. #5 I needed a place to construct open shelves that will display my collection of Roseville, Hull, McCoy, and Weller pottery. Actually, #5 was reason enough.I was busy today scraping adhesive off the kitchen walls while R tore down cabinets. In two areas in the kitchen the previous owner had applied ceramic tile to the walls. The mastic is coming off rather quickly but I will be left with a fair amount of sanding. You can see in the photo above the black goop on the walls above the counter. The adhesive that I have been scraping is tan so I am keeping my fingers crossed that this product will come off as easy as the tan substance.

The remaining plaster ceiling will come down tomorrow. After that we can remove the left over non functioning knob and tube wiring. I want to also move the locations of the ceiling lights. Currently they are off centered slightly and it is driving me crazy.

We can then insulate and installed bead board on the ceiling. Then it is on to priming the knotty pine, painting everything white, installed black granite on the counter tops, new black hardware to match the few original pieces, install the new appliances, then paint the floor in a black and white checkerboard on the diagonal, and top off with a coat of clear poly.

The very last item on the list will be to install the vintage lighting we have been purchasing over the last 3 or 4 years.