Today was day 3 of the brackets, corbels, and shelves installation project. On day 1 we installed the brackets under the corner wall shelf. The area under the shelf will eventually have a built in desk and cabinets. The shelf looked plain and I needed to add something to it. I decided on a smaller version of the brackets that I am using elsewhere. A bracket alone was kind of blah and I am of the school of moulding where the motto is 'when in doubt, add more moulding.' We took the same 1x4 that we used on our ceiling trim and found some small scraps that were long enough to back the bracket. These brackets are purely decorative and offer no real support to the corner shelf.

Next on the agenda was the corbels under the ceiling beam.These two bracket were large but if used alone would of been out of scale and wimpy. So we took the same 1x4 and backed the top and back of the bracket. Next we headed to the big scrap pile and found a wide board that we ripped to 5 3/4 inches wide and backed the top and back of the bracket creating a stepped layered look that made the bracket larger. Again these were decorative and were held in place with finish nails.
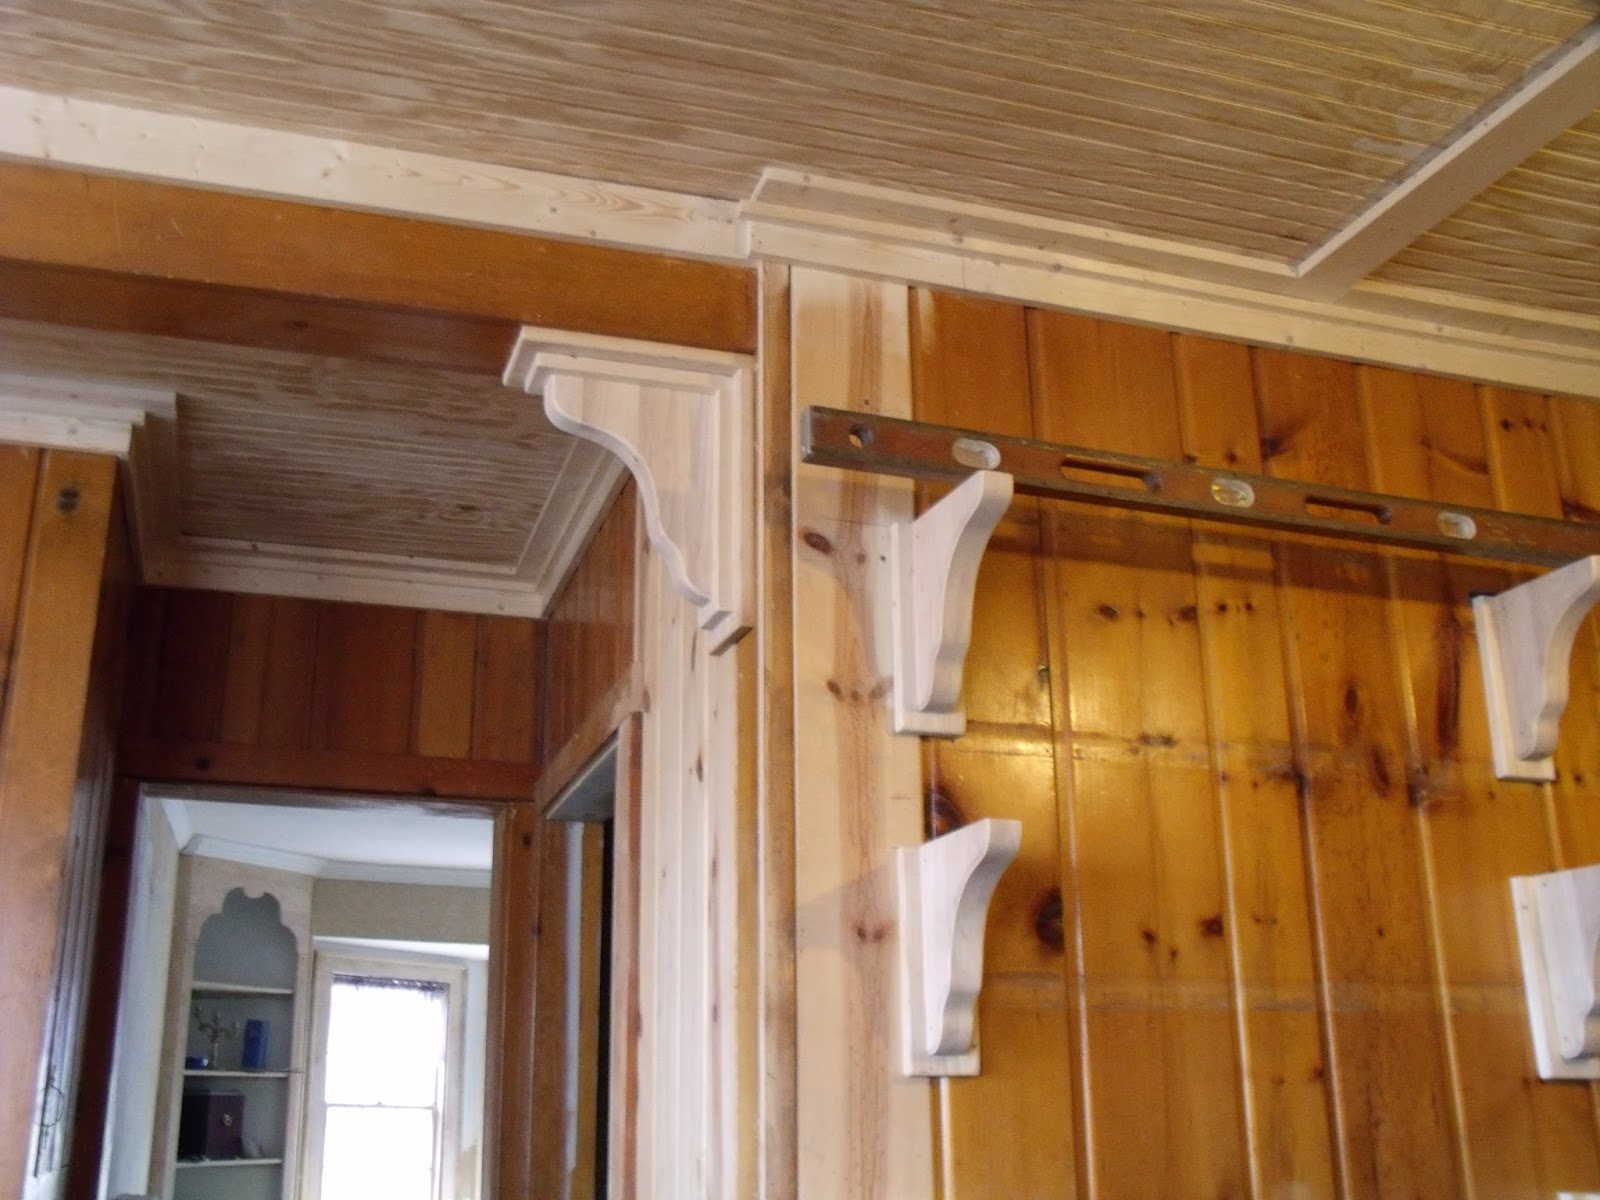

Last on the list are the shelves above the lower cabinets that will be my baking center. These shelves will support a lot of weight so installing them required more than finish nails. We decided on 3 shelves with 3 brackets to support the shelves. The actual shelves will be (2) 1x10s glued together for thickness. One board would be too wimpy and out of scale for the brackets. Also gluing two boards together rather than using one thick board adds strength and will help eliminate cupping and warping that happens a lot with pine boards. Why pine? We felt we needed to repeat the pine which is on the walls. Even after they are painted white you should still be able to make out the grain and knots. Plus, these 6 boards were 70 bucks and if we had purchased poplar the cost would have been a lot more.

We first found the center of the cabinet and marked that on the wall by adhering a piece of blue painter's tape and marking center. Next we needed to determine the spacing of the three shelves. I'm short so I wanted the bottom shelf to be somewhat accessible without a step stool. BUT it needed to be high enough for my Kitchen Aid stand mixer to sit underneath it. We decided on 18 inches and then used the 18 inches for the spacing between the other two shelves marking center and spacing on painter's tape.
We used the same design that we used on the corner shelf by backing the bracket with a 1x4. Since these brackets were functional and needed to support weight we first screwed the 1x4 to the wood wall. The placement of the screw was in the center of the board so that it would be hidden by the bracket. The bracket then was hung on the 1x4 using the hanging hardware and a screw. We then finished it off by drilling small holes into each side of the bracket and inserting a medium size finish nail that was then counter sunk. We tested each bracket and they are not going ANYWHERE.
By the end of the day we had 6 brackets installed. Tomorrow we will install the last three brackets and then add a length of 1x4 between each bracket to give the shelves additional support and provide a place to nail the shelf to between the brackets.
Last but not least....a gratuitous photo of the little kittens at day three. Mama Kitty and Aunt Sasha Kitty are busy taking turns cuddling the kittens. One of the kittens is a lot bigger than the rest and one is already trying to walk. He can't stand up but he gets around in the drawer quite fast with his*** little legs moving like crazy.
***I have no idea whether he is a he or a she but for some reason we just keep calling all of them HE.

Oops, I guess you need a new camera. If you get one that use AA or AAA the Duracell rechargeables are a much better choice than standard Alkalines and are better for the environment as well.
ReplyDeleteDoes the top of the corner shelf conceal heating ducts or something? It's all looking really good and I can't wait to see what it looks like painted.
Good to see that the kittens are doing well.
Alex.....I should have been more clear, the camera dropping was two years ago. I changed my post to be clearer. I was bummed because I could actually take some what decent photos with that camera (cheap) too.
ReplyDeleteNo heat ducts but the corner has an angled board that conceals wires running up the corner. Actually the wires are fro the rewire after the pine to put on the wall.
LOL about the pedicure incident :D
ReplyDeleteKittens are SUPER CUTE! I love kittens! Can't wait til they are walking all over the place. Will you keep them all?
Like Alex said, can't wait to see all of this painted. I'm sure you can't wait either.
I can't wait to see it all painted, either. I swear this is taking so long but every other day someone is calling Roger and asking him if he can come over and cut this branch or that branch. I guess we are the only one with a chain saw....LOL Ironically all our branches still need cutting up and we have a ton of tree damage.
ReplyDeleteNo we will not be keeping the kitties. But I want to find them GOOD homes. Finding a home for Patches and Sasha will be more difficult because they have to go to the same home. Sasha is just too attached to Patches. They are both precious and gentle.
The two boys Elvis and Morrie, will do fine going to separate homes. They like to play. Obviously Elvis likes other things, too. LOL
Jan: Glad to hear that you got your camera working again and that it didn't take a swim.
ReplyDeleteI thought there must have been a heating duct or something there because the shelves didn't go up higher and it was closed in.
Sorry to hear that things aren't going as fast as you like, but you are making progress and as my Dad used to "slowly but surely" you're getting it done.
The world could use more people like Roger who are willing to help out others. Hang in there he'll get to your own branches...eventually. :-)
Alex...you know after you mentioned the heat duct thing I looked at the photo again and thought 'wasted space' but then today I was standing there and realized that it was probably a shelf to display tea cups and saucers. That was a big thing and those shelves are just about saucer high.
ReplyDelete