Thursday, December 24, 2015

Snowblower Paddle Replacement Easy Peasy

The last two years were hard on our two snow blowers.  There were weeks on end where the blowers were used everyday if not for moving fresh snow it was to remove yesterday's pile of snow from the county snowplow at the end of the driveway.

One of our snowblowers has replaceable rubber paddles on the auger.  These get worn down from making contact with the concrete or asphalt driveway.  The snowblower will no longer scrape the snow off the surface of the driveway or sidewalk once they are worn.  After that you are basically just walking around pushing a snowblower and getting cold.
A couple of weeks ago R stopped by the garden center to see how much it would cost to replace the paddles.  The cost was $55.00 for parts and $45.00 for labor.  R hates to pay anyone to do anything mechanical because that is what we both did for a living before we retired, he as a journeyman machine repairman/hydraulic technician and me as a journeyman experimental test technician/mechanic.  So he told me to order the parts and he would take care of it when he had a free moment.  That free moment arrived this afternoon at around 3:00PM.
I found the replacement paddles online on the Home Depot site for $59.00  and used in store pick up to eliminate the shipping cost.  The paddles also come with the replacement bolts.  This is great in case the bolts you are removing are so rusted that you need to cut them off with a cut off wheel.  We were lucky and our just took a little elbow grease.  If you plan ahead you can squirt the bolts with a penetrating/rust dissolving oil a couple of days before you plan to replace the paddles. This will help loosen the rust so that you can remove the bolts.
You just slide the new paddle into the slot and line up the bolt holes.  Install all bolts and leave them loose until you have all the bolts installed, then go back and tighten them.  Repeat procedure for the second paddle.

New rubber paddles installed.
The above photo shows the worn rubber paddles that we replaced.

The entire removal and replacement took 35 minutes.

Tools used

3/8th ratchet
socket
open end/box end wrench
adjustable wrench
penetrating/oil dissolving oil 

Reuse Repurpose Recycle


Sunday, December 20, 2015

Barn Fascia Boards Finished and My Rake Bites the Dust

We finished the fascia boards on the back of the barn.  The barn is going to look great once it is painted.  It was looking in rough shape when we purchased our home.  Over the years we have done a little here and there but the work we did this summer really made a difference in the barn's appearance.
I raked today while R finished installing screws into the fascia boards.  After about an hour of raking my rake handle just broke in half.  Luckily R hoards broom/rake/shovel handles.  He uses them for a variety of things.  He's been known to drag a broken rake out of someone's trash and bring it home just for the handle.  It paid off today because the metal leaf rake that I was using was in very good condition except for the wood handle that cracked in half.  I guess I don't know my own strength.

R says he'll have me back to raking in no time.  Lucky me.

Barn Spruce Up Backside Edition

We are determined to keep working outside until it snows or our fingers fall off from frost bite.  No seriously, my mother is having health issues and at least the month of January will be busy taking care of her so we are trying to get as many projects completed that require both of us.  R will be on his own for a while and I know he has some one man projects that he plans to do.
But for now we are concentrating on adding the fascia boards to the barn.  We completed the front and now moved to the back.  The back needed more boards but we almost got all the boards up in one day except we were an inch short.  I do all the measuring and lumber lists and R was loving it that I was an inch short UNTIL I noticed that we had to cut off 6 inches off of two boards because of cracks and then add in all the length that we had to cut off to have the end of the boards land on a rafter tail and that is where my inch disppeared.
I never over buy lumber.  I know some people by 10% more but we already have a large inventory of lumber so I do not want to add to it.  I kept all our scrap when R and I built our first deck at our first house.  When all was said and done, it amounted to a 5 gallon bucket of little pieces.

So tomorrow we need to go buy another 1X8 and try to finish up the back side before the rain starts this next week.  We just temporarily nailed the boards in place and R can go back and remove a nail at a time and replace it with a screw.  We have found that it works better to use a screw on an angle when attaching to end grain rather than a nail.  In the spring I will fill the screw heads in before priming along with caulking.
We fired up the burner barrel to keep us warm while we worked today.  It was just enough to take the chill off our hands when we needed to remove our gloves to use the saw etc.  Morrie the cat was ready to go inside especially when the wind started to blow.  He's a sissy.

I hope that everyone is ready for Christmas.  I have my shopping completed but I still need to wrap. This year the wrapping won't be too bad because I can't think of any odd shaped items that I need to wrap.....those are the worse.  Let's hear it for square shaped boxes. Woo Hoo!

Friday, December 11, 2015

WooHoo Warm Winter Weather and Wreaths

I would be a very happy girl if winters were like today.  Mid 50's and sunny with just enough of a breeze to remind you that it is winter and not spring.  Perfect.

I assembled one more wreath and made bows for the remaining bowless wreaths.  My bows were not the best this year because by the time I decided on colors etc., I didn't have enough time to track down those ribbons in two sided wire ribbon.  Only the sheer black ribbon has wire edges and because of that my bows are not holding their shape in the wind.  But I like the combination of ribbons so now it is just a matter of tracking down those ribbons with wire.

Cost break down

Evergreen cuttings.  Shopped the yard.  FREE
1 paddle of wire.  $1.99 Michaels Left over from last year.
5 wreath frames.  Misc prices but bought over the years and reused. Range $2.99-$5.99
Ribbons of your choice.  I spent $22.00 but had I shopped early and use coupons I could have probably saved 50%

I've been pricing wreaths to get an idea of how much I have saved but since I can't find exact versions of mine I'll guesstimate.  Small wreath (1) $15.00. Medium wreath (3) $25.00 each. Huge Wreath (1) $50.00=$140.00  Plus, I used the left over cuttings for my window box and large pot.

Tomorrow we want to get some exterior barn work done.  Our plan was to do it in the spring but the weather is just too good to not get out there and cross it off our list ahead of time.

Bows and Blowing Wind

Today was another grey day, it would have been a great grey day had we not had 30 mph winds.  It's 216AM and it's still 50 degrees outside. Holy cow!!!!  This time last year we were hip high in the snow department.

I was trying to make a bow today but the wind would blow my spool of ribbon off the table and unwind the entire 9 yards.  After one bow I moved on to something else....my frustration level was highly elevated at that point, so for me it is best to just walk away and do something else.

So I decided to hang one of the medium wreaths on my middle dining room window.  Remember how I said that I bought extra suction cups because after several years they get hard and no longer work? That happened today but not before the wreath fell down to the ground 4 times.  So it's a little rough around the edges now but nothing that the 30 mph winds can't make worse...LOL

After the suction cup debacle I decided that my bow frustration had subsided some so I attached the bow to the small wreath on the front door.  The bow is made with three different ribbons. A sheer wide black ribbon, a black and white gingham print ribbon, and a black and white print ribbon. I know you are thinking...."black and white?  How festive...NOT"  My reasoning is that I do not want Christmas/Holiday decorations but more like seasonal/winter decorations.  After January 1st, I feel like red and green scream holiday and should really be removed.  Since I want my decorations to remain all winter they need to work with the style and color scheme of my home rather than a predetermined commerical color scheme.
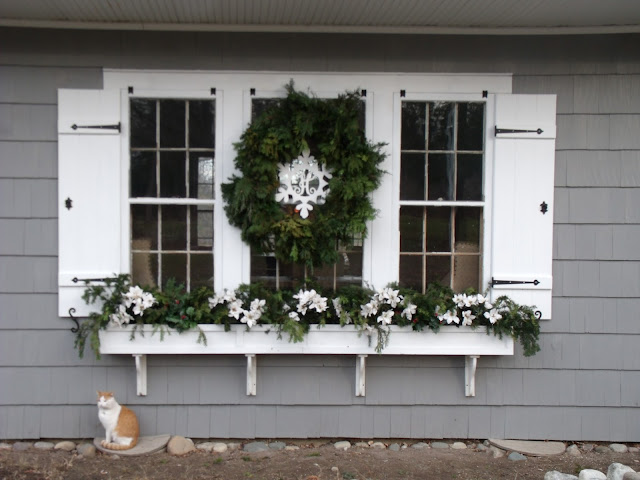
I moved on to the big wreath after attaching the bow to the small door wreath.  This wreath does not get a bow and instead gets a large wooden monogram snowflake painted white.  Morrie the cat was not happy with the wind and was the first one through the door when it was time to go inside.
R found some additional evergreen cuttings and I have three wreath frames left so I am going to try and make a few more wreaths tomorrow after I take care of some appointments and errands in the morninng and early afternoon.  R cleared out the back of his pick up truck so he can take a load of metal scrap to the scrapper next week.  He has been busy cleaning out the barn.  There is years and years of racing parts and sheet metal and STUFF.  We really need the room in the barn to store the mowers and lawn tractor. He's made quite a dent in the stacks of stuff but there is enough stuff to last him until summer or longer.

I also needed the pick up truck bed emptied because I need to run out to the boonies to my girlfriend's house and pick up some items that I won at auction.  She lives near a auction house that has online auctions.  She bids for me and then picks up my stuff.  I can't wait to see the stuff in person.  One of the items is a large vintage wrought iron arbor.  I have no idea where we will put it but it was just too cool to pass up.

Thursday, December 10, 2015

Let's Hang Those Wreaths 3 Ways

Today we started to hang the wreaths. The weather was far more agreeable than yesterday's bone chilling low 30's and actually both my phone and car said it was 51 degrees today. Due to absolutely no sun whatsoever it felt cooler than that.  Here in the north we have 3 or 4 months of grey weather no matter whether it is bitterly cold or mild like today.

The huge wreath is heavy and we both guesstimated between 25-35 pounds so the suction cup on the glass option is out.  So off to the hardware store to see what kind of screw in hooks were an option to chose from but they also had to not stick out like a sore thumb when not in use.  I will paint it white when the weather warms up in the spring.

A cup hook wouldn't work because the threaded part is not long enough to support the weight of the large wreath.  So I found these that actually have a max weight limit (40 lbs) right on the package.  I think that once I paint it white it should blend in when not in use. I drilled a small pilot hole so that it was easier to screw it into the trim.  Since I did not need the hook to stick out more than an inch, I screwed the hook in farther than just the threaded part.

I could have just rested the metal wreath frame onto the hook but that would have put the wreath in the wrong place so I needed to make a wire loop to attach to the wreath frame.  I cut a piece of the green floral wire to a length of 24 inches and folded it in half.  I then twisted that wired and when the 12 inches was fully twisted I folded it in half and twisted again.  This left me with a rather thick piece of wire that measures 6 inches long.


These photos are of the smaller wreaths wire loops where I just folded and twisted once NOT twice
Now look at your wreath and determine where the top will be located.  Every wreath has a less than perfect spot that you will want to disquise with a bow or some other embellishment.  I determined where the top of the wreath would be located and threaded my 6 inch twisted wire through the frame. Slip one end of the wire through the loop on the other end of the wire and twist the wire around each piece until you have a continuous circle of wire.  This gives you a very sturdy wire that can support the weight of the big wreath.

The medium size wreaths are hung using the large suctions cups and are hung on the glass.  I purchased these suction cups after Christmas one year and paid 75 cents a piece.  I think I bought 10 of them because after several winters they tend to get hard.  I like these because the hook part folds over and takes up less space in my wreath supply storage container.  I also like the little tab for removal.  It's best if you apply the suction cup to clean glass and with these suction cups, no water, spit, or glass cleaner is needed to adher it to the glass.


Oh man, the manicure is looking bad.  No need to redo until I am done with the wreaths.
I used a third method of hanging to hang the small wreath on the front door.  After all the paint stripping, sanding, and painting that took two years to complete, there was absolutely no way that I wanted to put a nail or hook into the front of the door.  So I opted for hanging the small wreath by a ribbon (actually two ribbons) and used 4 flat thumb tacks to secure the ribbon to the top of the door. Our door is over 2 inches thick so using one of those metal over the door hangers is not an option for the front door.


I will wait to to trim any wild or long evergreen pieces until after I attach my bows and do dads which I will do tomorrow.  And I still need to make one more medium size wreath.  My cuttings are running low but I think I am going to have just enough.

Tomorrow.....bow making and attaching, adding do dads, and why I chose the colors and do dads that I used for the wreaths.  Plus a cost break down.

Wednesday, December 9, 2015

Let the Wreath Making Begin

Today I started assembling the wreaths.  Always start with your largest wreath if you are making different size wreaths because you will need to use your largest fullest cuttings for the largest wreaths.The smaller wreaths can use the smaller cuttings.  So  I started with the extra large wreath that will hang on the middle living room window on the front of my house.

I will make two passes around the wreath frame to get a full lush wreath.  A large skinny thin wreath just won't get it.  I normally start with the inside first.  The large wreaths are more cumbersome to work with because they are heavier and don't easily turn on the table so I asked an elf (my husband) to help me with the big wreath.

First attach your wire to the frame.  If you are making a wreath with a variety of evergreens just make sure that you vary the assortment in each bundle.  I use three cuttings in each bundle.  My elf would hand me bundles and I would wrap the wire around the bundle and frame keeping the wire taut and making one or two passes with the wire depending on whether the cuttings were laying correctly or not after one wrap of wire.


The next bundle is laid over the bottom of the first bundle and so on. When you get to the last bundle, you will need to lift up the first bundle to tuck your last bundle under your first bundle.  The trick is to keep your wire taut at all times.  This keeps the cuttings tight to the frame.

The outside pass takes a little longer because as you wrap the wire around the frame you need to make sure you do not crush the bundles on the first pass.  I have tried to make my huge wreaths by going around one time by putting two bundles side by side but those wreaths never come out round. You may have better luck but this is the method that works for me.

As I make my outside pass I keep checking for roundness.  I'm looking for general roundness because after I hang the wreath a can snip a little here and there to fine tune.  But the beauty of using mixed greens is that it is more casual and loose so I don't fret too much about the shape at this stage.  To finish up leave about 8 inches of wire and loop it around the wire frame and tie it off.The huge wreath took 40 minutes for the two of us to make.

I repeated the method for the medium sized wreath except it take just one pass around the frame. You can make the wreath appear larger by making your bundles lean to the outside.  This is where the odd curved cuttings come in handy.  The medium size wreath takes about 15 minutes to make.

We made two medium size wreaths and one huge wreath before the sun disappeared.  But that was fine with me because my hands were so cold I could barely move my fingers.  I tried to use gloves but I kept getting them caught under the wire. We might have enough left for another medium size wreath and a small wreath for the front door.  There is just one small pile of mixed cuttings left out of the five piles that I started with at the beginninng of the day.

Tomorrow I will show you how we hang them.  The huge wreath weighs about 25-30 pounds so that takes a little more effort to hang it surely.

Tuesday, December 8, 2015

Day 2 of Wreath Making

Today was cold and foggy.  The temps hovered around 32 degrees so the fog was freezing on  the trees and shrubs.  Tommorrow is forecasted to be a lot warmer which will make the assembling of the wreaths a lot easier to do without gloves.

The first thing that you need to do after gathering your evergreens is to cut them to a length of no more than about 8 inches unless you are making a huge wreath.  You want to eliminate any thick stems and dead areas.  Save even the short pieces because they will work on small wreaths.  I will assemble three sizes.  A extra large wreath for my front window, several medium size wreaths or other windows, and a small wreath for my front door.
Do not discard curve pieces.  These add interest to the wreath and give it character.  The beauty of a real wreath is that they are not perfect.  If you crave perfect then save your manicure and get a fake wreath.
If you can work with gloves then do it.  The sap from the evergreens is sticky and doesn't quickly wash off.  Do not wear good clothes because you will get sap on your clothes even if you try real hard to be careful.  Trust me.  I learned the hard way and had to wash a very nice top in hot water to remove the sap.  Unfortunately it also came out of the wash a lot smaller than it went into the wash.
All the larger stemmed pieces I save for flower pots and window boxes.  I kill two birds with one stone and nothing goes to waste.  Place all your piles of evergreens close and if you can within arms reach because you will only have one hand available to grab the pieces as you work around the frame. You will make two passes around the frame.  I do the inner part first and the the outside last.  I do this so that I can make sure my wreath is round and not lopsided.  But it's up to you and probably doesn't even make any difference.
You will need metal wreath frames which are available at craft stores for 2 to 5 bucks.  You will also need a paddle of floral wire.  I use the green wire but silver will work because you do not see the wire.  I've had the same paddle of wire for three years and still have a lot of wire left to use.  The wire cost is around 3 bucks.  So you can see that after you buy your wreath frames and wire there is basically no other money involved if you gather your own evergreens.
Last year I checked out prices.  I never did find a wreath as large as my big wreath but the medium size wreaths are everywhere for around 29 bucks.  That's not a bdget killer but when you multiply that by 4 it's really adds up.  I can think of a lot of things that I want to buy for $120 and wreasths are not one of them.  Plus, your wreath will be fuller and made with love and that is what the holidays are all about.......LOVE and caring.
By 4PM I had cut all my evergreens and founds my frames and wire BUT it was getting foggier and colder and there was only 45 minutes left of daylight so I called it a day.

Tomorrow it wreath assembling and it is suppose to be 45 degrees.  Heat wave!!!!

Monday, December 7, 2015

The Beginning of my Holiday Wreaths

Today was a beautiful day.  Mid 40's and sunny.  Wow...I can't believe how much work I could get down outside if our winters were like this every year.  I know that this won't last so I am making the most of it.

I really didn't want to buy a whole tree just to cut it up so I walked around the yard and before I knew it I had multiple piles of evergreen cuttings.  I am keeping my fingers crossed that I can get 4 wreaths made using these cuttings.
I like a variety of evergreens and I was surprised when afterwards I realized that I had quite the variety of evergreens growing in my own yard.  Funny how you overlook what is right before your eyes.
First I cut some yews.  Some even had red berries on them.  When I started cutting I thought that all I had was yews but as I was taking my clippings to the picnic table I walked by these....
....cedar trees.  So I cut some which was great because they were starting to hang too low.  Then I noticed this....
....pine.  This tree was heavily damaged during the ice storm of 2013.  It was in rough shape when we bought the house but R spent a lot of time cutting out the dead branches and it appeared to get better...until the ice storm.  Then I realized that I had two other evergreens growing right next to it.
Yup, two large spruces that had low hanging branches that needed a trimming.  So I trimmed away.

That gave me 4 kinds of evergreens but then I remembered that I had junipers growing at the Torrey Rd house.  So off I went to cut a pile of juniper cuttings.  I love the blue color and these even had a lot of blue berries on them.  By the time I finished cutting it was dark so I didn't get a photo but then I realized I had another evergreen growing back at The Gear.

I also have two huge Norway spruce trees and they hang really low so I should be able to get some cuttings off of those two trees.  This should give my wreaths a nice variety of greens. I'll have a nice variety of both colors and textures.  #Ifeelsorry4mymanicure

Monday, November 30, 2015

Sprucing Up the Window Box with Yew Cuttings

Normally my sister brings me evergreen cuttings from their cottage in the U.P. (upper peninsula). But this year she stayed home because she had puppies.....little black labs.  Oh so cute.

So this meant that I had to go to plan B, which was to walk around my yard looking for green stuff to cut.  We had some high winds the other day and I was able to pick up some pieces of spruce but not enough for the window box.  The spruce pieces and a few yew cuttings went in the large pot by the front door along with some white silk poinsettas.

I also added the white silk poinsettas to the window box along with the yew cuttings.   I've used the same silk flowers for about three years now and they seem to be holding up nicely.  I think I originally purchased them on sale for 75% off.

It looks like I will need to buy a fresh Christmas tree to cut up and make my wreaths.  I normally make three or four wreaths and leave them up until March 1st.  From year to year they are different depending on what kind of greens my sister would cut.  I usually prefer a combination of different greens.  This year the wreaths will all consist of just one type of cutting and it will probably be spruce or fir.  I like how full spruce wreaths are but I love the floppy and non perfect fir wreaths, too.
 UPDATE Rejunvation is sending me a new replacement shade.  They were very pleasant to deal with on the phone.  The only downer is that I never received a reply from customer service on my email detailing the broken shade and documenting with photos.  After not hearing anything after three days I just phoned them.  Fingers crossed that the shade arrives safely and is packaged more securely than the first shade.
 Why is this photo crooked?  Camera or user error?