Wednesday, October 18, 2017

Black Walnut Raking

It is this time of year that I curse my black walnut trees.  I can work around the fact that I cannot plant certain plants within 50 ft of a walnut tree because my trees are huge and give us great shade during those hot summer months.  But come September and October it is a whole different story.

On Monday I spent 3 straight hours sweeping the driveway and then using a snow shovel to pick up 5 trash cans full of walnuts, walnut leaves and the tiny stem that held the leaves.  Unfortunately, that was only the tip of the walnut iceberg.
 I know that you are probably thinking "why didn't she rake them up every week, so that there wasn't so many to pick up at one time?"  I tried that method the second year after we purchased the house.  I was raking under a large walnut tree when one fell and landed directly on my collar bone and just missing my head.

That walnut left a 4 inch wide purple bruise with a black center the exact size of the walnut.  It hurt for weeks.  I've had other close calls but I have learned to not walk under the walnut trees if the wind is blowing or if the trees are heavily laden with walnuts like this year.

One of those close calls was two weeks ago.  I was sitting on a concrete bench drinking a Tim Horton's ice capp.  I really thought I was out of range and I wasn't paying any attention to anything but that ice capp when a walnut fell and destroyed my cup and then hit my thigh.

The walnut had enough speed/ velocity/ or whatever, that it was able to destroy a plastic cup and still leave a bruise on my thigh. 

 I've had people ask why I don't wear a hard hat?  I would need a hard hat with a 2 foot brim around the entire helmet to protect my body....and I don't think they make such a thing.

So that leaves me raking like a mad man once the majority of the walnuts have fallen from the tree.  My method is to rake them into piles and then shovel them into trash cans. 
The above photo is of the largest walnut tree.  We raked and shoveled all afternoon and only picked up 1/2 of the walnuts.  There are 15 trash cans with walnuts in them, sitting on the curb waiting for the trash guys on Wednesday.

There are 3 more large trees and 2 small trees that need picking up.  I will say that the crop of walnuts is unusually large this year.  Some years there are very few or they are small.  It all depends on when the last frost occurs and if there is ample rain early in the season.  So the same conditions that ensure that we have a heavy crop on our fruit trees are also the same conditions that make an abundance of LARGE black walnuts.

The reason we are in a rush to pick them up is because we need a tree trimmer to cut some large branches out of our trees.  If we leave the walnuts on the ground someone will break an ankle.  Plus, I cannot mow the lawn when it's covered in black walnuts.  It is bad for the blades and it's a bumpy ride.  

What about our other trees?  The leaves have only fallen off the ash and walnut trees.  The sugar maples are just starting to turn red and bright orange.  The black and silver maples, sycamore, red/burr/pin oaks, catalpas, and tulip poplars still have green leaves and it is the middle of October. 

They better fall fast because I can't imagine raking leaves in November.

Reuse Repurpose Recycle

Sunday, October 15, 2017

Dividing Potted Hosta Plants

Now is a perfect time to buy and plant hostas.  Recently, I purchased 4 potted hosta plants from my local nursery for 60% off.  I was able to increase my savings by dividing the plants before putting them into the ground.
When choosing which plant to purchase, first pick the variety then look for a plant that has multiple divisions.  The plant in the above photo has 2 divisions.  Remember that plants at this time of the year don't always look their best.  If the leaves are ripped, torn, or sunburnt on the edges don't worry as long as the plant itself is healthy.

I purchased this plant for 60% off the regular price of  $17.99 which is $7.20.   I can get two plants from that one potted plant so my final per plant price is $3.60.  That price is below the normal 4 inch potted hosta price of $4.99 for a common hosta.   

To divide hostas, first remove the plant from the pot and look for a gap between the divisions.  This particular plant has a 1 inch gap and it is at this place that I will divide the plant.
 I like to use a plastic utility knife that has a blade that can be extended roughly to 4 inches.  It is also important that the knife is very sharp because you want to slice through the roots and not smash or tear them.
If your knife is very sharp it will take about 10 seconds.  I cut through one side and then the other side because this was a 6 inch pot and a 4 inch blade.  It can be tempting to just cut one side, than use your hands to pull the remaining roots apart but that method can frequently lead to damage.  You want to leave as many intact roots as possible, so fight that urge.
In the spring you will be rewarded with a  rarer and larger sized hosta for less money than the starter hostas sold at the big box garden centers.

Here is another post that I wrote about dividing hostas that involved a different method and when I have the time this is the method that I prefer to use. 
Dividing Hostas and Getting More for Your $$$$

Materials needed
Healthy potted hosta plants
Plastic disposable utility knife
Bucket of water

FYI this same method can be used to divide day lilies.

Reuse Repurpose Recycle

Saturday, October 14, 2017

Curbside Treasures

R hit it big in the 'Curbside Treasure' department this week.

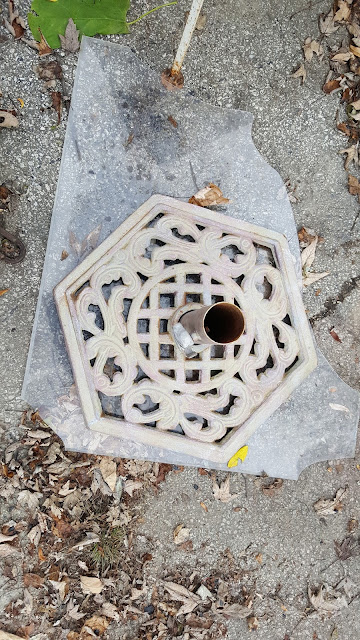
He found yet another cast iron umbrella stand.  This is the 4th cast iron base that he has found.  They all just need a fresh coat of satin black paint.  Less than 5 bucks will make this look like new.
He also found a large piece of Plexiglas.  We seem to use a lot of Plexiglas around The Gear.  The last time we needed Plexiglas was this summer when we made the shelves for the plant stand.  We have also used Plexiglas as shims when we raised up the floor in the corner of the dining room using a bottle jack.  So far all is well and the floor is still right where we raised it.  

I don't care for snow but he found a K2 snowboard, Vans boots size 13, and bindings.  We will sell those.
And finally the best find so far this summer.....a popcorn cart.  It appears that it was only used once or twice and rather than clean it, they put it out to the street.  R said he drove by it 3 times and finally thought what the heck.  It was covered in a black plastic trash bag and was laying on it's side so he only saw the red metal legs and could not see what it was but he knew it was metal.
Perfect for movie night and parties.  We will keep this. It is about 4 feet tall and will look great in the game room. It needs a good cleaning because it is covered in popcorn oil.  R put it in the barn until we have a sunny day to take it apart and scrub it clean. 
I've been craving popcorn all evening.

Have you scored anything good this summer?

Reuse Repurpose Recycle

Wednesday, October 11, 2017

Horseradish...Why you should grow it in your landscape

Horseradish is a perennial plant whose root is tuberous and is considered a vegetable. Sometimes it is also referred to as a spice.

  If horseradish is unfamiliar to you, you may have inadvertently tasted it.  The horsey part of Arby's Horsey Sauce is horseradish.  I liken it to a milder form of wasabi which is in the same family as horseradish and is sometimes referred to as Japanese horseradish.  

You will find horseradish root in the fresh produce section at your grocery store.  Horseradish sauce can be found in the condiment section and is very tasty on sandwiches.
 http://tcpermaculture.blogspot.ca/2012/10/permaculture-plants-horseradish.html
 http://www.countrysidenetwork.com/daily/gardening/herb-garden/growing-horseradish-tips-recipe/
http://www.topiarygarden.co.uk/Diary/image-of-the-day-2013-wk21-24.html

The flowers last roughly 2 weeks and bloom in late spring/early summer.  The leaves are 24-30 inches tall and remind me of ferns. Horseradish can easily be planted in the back of a sunny flower bed where it would make a nice green back drop for colorful flowers. 
The above photo is of my horseradish patch just two days ago.  It started with 5 plants that I purchased at the garden center for $1.99 each.  They were small plants in 3x3 inch containers.  
I could leave the clean up until spring but I have found that the more I clean up in the fall, the less stressful the clean up is in the spring when I am busy trying to pick up all the branches that have fallen from winter storm damage.  
I just cut the leaves back to about 1 inch above the tuber (root).  Fall is also the correct time to harvest the root but I really don't need any right now.
 
Another reason for cutting the leaves back in the fall is that I can see and pull out any weeds that were growing under the leaf canopy of the plant.
My horseradish plants grow under my Asian pear trees and I also like to rake out any rotting fruit that may have fallen from the trees.

I do not fertilize my horseradish plants.  The only water they receive is rain, unless we are experiencing a drought.  

The area where I planted the horseradish and Asian pear trees was amended with peat moss and composted manure before planting.  You can see in some of the photos how dark the soil is from those initial additions to the soil.  I chose this method because all the vegetation in this plot is edible.  Not only do I have pears and horseradish growing here but there is also onion chives and thyme.  Sometimes I will add a few annual lemon grass plants.  Lemon grass is great in chicken noodle soup or added to fish when we cook it on the grill in a foil packet with green onion and a small amount of Italian or herb dressing.

We love freshly grated horseradish mixed with mayonnaise on roast beef, prime rib, and steaks.  You will need to grate the horseradish tuber outside, never inside your house.  Also, always wear eye protection.  Think of this as dicing onions times 10. 

The rule of thumb with horseradish is a little goes a long way.  Horseradish can clear a stuffy sinus in seconds.  My nose runs and my eyes water when I use horseradish as a condiment.  But I don't mind because it tastes sooooo good.

Horseradish is a perfect addition to any edible landscape.  You have lovely tall green foliage all summer and tall, white, spikey  flowers in late May/early June, and you have a delicious condiment for meats.  Also, don't forget that horseradish is an ingredient in shrimp cocktail sauce. 

This winter I am going to search for a few wasabi plants to add to my  edible landscape in the spring.  

Do you like horseradish and what is your favorite way of using it?

Reuse Repurpose Recycle


Sunday, October 8, 2017

Why You should plant Milkweed in your Yard

What is milkweed?  Monarch butterflies need the perennial milkweed plant to lays their eggs on, then feed the larva (caterpillar) by eating the leaves,  then to attach the chrysalis, and finally they need the milkweed flower for it's nectar to feed the monarch butterfly.
Monarch butterflies are on the decline.  Last year was a disastrous year for Monarch butterflies.  During their migration northward they encountered a storm that killed millions of butterflies.  I know that last year I did not see even one Monarch.  This year we saw at least one Monarch every day during the latter part of the summer.


Monarch Chrysalis 

A list of Monarch butterfly and Milkweed sites for more in depth information.

Fantastic video showing how to remove the seeds.  Thanks YouTuber Mona Miller . Check out her YouTube channel.  Lots of important and interesting facts.  

Free milkweed seeds

Here at Gear Acres we try to maintain a large plot of native milkweed (Asclepias amplexicaulis).

I think that the 'weed' part of the name throws off people.  This is  not a weed.  It is a tall perennial plant with a large beautiful light pink flower that has a wonderful scent and as an added bonus, the bees love it .  Milkweed plants are not sold in plant form at nurseries because it doesn't transplant very well.  You will need to buy milkweed seeds and sow those seeds in the fall.  Seeds need the cold temps to germinate in the spring.  We were lucky and had volunteer plants near our fruit trees.  Volunteer plants are plants that you didn't plant but who's seeds were dropped by a bird or a seed that was blown into your garden by the wind.  The latter is probably how the original seeds came to be planted in my yard.

What is this line and where did it come from????

Milkweed is not to be confused with Butterfly weed.  You can buy butterfly weed at any nursery that sells perennials unlike the milkweed which needs to be grown from seed.  
My local Home Depot sold butterfly weed this summer.  It is actually a species of our native milkweed and it's botanical name is Asclepias tuberosa.  Butterfly weed attracts butterflies, bees, and hummingbirds.  So plant this in your garden, too.

We planted 5 butterfly weed plants this summer.  The flowers are orange but I understand that you can also get yellow if orange doesn't fit into your color scheme.  It worked out perfect for us because we planted the butterfly weed plants along the fence row by the street and we used a brighter, warmer color scheme of orange, yellow, and red.  We figured that unless we planted bright colors no one would see them as they drive by at 55 mph.  Also, butterfly weed is hardy and likes the sun which is perfect for this area that receives intense sun from early afternoon to evening. 

Today we harvested the milkweed pods so that we can plant the seeds elsewhere and have a second plot of common milkweed.
Have you ever wondered why they call it milkweed?  The plant has a milky white sap that contains latex and alkaloids.  Take care not to get the sap in your eyes.  If you get sap on your hands, wash them immediately so that you don't inadvertently get it in your eyes. 
 As the pod dries, it splits open......
 ...and exposes the seeds that are attached to silky threads.....
.....these act as little parachutes that carry the seed in the wind to it's new location.  I am going to harvest my seeds before they fly away, using the method in the video link located earlier in the post or right here
Morrie was today's supervisor.  He thinks that we made a big mess and that we should pet him instead.

Do you have milkweed in your garden?

Go  to MonarchWatch.org to see how your yard can become a Monarch Waystation.

Reuse Repurpose Recycle

Monday, October 2, 2017

Stump Grinding and Rainbows

This time of year is both sad and exciting.  Sad that my flowers are quickly dying back on one hand but on the other hand I'm excited just thinking about next year's planting choices.

Gear Acres Landscape 2017 was a year of finally checking off several items that have been on my 'to do' list for a long long time.  Sometimes I put a 'to do' chore on my list even if I know that the time isn't right.  An example is.....rent a stump grinder.  We finally cut down the last dead tree in 2016, so this was the year to rent the stump grinder.  

The most economical method is to rent by the day and not rent by the hour. So it only made sense to grind all the stumps on the same day.  OR in our case to rent on Friday evening and have it back by 9am on Monday.  But since we rented on Labor Day weekend we got an extra day and had to have it back by 9am on Tuesday for a one day charge.

The stump grinder has an hour meter on it and if we had exceeded the 24 hours we would need to pay the extra time at the hour rental fee.  But we didn't exceed it and in the end it was just the $400 charge for 1 day but we had 3 days to do it.

Now I know you are thinking 400 bucks is CHEAP?????  In this area the going rate is 75 bucks per average size stump.  We had two stumps that were huge and at least 3 times the average tree stump so let's say those would run $150 each which comes to $300.00.  There were an additional 11 stumps, plus one in my son's yard......12 X $75= $900 + $300 (2 lg stumps) =$1200 - $400 (rental cost) = $800 savings.  FYI We did not exceed 24hrs on the meter.  We were close but did not exceed.
You will end up with a piles of wood chips and dirt after you grind.  We worked on raking the chips out of the dirt and leveling the dirt over the next week.  It went slow because we had an extreme heat wave and the temps were in the high 90's which is very strange for September.
 We finished leveling and raking the loose dirt smooth and then threw down some grass seed.  It has not rained more than a few drops since then so we are spritzing the grass seed several times a day and it has started to grow.

Last Thursday we thought we would get the much needed rain that we have been missing for the last month.  The sky got real dark and it started to sprinkle hard and then the sun came out and we were rewarded with the most glorious double rainbow I have ever seen.
When I first noticed the rainbow, I thought it was just a regular rainbow until I walked behind the barn and saw this..... 
....but it gets better.  It was a double rainbow.  The top rainbow didn't photograph well but it was there.  Two complete full rainbows.
 The color was so intense and very vivid.  Normally you just see the red to orange to yellow to green bands of color but this rainbow also had a bottom band of blue to violet to pink.
 It was spectacular and then it was gone and I went back to watering my grass seed.

Reuse Repurpose Recycle