Monday, October 31, 2016

Paw Paws in the house!

The fresh paw paws that I ordered online arrived a couple of weeks ago.  I ordered the paw paws from Integration Acres.  I was somewhat concerned how they could send fresh paw paws without them arriving in a pile of mush.  My worries were for naught because they arrived fresh and without damage.

The fruit was sent loosely wrapped in newspaper and placed in a box filled with packing peanuts.  Since paw paws have a short shelf life Integration Acres send paw paws of various stages of ripeness.  That gave me a week or more of fresh paw paws instead of having 2 pounds of fruit that needed to be eaten right away.

When the box arrived, I of course opened it right away and grabbed the first paw paw that my hand landed on.  I cut it in half lengthwise and cut out a section and ate it.  What I noticed first was the texture.  The flesh of the fruit is very custard like.  I think it feels a lot like mango but different.  The texture is smooth like a mango but soft like a ripe banana.

The next thing I noticed were the seeds.  Oh my goodness they are huge and I saved every one of them.  More on the seeds later.

The taste is smooth and you hardly have to chew it but I was underwhelmed by the taste.  In my haste to try a paw paw, I had grabbed one that wasn't completely ripe.  

So fast  forward to later in the evening.  After the unripe paw paw incident, I unwrapped all the paw paws and placed them in the fridge to get cold.  I waited until the fruit was cold and then picked the most ripe paw paw of the bunch and tried again.  So much better. 

How did I know which one was the ripest?  When they are ripe the fruit is softer and the skin gets darker.  Actually the skin gets ugly like an over ripe banana skin.  By the way, you only eat the flesh of the fruit, not the skin or the seeds.

I really can't described the taste.  It's different but good.  My sister thought it tasted like a mango.  I thought it tasted more like a banana.  

Confession...I forgot to take photos of the fruit.  Bad blogger.  Number 1 rule in blogging....take photos. I dropped the ball or in this case, I dropped the paw paw.

I love that paw paws have no known pests so they are not sprayed with chemicals.   They are also filled with wonderful nutrients.  Paw paws are high in vitamin C, magnesium, iron, copper, manganese.  There is also potassium, zinc, riboflavin, niacin, and calcium.  3.5 ounces of paw paw has 80 calories.

Get this!!!! Scientists believe there is something in paw paws that either cure cancer or prevent cancer.  There is ongoing research so lets keep our fingers crossed.

We saved all the seeds.  Integration Acres sent a flyer with instructions on how to save the seeds. First you rinse off the slime that surrounds the seed.  I used my fingernail and once you get down to the outside of the seed, the slime can then be rubbed off.  Don't worry about damaging the seed because these seeds are large and have a hard outer skin.  

Dry them off and then place in a plastic baggie filled with moist sand and place in the refrigerator (NOT THE FREEZER) for 90 days. I think this is to mimic winter conditions.  After 90 days you can pant your seeds in a container and they will germinate in 50 days.  The soil needs to be between 65 and 70 degrees.  Keep the soil moist and don't let it dry out.  I read another article that said not to leave the seeds drying for more than 3 days as it affect the germination probability.  
The trees are sold online and at some nurseries.  I bought two bare root paw paw trees a few years back and they did not survive.   They have a long tap root so I am going to make sure I plant the seeds in a deep pot.  I have a few 4 inch pots that are 8 inches deep which should work great.

We purchased two paw paw trees at a local nursery and I hope they do well.  The first winter is the most vulnerable here in Michigan.  Our winters can be warm (in the 20's and 30's) with a lot of freezing rain (not good), or very cold (-20's), or with lots and lots of snow (not good and lots of limb breakage), or very cold with lots of wind (not good either because it dries out the plant and wind breaks limbs).  So fingers crossed that these trees make it through their first winter here at Gear Acres.
 The trees have a tropical look with the droopy large leaves.  Different than all the other trees in my yard.
I plan on ordering some seeds off the Internet because I have read in several articles, that it is best to have several strains for cross pollination.  The fruit I purchased online came from Ohio so I will look for seeds from another state, preferably from a northern state so  I can be sure it is cold hardy.

I also read that the paw paw tree is the sole host for the zebra swallowtail butterfly.  My home is at the most northern part of their range and I cannot recalled ever seeing a zebra swallowtail. We have the eastern tiger swallowtail butterfly in my area. 
Eastern Tiger swallowtail butterfly

Long term storage of paw paw fruit is to freeze the fruit after it has been pureed or you can dry it.  I have a dehydrator so next year I am going to order more fruit and try to dry paw paw chips like dried banana chips.

I also ordered a jar of spiceberry and paw paw jam from Integration Acres.  Deeeelish.  It's not sweet but not sour.  I spread it on toast in the morning.  It is the perfect jam for those who like a little something on their toast but don't want to start their morning with something sweet.

If you are looking for something different to plant in your yard, think about trying a couple of paw paw trees.  No known pests, free healthy fruit, and distinctive leaves.  The trees can be planted in semi shade or full sun.

Let me know if you plant any and how they grew in your yard.
I will update in the spring on whether the paw paw trees made it through the winter.

For now I'll leave you with this little song called the Paw Paw Patch.


Reuse Repurpose Recycle


Removing a window....

.....and installing a window.
The new window unit is under the blue tarp and the wall it is leaning against is where the window unit will be installed.  It's identical to the window units on the other side of the patio door and in the kitchen.
This is what the wall looks like on the inside.  When we purchased this house there were funky cabinets built here.  We removed the cabinets and found a small window.  This window will eventually find it's way to the basement where it will give us more light and fresh air.  
You can see in the photo above that the window took quite the beating.  Someone hacked off the sill and shingle nails came through the sheathing and broke half the panes.  The window weights are still in place and the ropes are not broke.  Yea!!!  But there are several muntin bars that need gluing because they are broke.  But for now we are happy to have an original window to use elsewhere.
This wall was plaster over wire mesh.  Not all the walls in this room are plaster, so all the walls will be stripped to the stud and drywalled.  This will allow us to add additional outlets, insulate, and inspect for active knob and tube.  It will also expose the back side of one of the kitchen walls so we can also look for knob and tube in the kitchen.
This wall did have some old blown in insulation but of course that all fell out when we removed the wire mesh.  That's OK because we prefer foam insulation.
We first measured the placement of the other window so that this window will be the same height and distance from the patio door.  We then hauled out the long level and the laser level and marked the studs for the correct height so they match the other window.  We couldn't measure up from the floor because the floor is very very unlevel.
 This is where we left off.  We saved all the studs that we cut off so we can use them elsewhere.  They are fir and true 2X4's.  You can see that the sheathing has a lot of cracks and splits. We will need to fix that after the opening is framed in but before the window is installed. 
I found this sycamore leaf in the yard.  It is a full 12 inches across.  Some day when I have time I would love to press and frame a leaf from each type of tree that I have in my yard.  Maybe frame them in simple frames and hang them in my mudroom.
 Update on the fungus in the yard.  The cap now has a more cap like appearance instead of a ball shape.  It almost looks cartoonish.  

Reuse Repurpose Recycle


Wednesday, October 26, 2016

How we move heavy objects.....

......without doing further damage to our backs.

R fractured several vertebrae sometime in the past.  By the time that it was discovered they had healed back together but not perfectly.  We think that it happened during his motorcycle racing days or maybe later during his car racing days.  My money is on motorcycle racing.

Myself?  I was waiting to make a left hand turn into my driveway when an elderly lady ran into the back of my SUV doing about 55mph.   Witnesses said she never touched her brakes.  She told the policeman that it was my fault because I stopped.  She totaled her car and the officer told me that just one week prior she hit a van parked near the road and totaled out that vehicle, too.  I now have two bulging discs as souvenirs of that hot July day. 

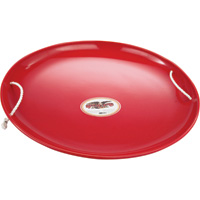
That is why we try and use furniture dollies, come alongs, chain falls, and snow saucers to move heavy items.  Our favorite choice for sliding heavy objects across the lawn is to use an old metal snow saucer.  We attach one end of the chain or strap to the handle hole and the other end of the chain or strap to the trailer hitch. The trick is to start moving slowly so that the saucer will start sliding on the grass.
We have also used this saucer method to move boulders in our landscaping.  But today we used it to move the large piece of concrete that was the old footing for one of the original posts under the bump out on the back of the house.
I am still spray painting our patio furniture and all that is left is the rectangular table, one dining chair, and a tall plant stand.  The table and chair have peeling paint and rust so those require some prep with a wire brush and then priming before the top coat of satin black.  
You can also  you a wire wheel on a drill motor but you need to be careful that you not over spin the wire wheel, or use too much pressure, or use a wire wheel that has damaged wires.  I know plenty of people who have had pieces of wire get lodged in their eyeball after it broke free of the wheel. Safety glasses are a must but actually googles are better.

Sand paper torn into strips can also be used to remove rust and paint chips on round stock areas like the legs.  If the rust is extensive, another choice is sand blasting.  I felt that the rust was limited on these pieces but the next time I paint these pieces I will first sand blast.  It looks like they have been painted three different times (pink, white, and cream) already.  If I continue to repaint and repaint I will start to lose the fine detail in wrought iron design.
And finally....I was walking back to the house after getting the mail when I noticed two round things in the lawn.
 When I got closer I could see that they were some sort of fungi.  Probably not a mushroom but very interesting color and HUGE.  I would guess about 6 inches across and 6 inches high.

 Reuse Repurpose Recycle


Saturday, October 22, 2016

Starting the fall cleanup

Summer was officially over for me when I tossed my cheap flip flops in the trash.  Every year I buy a pair of inexpensive flip flops to wear in the yard and when the summer is over I just toss them.  Sometimes I need to buy a second pair to get me through the summer if I am doing a lot of ladder work.  But this was a one flip flop summer.

These last two weeks have been busy with small jobs in preparation for the winter.  I have been busy spray painting our vintage wrought iron outdoor furniture.  It's amazing the transformation that only paint can achieve.

I use spray paint in black with a satin finish.  Matte finish just doesn't do it justice and semi or hi gloss is just too much shine.  I made the mistake years ago when I repainted my first wrought iron furniture.  The furniture was already black so I purchased hi gloss black in a spray can.  I was disappointed after it dried that it didn't look like the original finish.  The next piece I tried semi gloss and didn't see much of an improvement.  That led me to the satin sheen, which I was certain was going to be too DULL.
NOPE.  Satin was the correct sheen which meant I had to go back and repaint the previous two pieces. 

I always start with the piece upside down and when it is dry I flip it over and do the top.  This eliminates scuffing the newly painted topside if you had painted the top first. 
All of this furniture is from Woodard but from different lines of Woodard.  They all work together because they have common features like the mesh, lattice detail, or the oak leaves plus now they all have a common color and sheen.

The pieces that I have left to paint have rust or peeling paint to tend to first before I paint.  My daughter in law has vintage wrought iron furniture and every spring she gives the pieces a once over and spray paints any area that shows rust or peeling.  We both leave our furniture out all winter.  For a brief moment I  thought about painting my furniture white. But I leave the furniture out all winter so even a little discoloration from rust would easily show if painted white.  Rust tends to show up around the weld spots first so when I paint I always pay special attention to those areas.  I had thought about buying patio furniture covers to protect the furniture during the winter and during the summer they would keep the cushions dry.

While the paint was drying I would help R with some tree trimming out by the driveway gates.  We had several problems going on out there.  

1. The limbs were too low and obscuring the pillar lights and scraping delivery trucks. We were also worried that during windy weather that the branches could cause damage to the lights. The left side pillar area was finished in the photo below and we were working on the right side.
2. The abundance of low hanging limbs were creating too much shade and my Nearly Wild roses were nearly dead.  
3. We had black walnut limbs growing into the lilacs and a clump of choke cherry. The black walnut limbs were causing deformity of the leaves on the lilac bush and dead leaves on the choke cherry bush..  
Choke cherry have thorns and someone always ends up bleeding and swearing when we trim the choke cherry bushes.  The birds love them and the berries bring in the cedar wax wing birds.
Where ever the black walnut touched the lilac bush the leaves were smaller and curled.  The photo below shows the smaller leaves on the left side of the bush. 
 And finally.....a photo of two wild turkeys that strolled through the yard. 

Reuse Repurpose Recycle

Thursday, October 13, 2016

Hidden Window

We finished moving the upright video games so we could get to the wall where we will install the new windows.  I knew that there was a small window concealed in the wall but I couldn't see all of the window until now.
The ropes are still intact but the glass panes in the upper sash are broke. The shingle nails came through the sheathing and hit the glass.  That's an easy fix.

This window will eventually find a home in the walkout area of the basement where the current entry door is located.  That door will move to another more accessible location.

The photo doesn't show the original wall color very well but it's a great color of green, like a pale version of apple green.  This might have just solved my dilemma with picking a green color for the house.  

It looks like the room was originally the green color, then Mamie Eisenhower pink, and finally white. We also uncovered  some original base board.  That will come in handy when we do repairs in the living room.

This wall is the original plaster and has a lot of damage.  The rest of the room is drywall.  We plan to gut the room so that we can insulate and run new electrical.  But for the time being we will only remove this section of plaster and the drywall around the current sliding door so that we can add our two exterior lights.

We are all caught up on our mowing and we have 2 or 3 days of cool dry weather to get things done before we get 5 days of rain.  Let's hope the forecast is wrong because it's cooling off fast.

#wheredidsummergo

Reuse Repurpose Recycle

Wednesday, October 5, 2016

Paw Paw and Sugar Maple Trees for Gear Acres

We have a million things on our 'to do' list that must be done before it's snows so taking out time to plant trees might seem like something we could have done in the summer or next spring.  But opportunity and need came together this week, so trees were bought and now we're planting.
The big nursery where I buy a lot of my trees will close on Sunday for the winter.  I also had $4.75 of rewards money that needed to be used this month or lose it. 

 Last weekend I did a quick run through the trees looking for sugar maples and found that they only had three left.  The three all had a nice shape and were very straight.  Unfortunately I wasn't driving the truck and these were 10 foot tall trees.  So I decided to come back the next day with R and the truck.  

I wasn't in the market for fruit trees, because of our black walnut situation, but I couldn't resist looking.  At the end of the row were three Paw Paw trees that were about 6 feet tall.  I've always wanted to plant some Paw Paw trees but I thought I would have to drive to Indiana to get them.  I could get them by mail order but they are usually bare root and maybe 24 to 36 inches in height.  They are not cheap either.  By mail order they are usually $24.99 for a 3 foot tall bare root.  I've never had good luck with bare root trees plus we have that black walnut problem.
 I wanted those trees BAD.  But at $59.99 each I needed to find out if they tolerate being planted near or under black walnut (Juglans nigra) trees. So I searched 'can you grow paw paw close to black walnut trees' and the first thing that I see is 'it's both shade tolerant and julgalone tolerant (can grow with/under black walnut trees').    Yippee!!
Paw Paw Fun Facts

You can spell Paw Paw two ways....PawPaw or Paw Paw.

George Washington loved Paw Paw fruit and Thomas Jefferson cultivated it at Monticello.

Lewis and Clark depended on Paw Paw and nuts when their rations were low.  

Paw Paw fruit is eaten fully ripe and has a tropical taste that most describe as a combination of mango, pineapple, and banana.  

Shelf life of a fully ripened Paw Paw is just several days at room temperature but refrigerated fruit can last a week.  The fact that shelf life is short is probably why today we do not see Paw Paw fruit in the grocery store.  

According to Wikipedia the Paw Paw fruit was commonly referred to as wild banana, prairie banana, Indiana banana, Hoosier banana, the poor man's banana, and banango.  I have heard it referred to as the Indiana banana before but those other names are new to me.


I have always read that Paw Paw are under story trees but the tag that came on the tree indicated full sun.  I looked around my yard and found two spots.  One was a definite under story location with sun in the morning.  The other spot was more open but shaded on and off throughout the day as the sun moves across the sky.

Paw Paw fruit has also been found to have cancer curing or cancer prevention properties.  Normally I might side eye that but the Memorial Sloan Kettering Cancer Center has info on Paw Paw fruit on their website.  Check out the two links below for cancer and Paw Paw info.


I really wanted to taste Paw Paw fruit, so I searched and searched and finally found a website that sells Paw Paw Spiceberry Jam.  They also sell cool t shirts for the Ohio Paw Paw Festival AND fresh Paw Paw fruit.  So in the next week I should have my hands on some fresh Paw Paw.....I hope.  I just went to their site and they are now out of fresh produce.  Fingers crossed that I get lucky and they send me some.


Here is their website if you are interested in some jam or other tasty items.


We were able to plant 1 of the 3 sugar maples (Acer saccherumtoday.  The addition of these three trees will give us a total of 5 sugar maples.   
 The sugar maple trees will be planted along the curve of the driveway.  Currently we have two semi dead box elder trees (Acer negundo) in this location but they will be removed as soon as R gets his chain saw back from the shop.  I have a large box elder out by the road that is in better condition than these two trees.  I know a lot of people do not like box elders.  They tend to grow in a leaning manner and have a lot of small dead branches in the canopy.  It's just not a pretty maple tree.  My favorite maple tree is the black maple.  It's considered a subspecies of Acer saccharum but the bark is darker and the black maples in my yard have the perfect shaped canopy, almost round. 
 The two leaning trees in the middle and left side of the photo are the box elder trees.  The one on the far left has rot between the two main trunks and the tree in the center has a half dead canopy.  We try very hard not to cut down trees in our yard but these two will not improve.  Many of our small trees are volunteers that we transplanted from our flower beds out into the lawn.

Currently at Gear Acres we have the following trees

Sugar maple
black maple
silver maple
red maple 
box elder
 sycamore 
pin oak
white oak
bur oak
black walnut
tulip poplar or Liriodendron tulipifere
ash
hickory
catalpa
locust
dogwood
comice pear
bartlett pear
asian pear
japanese plum
european plum
4 varieties of apples
paw paw
quince
blue spruce
norway pine
yew
cedar
juniper


“A nation that destroys its soils destroys itself. Forests are the lungs of our land, purifying the air and giving fresh strength to our people. ” 


Reuse Repurpose Recycle