Here we are just one week into the official winter season and it was 50 degrees at 5:35 in the evening. We decided to use this unseasonably warm weather to get an early start on raking out the flower beds.
Today was a rather odd day. Although it was warm by winter standards it was still a little crisp. Had the sun been able to peek through the thick clouds we might have had a stellar day. The clouds were so thick that it appeared to be twilight all afternoon.
We were able to get the flower bed in front of the living room raked out and all the perennials cut back. If the weather is rake worthy on Sunday we will continue around the north side and clear out the hosta beds around the sun room.
Early Saturday before we raked we changed out the magnetic weatherstripping on two doors at the Torrey Rd house. Each door cost $17.95 to R&R (remove and replace) the weather stripping. The magnetic weatherstripping was ineffective because of age. The old pieces were compressed and no longer blocked the cold air from coming into the house.
R also R&R the dryer vent. I purchased a unique dryer vent that is suppose to block the cold air from coming into your dryer and extending drying time and cooling off the laundry room. I'll do a blog post once I have had a chance to check out it's performance. In theory it should work great but I want to see for myself before I say anything.
I hope everyone had a great Christmas. I know, I did. Lots and lots of good food. Seriously, I can hardly move. Too many goodies. My sister out did herself in the cooking/baking category this year.
Sunday, December 28, 2014
Sunday, December 21, 2014
Monogrammed Snowflake Wreath
There were two things that I wanted to accomplish with my large wreath. #1 was that any embellishment on the wreath must be able to be seen from the road. Our house sits back from the road and any small doo dads like pine cones and bows cannot be seen. #2 it couldn't be just a Christmas or holiday wreath. The wreath had to work until the weather changed. So it had to be a winter wreath.
So in a nut shell....I needed something big and wintery like a big snowflake. But I didn't know I wanted a snowflake until I saw this one.
 What I knew I wanted was a monogram. A big old "H". So I went surfing the web for a large wood cut out of an H and landed at Unfinished Wood Co. I found this snowflake H when I searched their selection of seasonal monograms. I knew the moment I saw it that it would be perfect. For directions to making the evergreen wreath, go here.
 The snowflake arrived within 3 weeks unpainted but ready to paint. I used a emery board for acrylic nails to soften the sharp edges but that step is not needed. I then drilled a small hole at the top so I could thread a length of wire through it to attach the snowflake to the wreath.
 I brushed on three coats of white craft paint using a flat artist brush. If I was to do this again I would spray paint this snowflake because of all the little tight spots and inside corners that were really difficult to paint. I also painted both the front and back because this was hanging on the outside of my living room window and would be seen from inside of the house.
 The snowflake is large enough to be seen from the road and then there is the added surprise of when you get close enough you can see the monogram.
 I love this wreath because it will work well throughout the winter. So often by the time Christmas arrives we are already burned out on the decorations. So many stores and businesses decorate for the holidays sooooooo early that we are really ready for a decoration break by January. This snowflake and wreath are simple yet bold without a lot of busy sparkly design that scream DECEMBER. Another plus is that it is reusable not only in this application but can be used alone on the front door or even indoors. Maybe next year I will add a little glass glitter to make it sparkle like snow.
So in a nut shell....I needed something big and wintery like a big snowflake. But I didn't know I wanted a snowflake until I saw this one.
Sunday, December 7, 2014
Making Wreaths and Adding Greens to the Window Boxes
This last week I assembled a large wreath with pine boughs which I will use in the living room window and a small diamond shape wreath that I made for the small window in the front door.
Both wreaths were basically assembled in the same manner but because I used different types of greens the end result looks very different. For the large wreath, I used very floppy long needle pine with the still attached small pine cones. Using this type of pine will give you a more relaxed casual wreath.
The small diamond shape wreath was made with spruce cuttings and this gives a denser thicker more traditional wreath. I had limited available space around the window on the door so this worked perfect.
Once you buy your wreath frames, the yearly cost for making wreaths will be zero as long as you do not need to buy cuttings. In addition to the frame, you will need a paddle of floral wire. I buy green but it also comes in silver.

I cut all my greens to around 8-10 inches before I even start. This will make your wreath making go faster. If you cut your clippings to size one day and assemble the next day, make sure you store your clippings in a closed plastic bag stored outside. Warm, dry air is a no no for wreaths....ask my sister. Our first year of wreath making we made A LOT of wreaths. She made some beautiful blue spruce wreaths that she hung inside her house. Within days it was raining needles every where. So even though they look fabulous inside they are really best to use outside.
You'll need a flat surface at least a little bigger than your frame. Attach your wire to your frame....anywhere.

In your hand assemble 2 or three cuttings and place it either to the outside edge or the inside edge and wrap the wire around the greens and the frame. Now repeat the process on the remaining side. Now place your next greens over the bottoms of the previous cuttings to cover the cut ends. Repeat this process around the entire frame.


You can work in a clockwise or counterclockwise manner. Whichever works best for you. The first couple of rows will be the most difficult and slowest. Once you get your rhythm it will go faster. Do not try and be perfect. If after you are done and you find you have a few 'wild hairs' just clip them.


To hang your wreath I use a large heavy duty plastic suction cup on my windows and a little brass nail for the wreath on the door. It's also easier to add your bow and decorations before you hang your wreath. In the past I have added pine cones, bows, and small feathered birds (Michaels). White bows and white doves or red bows and red cardinals are some of my favs. There also peacocks which would look great with ribbon that looks like peacock feathers.

I've already hung my big wreath before I finished decorating it because I wasn't done painting the decoration that I am adding. My leftover greens were added to the window box. Remember to save your ribbon spools so that you can store your ribbon after you take down your wreaths. I just unwire the ribbon and roll it back on to the spool. This saves space and keeps the ribbon from getting crinkled. I need to reposition the bow on the front door wreath. The wind was blowing quite briskly and now my bow looks like a wreath hat.

Both wreaths were basically assembled in the same manner but because I used different types of greens the end result looks very different. For the large wreath, I used very floppy long needle pine with the still attached small pine cones. Using this type of pine will give you a more relaxed casual wreath.
The small diamond shape wreath was made with spruce cuttings and this gives a denser thicker more traditional wreath. I had limited available space around the window on the door so this worked perfect.
Once you buy your wreath frames, the yearly cost for making wreaths will be zero as long as you do not need to buy cuttings. In addition to the frame, you will need a paddle of floral wire. I buy green but it also comes in silver.
I cut all my greens to around 8-10 inches before I even start. This will make your wreath making go faster. If you cut your clippings to size one day and assemble the next day, make sure you store your clippings in a closed plastic bag stored outside. Warm, dry air is a no no for wreaths....ask my sister. Our first year of wreath making we made A LOT of wreaths. She made some beautiful blue spruce wreaths that she hung inside her house. Within days it was raining needles every where. So even though they look fabulous inside they are really best to use outside.
You'll need a flat surface at least a little bigger than your frame. Attach your wire to your frame....anywhere.
In your hand assemble 2 or three cuttings and place it either to the outside edge or the inside edge and wrap the wire around the greens and the frame. Now repeat the process on the remaining side. Now place your next greens over the bottoms of the previous cuttings to cover the cut ends. Repeat this process around the entire frame.
You can work in a clockwise or counterclockwise manner. Whichever works best for you. The first couple of rows will be the most difficult and slowest. Once you get your rhythm it will go faster. Do not try and be perfect. If after you are done and you find you have a few 'wild hairs' just clip them.
To hang your wreath I use a large heavy duty plastic suction cup on my windows and a little brass nail for the wreath on the door. It's also easier to add your bow and decorations before you hang your wreath. In the past I have added pine cones, bows, and small feathered birds (Michaels). White bows and white doves or red bows and red cardinals are some of my favs. There also peacocks which would look great with ribbon that looks like peacock feathers.
I've already hung my big wreath before I finished decorating it because I wasn't done painting the decoration that I am adding. My leftover greens were added to the window box. Remember to save your ribbon spools so that you can store your ribbon after you take down your wreaths. I just unwire the ribbon and roll it back on to the spool. This saves space and keeps the ribbon from getting crinkled. I need to reposition the bow on the front door wreath. The wind was blowing quite briskly and now my bow looks like a wreath hat.
Why are my photos always so crooked? It has to be the camera.
Thursday, December 4, 2014
A New Bee Hive for Gear Acres
Yesterday we received the new bee hive in the mail that I ordered several months ago off of eBay.
This bee hive is slightly different than the one we already have here at The Gear. This one is a narrower hive that has 5 frames in each box rather than 10 frames making the hive perfect for smaller yards or for the person with lifting limitations. Each box when filled with honey, should weigh roughly half of what a regular 10 frame box would weigh.
Our intention is to place this hive in the center of a flower bed on the far north side of the yard. I've seen these hives painted up in fun bright combinations and I want to give that a try. During the winter I will sand and prime the hive. I have contemplated on painting it black and then paint white lattice on it with vines and flowers growing on the lattice. But.....and you know there is always a but....I am just not a very good artist. So I am still in the planning phase.
Here is what the new hive looks like fully assembled. Notice how it is narrower than a tradition 10 frame hive.

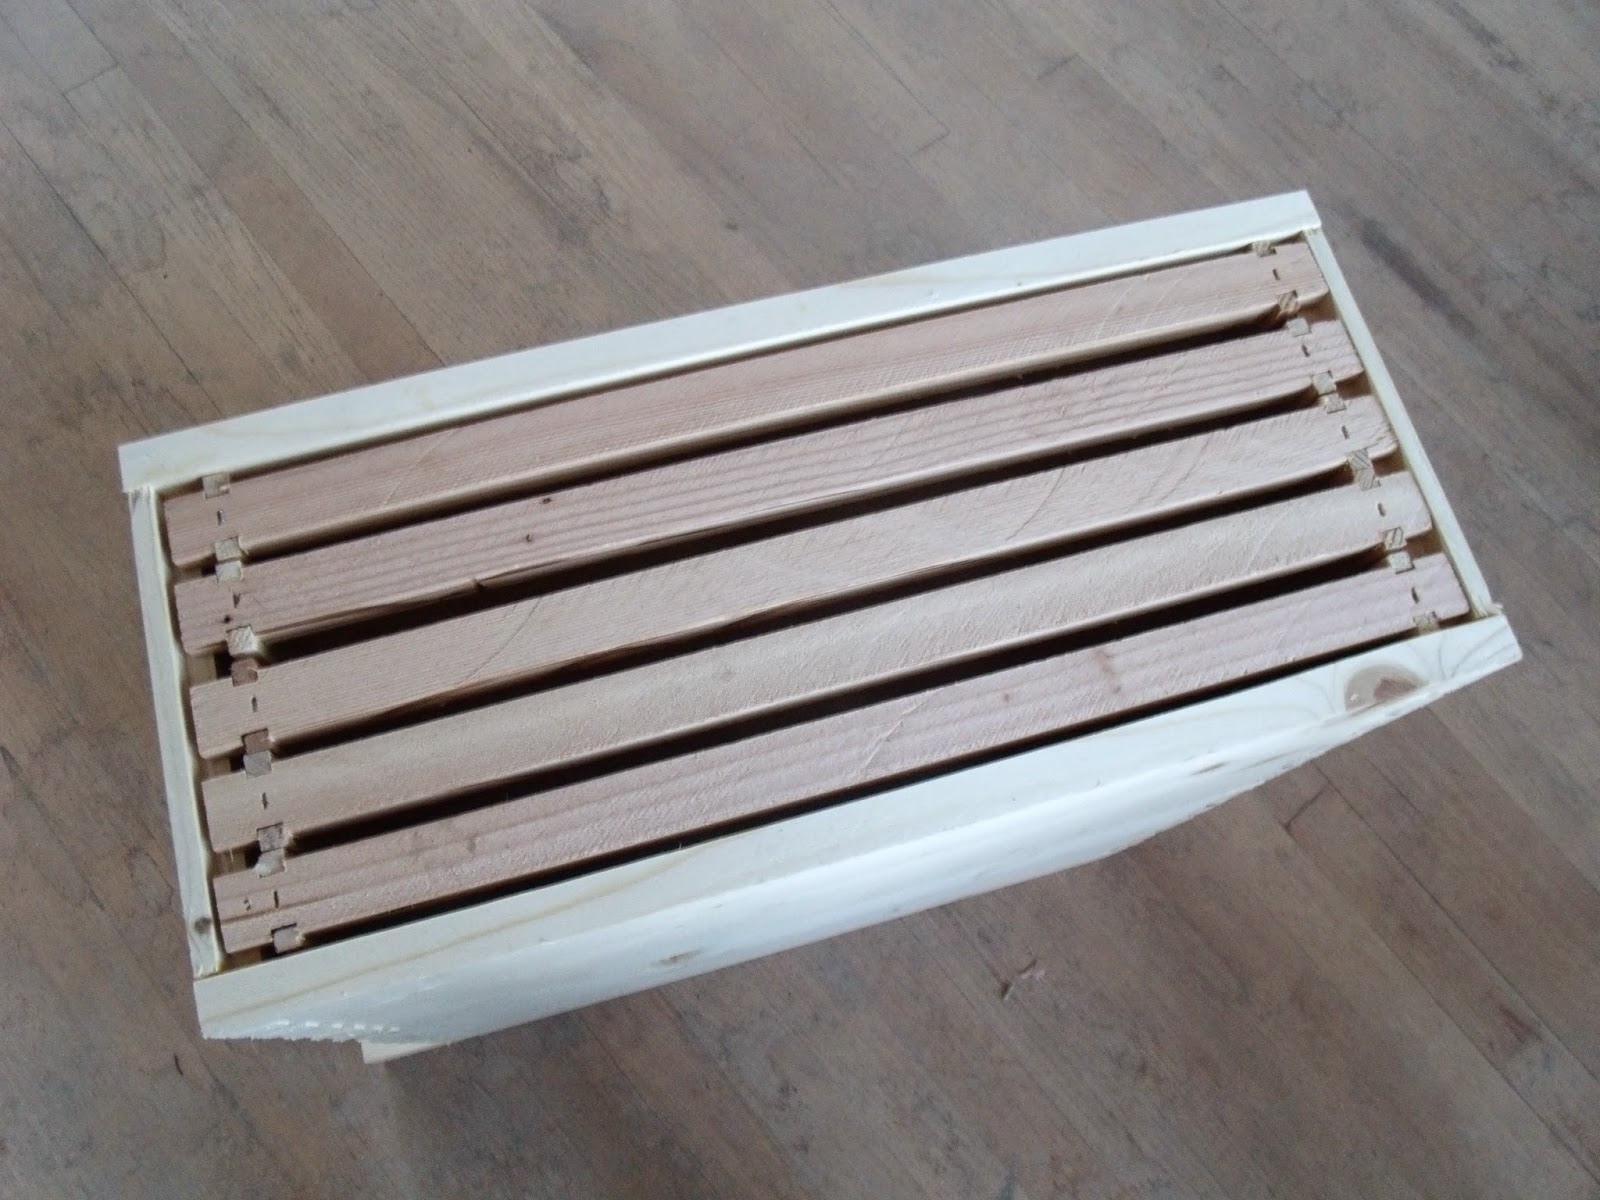

 And this is the spring and fall position or the winter position if the winter climate is milder than in the north.
 This screen piece is called a queen excluder. You place it between the brooder boxes, which are usually your two deep bottom boxes and the upper boxes. This keeps the queen in the bottom two boxes. Why keep the queen in the bottom two boxes? She lays eggs and larva is developing and you do not want that in the boxes where you will be taking the honey. The queen is larger than the rest of the bees and she cannot make it through the screen. The rest of the honey bees come and go through the screen without any problems.
 This is the inside cover and it goes on the hive before the roof.
 If you look at the first photo you can see the queen excluder and the roof.
As soon as the seller starts listing more hives I will let everyone know. The hive was packaged well and the construction of the hive was very nice. Of course we will do a little sanding before we prime it but that is to be expected. If you want to buy a hive for the upcoming summer, make sure you do it early enough so that you can prime and paint it.
Here is an interesting bee fact. Next time you put a teaspoon of honey in your tea or coffee give this fact a little thought.

This bee hive is slightly different than the one we already have here at The Gear. This one is a narrower hive that has 5 frames in each box rather than 10 frames making the hive perfect for smaller yards or for the person with lifting limitations. Each box when filled with honey, should weigh roughly half of what a regular 10 frame box would weigh.
Our intention is to place this hive in the center of a flower bed on the far north side of the yard. I've seen these hives painted up in fun bright combinations and I want to give that a try. During the winter I will sand and prime the hive. I have contemplated on painting it black and then paint white lattice on it with vines and flowers growing on the lattice. But.....and you know there is always a but....I am just not a very good artist. So I am still in the planning phase.
Here is what the new hive looks like fully assembled. Notice how it is narrower than a tradition 10 frame hive.
See the opening or entrance to the hive? This is how it is normally and the bees can come and go across the entire opening.
This is all well and good in areas where the climate is mild but here in the north where we can have brutal temps during the winter, it helps to reduce the area where cold air can enter the hive. This is especially important if your hive is located in a windy area. This hive came with a little gadget that restricts the size of the entrance. You place this piece of wood in the entrance and depending on how you have it oriented, it will vary the amount of air that can enter the hive. See the little square opening on the right? This would be the winter opening.
As soon as the seller starts listing more hives I will let everyone know. The hive was packaged well and the construction of the hive was very nice. Of course we will do a little sanding before we prime it but that is to be expected. If you want to buy a hive for the upcoming summer, make sure you do it early enough so that you can prime and paint it.
Here is an interesting bee fact. Next time you put a teaspoon of honey in your tea or coffee give this fact a little thought.
Wednesday, December 3, 2014
Evergreens for the window box and flower pot
The holidays are right around the corner and I am already behind. I'm not even going to attempt an excuse...LOL
On to what we have accomplished.....even if it was a little late.
My sister always spends most of the month of November in the U.P. (upper peninsula) so when she wasn't cooking she went outside and cut two huge bags of evergreen boughs for me. I need them for my window box, large flower pot, and to make wreaths.

I first cut the boughs into 8 or 10 inch lengths but left a few longer ones for the large flower pot. The weather was brutal. The wind was blowing and the wind chill must have been in the low teens. I was about halfway through putting greens in the window box when I could no longer feel my fingers. It was sunny but brutal......brrrrrrrrr.

 I added some fake white silk poinsettias which really made the white trim on the house pop. This has helped me to decide what kind of flowers I am going to plant in the spring. White geraniums with dark purple Wave Petunias and maybe some Dusty Miller and if there is room, a few of those chartreuse lime green sweet potato vines

Tomorrow I will make the wreaths. I'm shooting for two large and one small wreath.
We also installed the LED solar lights above the kitchen door. Installation was a breeze but I'll write more about that later.
Good news!!!! Today they released the December forecast and they are predicting warmer than normal. Please please be correct. What do you think????
On to what we have accomplished.....even if it was a little late.
My sister always spends most of the month of November in the U.P. (upper peninsula) so when she wasn't cooking she went outside and cut two huge bags of evergreen boughs for me. I need them for my window box, large flower pot, and to make wreaths.
I first cut the boughs into 8 or 10 inch lengths but left a few longer ones for the large flower pot. The weather was brutal. The wind was blowing and the wind chill must have been in the low teens. I was about halfway through putting greens in the window box when I could no longer feel my fingers. It was sunny but brutal......brrrrrrrrr.
Photo taken without the flash.
The grey looks too blue.
This photo was taken with a flash.
This is how the grey looks in person.
Tomorrow I will make the wreaths. I'm shooting for two large and one small wreath.
We also installed the LED solar lights above the kitchen door. Installation was a breeze but I'll write more about that later.
Good news!!!! Today they released the December forecast and they are predicting warmer than normal. Please please be correct. What do you think????
Subscribe to:
Posts (Atom)