Saturday, April 25, 2015

First Top Coat on the Front Door

The temperature outside today finally hit a balmy 57 degrees with no wind.  This allowed me to get the first of two top coats on the front door and about half of the door trim before it starting getting too cold.

Later tonight I am going to paint the One Buck Duck.  That's our new name for the dollar garage sale metal swan, duck, goose thing that R bought the other day.  He'll look spiffy with a new coat of paint.

As I tripped over the rubber door mat with my good foot, I remembered that I have a large decorative cast iron door mat stored away somewhere.  Where it is stored.....I do not know.  Kind of like the vintage lock set and door handle for the kitchen side door.  I know it is inside of a yellow cigar box but for the life of me I cannot find it.

R fired up one of the push mowers and mowed the side yard.  I love the smell of fresh mowed grass. But come July, I'll tell you that I hate the smell.  I worked with an engineer from Japan who was over here for a joint project.  He told me once that he really wanted to mow a lawn.  I told him that it wasn't all it was cracked up to be and after doing it once, you will be cured.

When my son was young he begged me to let him mow to back yard with the riding lawn mower.  I finally relented after I mowed the edges and got the rows all straight.  He mowed for about 10 minutes when all of a sudden he veers off 90 degree and starts going this way and that way.  I rushed out because he was messing up all my straight lines (OCD when it comes to my lawn) and asked him "what are you doing?"  He said he didn't like going in circles and that was the last time he mowed. Ironically, as I am writing this, he is driving in circles at a dirt track in his race car.  Maybe I had him turning right and that was what was wrong.  #racecardriverproblems

Finally here is a photo of a magnolia bud.  We will hav to see whether the cold weather or a frost will destroy these buds before they get a chance to bloom.  These usually bloom during the week of Mother's Day so I would say these are a little early.  How this happened....I do not know since it is soooooooooo cold. 

Friday, April 24, 2015

Working around the cold weather

My painting plans flew right out the door.  It has been so cold and windy that it's impossible to work on anything outside especially since I am still wearing flip flops.  I'm going to try a soft shoe tomorrow if I can find a pair that will not put any pressure on the burned area.  I'm just thankful that the stinging has gone away.

I need my foot to heal before Mother's Day.  My daughter in law and her sister take their mother and me out to lunch and a pedicure for Mother's Day.  Two years ago I dropped my camera in the foot bath when the manicurist grabbed my foot AND last year I had a broken ankle.  So I really don't want to be THAT person again this year.

Yesterday we went to our local nursery and bought 10 tomato plants and 4 pepper plants.  It will be at least three more weeks until we can plant so we are going to repot them into larger pots and grow our own 'cheater plants'.  That's what we call the large tomato plants that you can buy and that sometimes already have flowers and fruit on them.

The last few years we have bought the heirloom type of plants.  The first year we had a ton of tomatoes but the next three years the yield has been lean.  Not only did we have less fruit but we also experienced a lot of tomato wilt.  We are relocating our tomato plants and hope that helps but we are also limiting our plants to just Beefsteak, Roma, Early Girl, and Sweet 100.  We still need to buy a few Hungarian sweet peppers for R because he loves them and we are going to try Brussels sprouts again but this time we need to bunny proof the plants.

Last fall we planted three varieties of garlic and they have all sprouted and are looking good.  My fingers are crossed that they grow big and dry correctly.  This is only the second time I have tried to grow garlic.  The first time I planted in the spring, which is wrong for our area, so my results were all green tops and hardly anything below.

Today we went to Tractor Supply to buy fish emulsion but they didn't have any on the shelf.  They did have baby ducks and baby chicks.  They were so cute.  R was smitten.  But I had to remind him that we first have to build a coop THEN get the chicks.  Can't put the cart before the horse or in this case the chicks before the coop.

So what DID I buy at the farm store???  A top and not the spinning kind either.  What kind of person buys clothes at the farm store??  AND I don't even have a farm.  R bought a package of valve stems. We lead very exciting lives....NOT.

Here is a photo of the front door with two coats of primer.  It's just begging for a top coat but I've resisted because of the wind.  The front door needs to have a nice finish on the door because people get really up close and personal to the front door.  So I am resisting the urge until the weather is right.

Notice the metal swan next to the flower pot?  R bought that at a garage sale for a buck. See the sticker?  He loves his garage sales.  It will get a new coat of white, black for the little eye, and yellow for the bill.  The blue paint will go buh bye.

R nabbed the first curbside treasure of the spring.  I'm going to do a before and after so you will have to wait to see what he found.

Monday, April 20, 2015

Curated Window Box Board for Hometalk


The wonderful people at Hometalk have asked me again to curate a board for their website. If you are not familiar with the website Hometalk, then you are missing out on a chance to browse posts and boards by talented homeowners FULL of fabulous ideas.  Hometalk also has a Ask & Answer section where you can ask a question and get answers from Hometalk readers. 
Find me on Homtalk.com   
This time Hometalk asked me to put together a board featuring different window boxes.  I was surprised at the timing because with warm weather fast approaching (not fast enough for me!!) my window boxes have been on my mind a lot.  We are currently knee deep in spring clean up and while I am raking I keep glancing over to my own window boxes trying to imagine different flower combinations and colors. So many colors and so many flowers!! 

So the opportunity to put together a board was not only fun but has helped me to decide which color and type of flowers that I am going to use this year in my own window boxes.  I hope you, too, find an inspiration or two from Heavenly Window Box Ideas and Inspirations.


Hometalk last year asked me to curate a board about hostas.  If you have read my blog for any amount of time, then you know I love me some hostas.  If you missed the post last year about hostas, you can read it here.
Below are links to previous Gear Acres posts about hostas.


Find me on Homtalk.com

Saturday, April 18, 2015

Priming the Front Door and Burning My Little Toe

Ouch!!!!!  Several days ago we were burning some branches that were too big for the yard waste paper bags and I was wearing a pair of nylon mesh sneakers without any socks.  As I was standing next to the burner barrel a hot ember fell off a burning branch and landed on my shoe.  My feet tend to be numb because of poor circulation but some times I have stinging pains in my feet so when the shoe melted and the ember started burning my toe, I didn't even look down at my foot.  Finally I said to R, "damn, my foot is killing me.  Oh s*&t!!! my shoe is on fire!"  So now I can't wear a shoe on that foot and it hurts like H E double hockey sticks.

So between my toe and windy weather, I am finally just now getting around to painting the front door.  We spent several days giving the door another good sanding and a close inspection to look for nicks and gouges that needed to be filled.  Of course we couldn't fix every imperfection and we don't want the door to look new because it isn't new, it's 89 years old.  We used two part epoxy to fill old nail holes and large cracks and glued a loose piece of wood and left it to set up over night.


Today we sanded those areas and gave the door it's first coat of primer.  The door really soaked up the primer so tomorrow I will give it another coat.  The primer is white and our final top coat will also be white so we got a sneak peak at what the door will look like when it is finished and we both love it.

The door had many many layers of paint on it when I stripped it several years ago.  In it's life time it has been white, aqua, red, dark green, and tan.  But it appears to have been red more than any other color.  The wrought iron driveway gates were red when we purchased the house.

The white door will allow the wrought iron hardware to stand out.  Of course there was the temptation to give the door a 'pop' of color but the roof is dark emerald green and the body of the house is dark grey so it limits the colors that can would work well with dark green and grey.  Red comes to mind and at one time the door was red but that just seems too Christmasy for a year around color combo.

Painting the door white will allow us to use just about any color combination of flowers.  Also, having a white door is classic for this style of home and trendy is just not us.  No chevron pillows at The Gear.

Once the door has had two top coats we will......
1. Reinstall all the wrought iron hardware i.e. door knocker and large straps.
2. R will clean and adjust the lockset and reinstall that and the thumblatch door handle.
3. We will install the new bronze V weatherstripping that I purchased last year for all the exterior doors.
4. Hang the new cast iron house numbers but first I need to grind off the flash and repaint.  I'm a daughter of a journeyman mold maker so when it comes to casting I'm kind of particular.

Rain is in the forecast for Sunday night so I might just be able to squeak out at least one top coat before then.  We haven't had much rain but we have had a lot of wind which makes raking leaves nearly impossible.
Finally some spring color.  These are little tiny daffodils.  I could only find two tulip buds that the deer have missed but I'm sure they will get them on the next go around.  

Monday, April 6, 2015

Solar LED Lights and Dryer Vent Updates

I was searching through my photos, looking for a particular photo, when I ran across this photo of the solar LED lights that we installed on the eave trough over our kitchen side porch.  It was then that I realized that I never posted about the lights after we installed them.
If you want to read the post about the lights just go here.

In a nutshell.....we love them.  The install was simple and who doesn't like simple.  We installed them on our eave trough with the bracket and thumb screw included in the box.  There was a fair amount of snow here in Michigan this winter and they survived the snow and ice without any problems.

The amount of illumination given off by these solar lights is subdued which is what we wanted. We were concerned about the light shining into our kitchen through the window since the lights were mounted directly over a large window.  What we wanted was just enough light to be able to climb the steps without tripping and to be able to insert the door key into the lock without fumbling all without the cost of using electricity.  Both of those tasks are easily accomplished without any light shining into the kitchen.

Solar lights have rechargeable batteries which in some situations can last anywhere from a few hours to many hours.  I can honestly tell you I have no idea how long these lights shine at night before the batteries go dead or if they go dead at all.  We know they shine late enough for our use and if for some reason we need to leave in the middle of the night in a hurry and the batteries are dead we can just turn on the exterior 110 light.

The only downside I can see with these solar lights is that they only come in white.  Lucky for us, white was the color we needed.  The price is right because there are not many items you can buy for a 10 spot.  The install was easy enough and opening the box was probably harder then the actual install.

The dryer vent was the other product that I didn't do a wrap up on.  You can read about the install and price here.

We love this dryer vent and as I said before, it is the best dryer vent ever.  We had a lot of wind this winter and with the traditional louver dryer vent that wind would come right into our dryer depending on the direction of the wind.  If the outside temperature is 20 degrees and that 20 degree air is blowing into your dryer than you can be sure that it is lowering the temperature of your laundry room in addition to adding to your drying time.  Let's not even think about the zero degree and lower temperatures that we had this past winter.

I specifically made trips to my dryer to check on the internal temperature of my empty dryer during extremely windy and cold conditions this past winter.  I found that the inside of my empty dryer was only slightly cold and not even close to how cold the inside was with my old dryer vent.  I also noticed that the laundry room was warmer.  How much warmer?  I can't quantify it with a number but I can say that my flannel PJs (I do laundry at night before I go to bed) were enough to keep me warm when I put clothes into the dryer.  In the past I would hurry and leave the laundry room as fast as I could because it was so cold.

The price of the dryer vent was OK considering I had to order it online. When considering the price of online items shipping needs to be included in the overall price. Unfortunately, I could not find this product locally, which is a shame. With today's emphasis on saving energy and cost saving, dryer vents are often overlooked and can be a source of wasted energy.

Another bummer is the color.  It's off white and not pure white.  I personally think they should offer it in both white and off white or a paint able plastic so that the vent can blend with all exteriors.  I won't need to paint the dryer vent at the Torrey Rd house but at The Gear it will need to be dark grey to blend with the siding.  I have a real pet peeve about vents.  I see so many of these large newer homes that cost BIG BUCKS and the backs of those houses are littered with numerous ugly vents.  I want my vents to blend and go unnoticed.

So there you have it.  We were happy with both products.  We would buy them again AND we would encourage our family and friends to purchase them, too.  Let me know if you purchase either of these products and how they worked out for you.

Wednesday, April 1, 2015

Mason Jar Project for Salt Storage

Last week I went to the cupboard to fill the salt shaker and measure salt for a recipe.  What did I find? About 4 tablespoons of salt left in the cardboard canister that salt comes in when you buy it at the store.  If the salt was stored in a clear container I would have bought salt before I was that low.  I remembered seeing something on Pinterest about cutting the top out of the cardboard salt container and using it with a canning ring on a Mason jar.  I had just purchased a new canister of regular salt and one of sea salt for my husband so I rummaged through my Mason jar stash and found two medium size wide mouth jars.
I washed and dried the jars but to make sure they were absolutely dry I gave them a little blow dry with my hair dryer.
This is the ring placed on to the top of the cardboard salt canister to make sure I had the correct size ring.  Next, I cut off the bottom just to practice my technique.
 That worked out great so now to the actual top.
I guess I got a little over aggressive and poked some holes in the top.  Lesson learned.  Take your time.
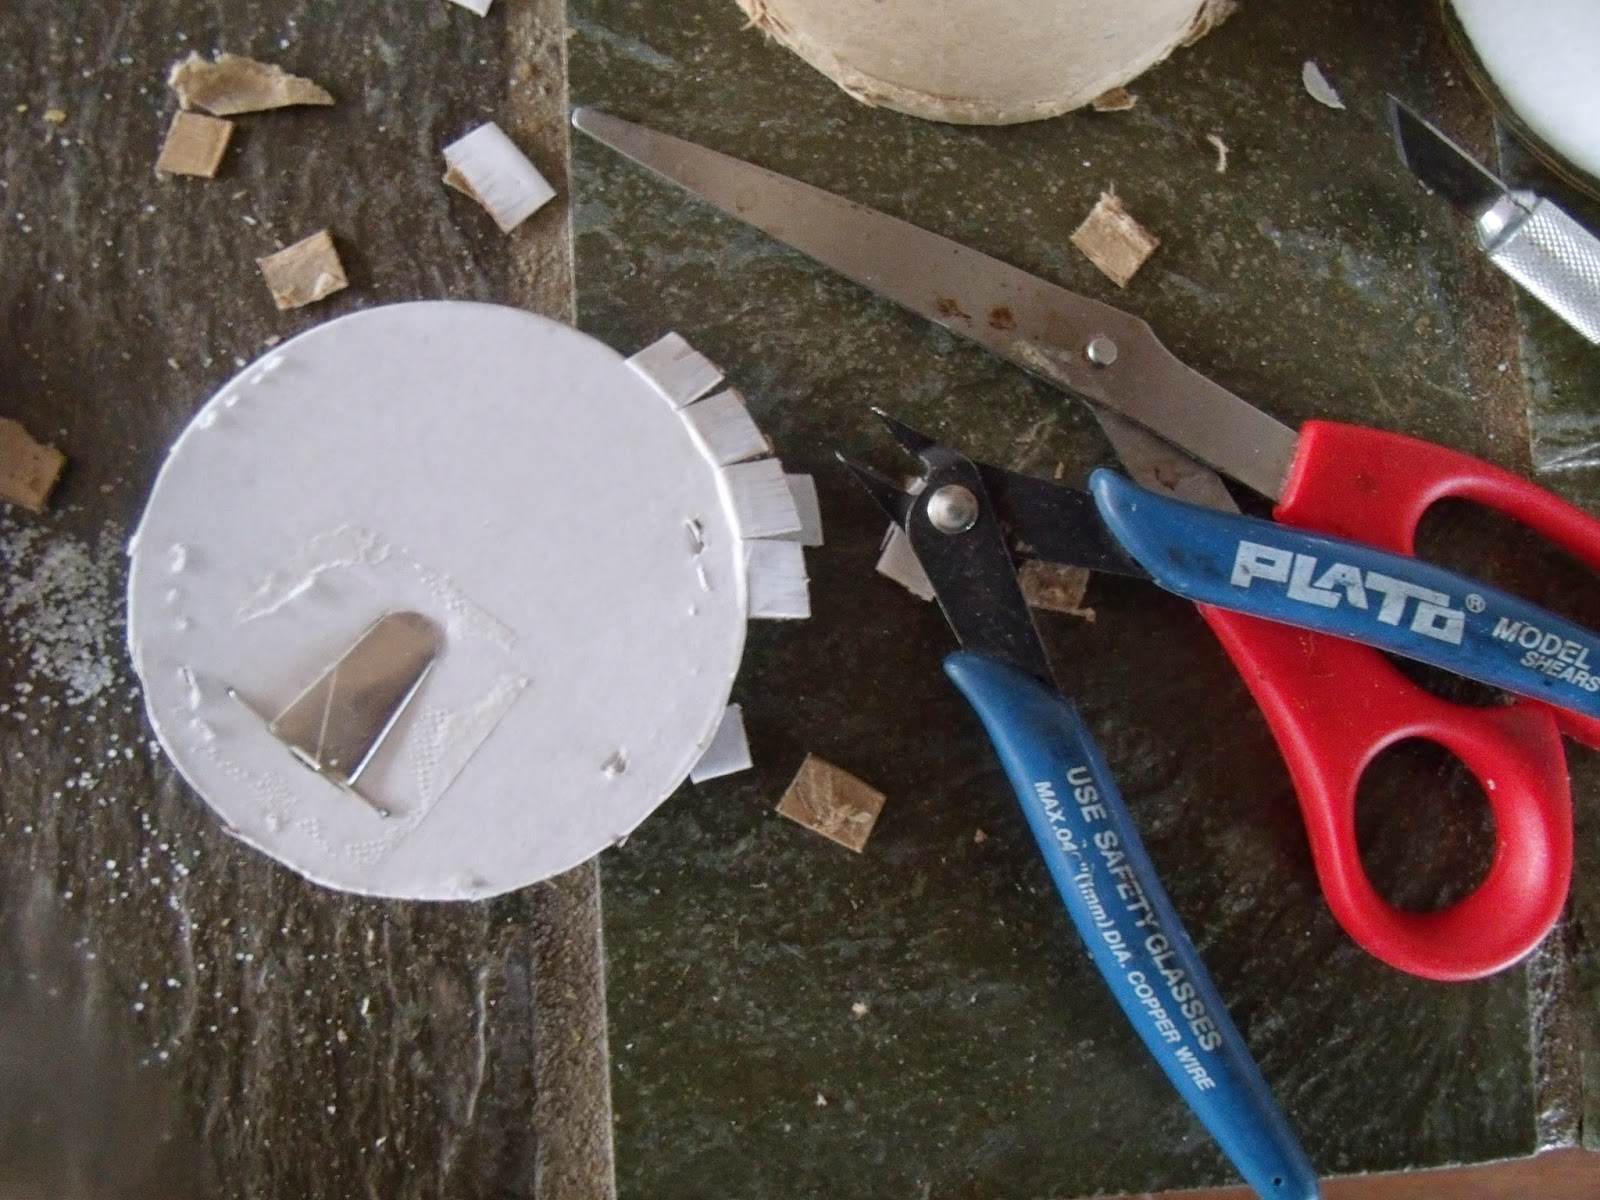
Next I used my small wire cutter, that I used for cutting instrumentation wire, to make cuts around the edge so I could use my scissors to cut off the excess.  I cut just to the outside of the top with the scissors.
Here is the top inside the ring.  It really could be bigger so that it is tight inside the ring.  This top will be replaced anyways because of the holes, so not a big deal, I'll just make the second one a little larger.
Here is the second one.  A little larger and without holes.  AND in focus this time.  Damn camera.
 These jars have one side marked with ounces and cups while the other side is milliliters.
Here is the top I screwed up.  It wasn't very pretty to begin with because the sticker over the spout did not come off cleanly.  I wrote 'sea salt' so my husband would know which salt was the 'sea salt' but I plan on adding labels in black lettering. The next time I have my black spray paint out, I'll give the rings a coat of satin black.
You could use these tops for anything pourable. I buy 'coarse ground black pepper' from an Indian market down by Detroit and it comes in a resealable plastic bag.  I buy a pound at a time so storing in a glass jar with a spout would make filling the pepper shaker a lot easier.  Sneeze sneeze.

A real crafty person could also cover the cardboard top with vinyl shelf paper or glue a pretty wrapping paper or scrapbook paper to the top and reinsert the spout.  Endless possibilities.  I can see that I will be making more of these in the future.