Sunday, November 29, 2009

Free 8X10 Canvas Photo

Do you have a special photo that would look great printed on canvas? Here is your chance to do it for free + shipping.

http://www.canvaspeople.com/freegift

My shipping cost was $14.99 for the free 8 X 10 size. I know of one person who only paid $11.99 for shipping so it must be calculated based on location. $14.99 for Michigan and $11.99 for Idaho, so I am assuming this is west coast based.

This would make a great gift especially if framed in a nice frame. Don't buy the frame from them. Use a 50% off 1 item coupon and get your frame from Michael's Craft Store. Coupons are usually in Sunday's newspaper. Since 8 X 10 is a common size you will be able to buy a pre made frame instead of a expensive custom frame.

Children, grandchildren, and pets are always excellent choices for canvas photos. But what about using software to combine a 'before and after' photo of your house? What better reminder of how far you've come (other than your credit card bills) on your restoration than a canvas printed 'before and after' photo framed and hung for all to see.

If you are really handy you could make your frame out of reclaimed wood from your home. Use old baseboard or trim to build your own frame.

What photo did I put on canvas? R in his race car of course!

Wednesday, November 25, 2009

Just as I Thought

Guess what is in this canvas bag?Yup, those are the elusive hinges that I have been eluding me for the last week or so.And you know what? They were right where I put them. I remembered that I needed to use the shipping box for something else but I could not remember what I put the hinges in to keep them safe. Duh....National Trust for Historic Preservation canvas bag, of course they are vintage style hinges.

I chose the hinges because I needed surface mount hinges and did not have a lot of space. I also needed a hinge that was available in black. I originally thought about the L hinge but wasn't really wowed by the idea. One night while watching one of my favorite movies, Mr. Blandings Builds His Dream House (1948), I noticed these hinges on casement windows and I liked how they looked.

My favorite part of this movie is when Mrs. Blandings is trying to explain what colors she wants the contractor to have his painter paint her rooms.

Mrs. Blandings: I want it to be a soft green, not as blue-green as a robin's egg, but not as yellow-green as daffodil buds. Now, the only sample I could get is a little too yellow, but don't let whoever does it go to the other extreme and get it too blue. It should just be a sort of grayish-yellow-green. Now, the dining room. I'd like yellow. Not just yellow; a very gay yellow. Something bright and sunshine-y. I tell you, Mr. PeDelford, if you'll send one of your men to the grocer for a pound of their best butter, and match that exactly, you can't go wrong! Now, this is the paper we're going to use in the hall. It's flowered, but I don't want the ceiling to match any of the colors of the flowers. There's some little dots in the background, and it's these dots I want you to match. Not the little greenish dot near the hollyhock leaf, but the little bluish dot between the rosebud and the delphinium blossom. Is that clear? Now the kitchen is to be white. Not a cold, antiseptic hospital white. A little warmer, but still, not to suggest any other color but white. Now for the powder room - in here - I want you to match this thread, and don't lose it. It's the only spool I have and I had an awful time finding it! As you can see, it's practically an apple red. Somewhere between a healthy winesap and an unripened Jonathan. Oh, excuse me... Mr. PeDelford: You got that Charlie? Charlie, Painter: Red, green, blue, yellow, white. Mr. PeDelford: Check.

My other favorite line is when the Blandings' friend, Bill Cole says, You've been taken to the cleaners, and you don't even know your pants are off.

Every time I have to deal with a contractor, I think about those lines.

I just read that they built replicas of this house all over the United States. Two years ago there was a story in the newspaper about one built in the Toledo area. You can read the article here.

If you are building or restoring a home buy this DVD. It is so timeless when it comes to contractors and the highs and lows of home improvement. Plus, Cary Grant is just so debonair. A polished up George Clooney. You ladies know what I mean.

Tuesday, November 24, 2009

Shingling is Done Until Spring

R and I shingled until after 5PM today. The last few shingles were installed in near darkness.

I was sure we would run of of shingles but to my surprise we still had a 1/3 of a bundle remaining when we installed the last shingle.Last weekend I found the best tool to use when installing cedar shingles. This tiny plane is the perfect size to keep tucked in your pocket. There were so many times I needed to adjust the side of a shingle and ended up having to walk over to the WorkMate, score a line on the shingle, and then either use the saw or a utility knife to cut away the excess shingle. This slowed down progress and as in the case today....we had absolutely no time to spare. So today whenever I needed to make an adjustment, I just pulled out the little plane and made as many passes as needed to get a good fit. This saved a lot of time because I did not have to walk away, make my cuts, and walk back to where I was shingling.

Best part is that this little gadget was less than four bucks at Harbor Freight.

We are both sooo happy that the shingling is done for now. We both have slivers in our fingers and those little slivers hurt big time. My nail tech spent the first 15 minutes on Monday picking slivers out of my fingers. Thank you, Virginia. Virginia and her band, Still Waters, have a CD coming out in February 2010. She filmed her music video last month and I was able to view it a couple of weeks ago. I'll let everyone know when it will be available for viewing on the country music and Christian channels. I was impressed and I am not a fan of that particular genre either. Strictly R n R, jazz, or blues.

Which reminds me that if you have a chance to take in the Trans Siberian Orchestra around this time of year, don't hesitate...go and see them, they put on an excellent show.

Today we had Sweers Eavetrough and Roofing stop by for an estimate to install 6 inch gutters and 5 inch downspouts. We will also have them install the leaf caps on the gutters. We have too many leaves to not have the gutters covered. The new eave troughs will be installed in two weeks.

I am still waiting on the chimney guy to show up. We need chimney caps on 2 of the three chimneys. Each chimney has at least 2 flues. The fireplace in the family room/library needs an expert to look at the firebox. We think that some of the mortar needs replacing. Plus, I want someone to say "yes, it is alright to fire that fireplace up." We have an abundance of wood to burn and it would be nice to use it to help with heating that room. The other two fireplaces can wait for now. I haven't decided if I want gas or not in the living room and master bedroom.

FYI...I still have not located the hinges.

Monday, November 23, 2009

Under the Gun

I think our string of good weather is running out. The forecast for Tuesday is slightly colder than today and after that the forecast is for rain or snow showers.

Tomorrow we have to hit it hard if we are to finish the south wall. The south wall only needs two rows but of course the bottom row is done twice so essentially we have three rows.

I think we have just enough shingles left to finish. I better measure twice and cut once because I do not want to stop and go buy another whole bundle just for a couple of shingles.

We were making good progress today but then we came to the very last small odd shaped shingle. It took forever to get it right. Since it was an interior corner it was important that the fit was tight to keep the rain out.Sometime in the next year we will be replacing those two ugly banks of windows. Who would put a bay window and bow window in the same room? I'm hoping for double hung windows in the same configuration as the windows in the living room which are 8 over 8 flanked on each side by 6 over 6 windows. That would leave the original dining room bay window as the only bay window in the house. The windows in the family room/library are 1960's era windows so they are not original for that room nor the house.

FYI....I still have not located the hinges.

Sunday, November 22, 2009

More Shingling

We finished the sun room area two days ago. Remember this mess?It looks like this now.Unfortunately I still have not found the hinges I ordered. So we moved on.

The only two areas left that need shingling are the two areas where we replaced the rotted sill plate. Someone or at sometime dirt was piled up against the house. After we removed all the over grown shrubbery we realized that we also needed to remove quite a lot of dirt so that there was adequate drainage and so that the dirt was no longer in contact with the wood shingles.

Yesterday and today was spent shingling the west side of the family room or the library as it was referred to in the listing when we purchased the home. Tomorrow we will finish this area and start on south side. This should complete the major shingling jobs until we remove the 1960 era window in the game room.

Please excuse the photo's poor quality. It was nearly dark when I remembered that I needed to take a few photos.

Wednesday, November 18, 2009

One Last Board & We're Done

The weather report today was for rain after 3PM. It was rain free at three but you could feel the cold front moving in from the south.

We have only one board left to install and we will do that tomorrow. That leaves the installation of the windows which cannot be done until I find the hinges.So rather than hear R say, "if you would quit writing and reading blogs all night and look for the hinges instead, we could wrap this project up!" I'll post a quick photo and then it's off to look for the hinges.

Tuesday, November 17, 2009

More Sun Room Progress

We have now progressed to the point where we are left with the tedious part of the project. All the shingles are installed except for the last two which will be the first thing we do tomorrow.

That leaves the rotted wood area just under the eave. R has removed the 1 X 4 that looked like a chipmunk gnawed through it. We will replace the board because it is missing at least 4 or 5 inches. Once this is done we can reinstall two small trim pieces and we will almost be done.Last on the list is the re installation of the casement windows. But before we do that I must find the hinges that I bought last year. I know I put them somewhere safe so I wouldn't lose them but I forgot where that location is located. Drats!I took care of one of the small details while R was removing the chewed up/rotted board from the fascia. The area right below the sill needed a small piece of trim to cover the nail heads that hold the last row of shingles in place directly under the sill. I knew I wanted something simple and I really did not want to put something like a 1 X 3 board under the sill.

So this morning we made a quick trip to Home Depot and scanned the racks of trim for something appropriate. I was hoping for trim that could be cut on the end without the need of cutting a small return piece to finish it. Nothing struck me as perfect so I went with a small cove type moulding.

I cut each end at a 45 degree angle and then put the saw back to zero degrees and cut off the little point so the trim has what appears to be a nice return. I was pleasantly surprised at how well it looked when it was complete. Installation was fast using the air brad nailer. From first cut to the last nail...total time for installation of trim piece...10 minutes.

The last two photos show what has been done so far and where we will pick up tomorrow. We are keeping our fingers crossed that the 30% chance of rain doesn't materialize.

Sunday, November 15, 2009

Continuing the Sun Room Exterior

Waaaaay back last year we started to restore the casement windows in the sun room. The windows were in terrible shape and required a lot more work than what we originally thought. It seems that the windows were held together with the many thick coats of paint they had received over the years. This is a photo of the windows after we removed the paint.The paint covered rot, cracks, loose muntin bars, and loose tenons. Through the power of glue and wood epoxy we were able to bring the casement windows back from near death. This is what the windows look like on the back side of the sun room.One of the other problems with the sun room was the nonconformity between the three sets of windows on the front and back of the sun room. Also the windows were not trimmed out in the same fashion as the rest of the house. Notice the two different sizes of windows in the photo above. The photo below shows how the windows throughout the house are trimmed out on the exterior.So first on the list to remedy this was to rebuild the window jambs so that the windows could be mullioned together. Here is a photo after the shingles were removed but before the new jambs were installed.The photo below shows the new jambs and the start of the sill repairs.We also needed to rework the sills to make it appear as one long sill instead of three small sills. We not only added wood between the three sills but also about four inches to each end of the sill. We cut down a 4 X 4 post to the correct thickness plus about 1/16th of an inch so that we could sand the piece to the exact size once it was in place. Wood glue and a hidden nail held the piece in place. When all is said and done....R will add a small bracket underneath and hidden from view to reinforce the patch. FYI....that is not the hidden nail but an old nail that we could not remove so R countersunk it so we could putty over it.We then trimmed out the windows in the same fashion as the rest of the house trying the best we could to keep the same reveal. The trim measured 4 1/2 inches so we needed to rip about an inch off a 1 X 6. We then used the discarded piece to build up the one edge to give the illusion of a 2 X 4 1/2 which is what is used on the rest of the house. I then sanded off the sharp factory edge on the new wood to make sure the new work blended with 72 year old wood. Once all the trim work was complete we could start shingling.

This is where we were at in the project at the end of the day on Friday. Saturday was beautiful and set a new record of 66 degrees a perfect temperature to shingle. Did we shingle..no....we went to a racing banquet so R could receive his Rookie of the Year jacket and his trophy for 10th place in the Michigan Traditional Sprints Racing Series. He is probably the oldest known Rookie of the Year in captivity....LOL. At the ripe old age of 57 he competed against guys in their 20's and 30's with years of dirt sprint car experience. R on the other hand was coming off the asphalt and use to racing modifieds. So we started shingling on Sunday when the temps were barely 50 degrees. Brrrrrrr

We were able to get approximately 1/3 of the shingling completed today before we ran out of daylight.

We are not looking forward to shingling the area where the sun room attaches to the house. I see a lot of customs cuts are in our future. Grrrrrr

Tuesday, November 10, 2009

Next Project...Oak Door with Beveled Glass

Last night I resumed a small project that I had started over a year ago. I usually have several projects going at one time. This allows me to work on one project while waiting for a part, perfect weather, inspiration, or ambition. Sometimes I just get bored with a long term project and need to do something else to just break the monotony.

Several years ago I bought the door that we are going to install between our vestibule and foyer. When I stripped the paint from the doorway and saw witness marks from previous hinges it was confirmed that indeed there had been a door at one time.

I purchased an old solid oak door with 15 beveled glass lites. This door was covered in numerous coats of paint. Some of the tiny trim around the lites were loose and had paint drips behind the glass. I needed to remove the glass and clean the paint drips if I was going to return this door to it's previous glory.

Slowly I removed the trim which was only attached with one small nail. The beveled glass was not only paint covered and filthy but also very thick heavy glass with a slight green tint. Once all the glass was removed I could finish stripping the paint drips.This left me with a stack of very heavy and very dirty glass. I was very careful when handling the glass as I did not want to have to replace any broken lites nor did I want to cut myself. The procedure I used took a whole evening to complete and resulted in a case of dish pan hands for me.First of all I placed a thick bath towel in the bottom of the sink. I then very carefully place one piece of glass onto the towel and then turned the water on. I used a couple drops of dish soap to help clean off the grime. I found that a sponge with a Scotch Brite pad on one side worked the best at cutting the dirt. Once I had removed all the dirt I could see where I needed to use a razor blade in a paint scraper to remove the paint. I then dried off the glass and placed it onto another thick bath towel.Here is a photo of the finished stack of clean glass.
The next step is to reinstall the glass and return the small trim pieces without breaking the glass or the trim pieces. But before I can do that, I have to finish the project R and I are currently working on. More on that...tomorrow.

Sunday, November 8, 2009

Shingling Through the Rain & Sunshine

Today was an absolutely gorgeous day. This was a perfect fall day unlike 2 days ago. Let me start at the beginning.

Day 1 consisted of removing the security wrought iron door that was installed as an interior door. Some of the bolts needed to be removed by grinding the heads off with a pneumatic grinder with a cut off wheel. This took the majority of the afternoon and it was far to late to start removing the ugly exterior door which then would have left a hole in the wall.

Yes, that is an old Defender game. We also have a Stargate, Tetris, Mr. Do, and an Elevator Action game. This is why this is going to be the game room when we are finished. We also have a 1920's billiard table. This room will be the last room we complete since we have the saws and all the tools stored in this room.
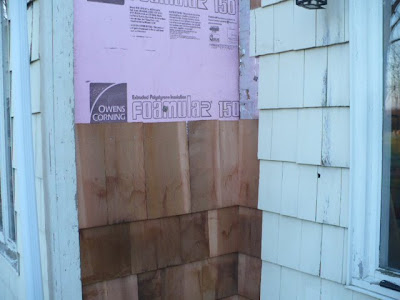
Day 2 started with removing the ugly white aluminum cross buck door. Easy, quick, no problem. Next step was to remove the interior door trim and the door jamb. A reciprocating saw made fast work of this part of the demo. The door sill lifted right out because it was half rotted and this left us with the rough framing. We then measured and cut 2 X 4's to frame in the area so that we could sheath it with 1 X's planks to ready it for shingles.While I cut the 2 X 4's R removed all the remaining shingles from around the door and at least one shingle in every row on the adjacent wall. We needed to remove those shingles so that we could install the shingles in the corner properly. When the shingles were originally installed they did not overlap alternating rows. This is done so that the shingles are less likely to get water behind them in the corner.

Oh wait....I forgot to mention that as soon as we removed the second door and were at the point of no return....it started raining and then it started sleeting and then it started getting very windy. Thankfully I was manning the saw and R was the one outside.....hee hee.

Once the hole was framed in I started looking through our scrap pile for all the 1 X 6's, 1 X 8's, and 1 X anything that we saved when we did any demo. We were lucky in that we had enough used lumber to close off the opening. Once the framing and sheathing was complete we covered the entire areas with 2 inch thick foam board since the remaining untouched part was covered with 2 inch foam board. By the time we finished closing up the opening....the sun popped out and the wind died down. We called it quits at this point.

Day 3 was warmer and actually we had just had sweatshirts on but it was still windy. My mom and dad stopped by for a quick visit and then we assembled all the needed materials and tools except for a utility knife with a sharp blade. Every time I buy a utility knife I also buy a package of blades but when I need a new blade I can never find the spare blades so we were off to the hardware store.

Ace is our hardware store of choice here in Grand Blanc and lucky us.......they were having a 20% off nearly everything sale. We purchased a new utility knife, more utility blades, a package of different size hacksaw blades (for another project), and a handful of caramels. We then decided that since we were out and about that we should stop by the Hot Dog Stand up town and grab a couple of hot dogs.

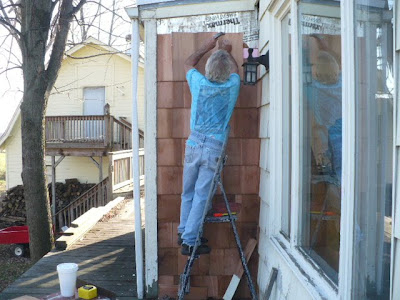
We finally made it back home and started shingling. The first row takes the longest because essentially you are shingling it twice making sure to stagger the shingles so that none of the gaps between the shingles fall too close to one another. Shingling continued until B & G showed up on their motorcycle. We completed several rows after they left and R informed me that he wanted to watch a sprint car race on TV at 8PM. So we called it quits.Day 4 (today) was warm with a slight breeze. We shingled for about 2 hours and then realized we were running out of nails so it was back to Ace hardware for another box of nails. Had we paid better attention yesterday we could have gotten those same nails for 20% less. We also got another handful of caramels.We had to decide whether to install all the shingles perfectly straight (which is the correct way) or to slightly leave imperfections so that it blended with what was already installed. Whoever installed the shingles adjacent to where we were working did not do the best job. I know over time the shingles shrunk slightly. We chose to try and blend the work so that once it is painted it will look like it was all done at the same time. In a perfect world we would re shingle the entire house but you have to pick your battles and that is currently not on our agenda.

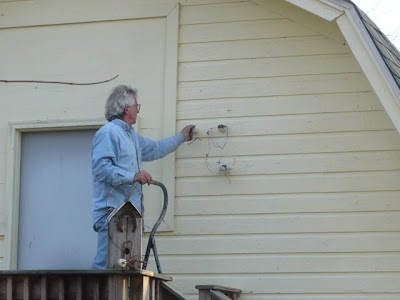
Two hours later we were done shingling. We also removed an ill place light that was by the door. Tomorrow I will pull the wires back through the wall and disconnect it from the switch. R also removed several insulators that were left on the side of the barn and are no longer in use. Just more needless stuff left attached to the exterior of the house.There is also an old mercury vapor light dangling from the peak of the barn and an old basketball hoop that needs to be removed. Both will require the extension ladder to reach them and currently the extension ladder to waiting for me to clean paint off one more storm window hanger.

We finished the day by picking up a couple piles of leaves, planting eight tulip bulbs, and hauling 5 trash cans full of scrap wood to the curb for trash pick up Tuesday morning.

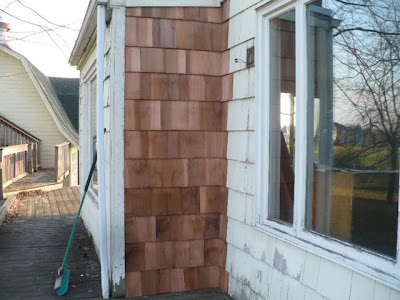
What was that? Oh, I forgot to show you the completed project. Here for your viewing pleasure the completed shingles. Notice the light and insulators that were removed. First a before photo to remind you of the ugliness. Notice ugly door, ugly light, and ugly insulators.

Friday, November 6, 2009

Homeowners Insurance Paid Through Escrow Account

Two weeks ago I received a check from our mortgage holder for an escrow overage. I didn't think much about it until the next day when I received a letter from my homeowners insurance agent saying that our insurance had not been paid and would be canceled in two weeks as we were already in the grace period time frame. This was the first time in nearly 30 years of home ownership that this has happened.

I called the 1-800 number on the escrow statement. The bank's representative assured me that the payment had indeed been made 1 day before it was due. Now I find this ironic since banks are notorious for telling you to allow for 7-10 days for payments to be processed. I can only assume now that they do not extend that same courtesy to those businesses that they pay. Maybe I should charge them a $49.00 late fee and tell them next time to make sure they allow ample time for processing.

I called my insurance agent just to make sure that the payment was received. She told me that, "yes, it indeed had finally arrived." She also said that this is becoming more of a problem. Seems that lending institutions are holding onto their (actually 'your') cash as long as they can. She said that Chase was by far the worst. Our mortgage is with Citizens Bank (originally Republic Bank) and Citizens recently failed the government stress test for banks. Ironically their CEO received a huge bonus as well as the former CEO who recently left. I sure hope their bonus arrived on time.

Moral of story....no matter how punctual your mortgage holder has been in the past about paying your insurance premium double check that it indeed has been paid on time. I have no faith in banks at all these days. But at least I can sleep easier knowing that the CEO received his bonus.

Tuesday, November 3, 2009

Stupidity with a Capital 'S'

See that nasty old aluminum cross buck door? Tomorrow, fingers crossed, it will be gone. Here's the deal. Who puts a wrought iron security door on the inside of a house and then to make matters worse, like that wasn't ugly and stupid enough...they added an even uglier storm door on the outside. So basically I have two storm doors and no exterior door. What were they thinking? Jayne, of Dainty Digs fame, has a neighbor called WTB and he calls this stupidity. That's right.....stupidity with a capital 'S'.

This door is located in what is to be our game room. The room already has a set of patio doors so I don't think egress is a problem. On the other hand wall space is lacking in this room because of the numerous windows. So the plan is to remove the set of storm doors and wall it up.

Unfortunately our 2 X 4 inventory is low so we will have to spring for 2 X 4's but the rest of the supplies we already have on hand. So this amounts to another low cost/no cost project.

The aluminum door will go into the scrap pile and the wrought iron door will be stored in the barn along with the other wrought iron door we removed. There is yet another wrought iron security door on the kitchen door that still needs to be removed.

My guess is that this project will take 2 days to complete so it will probably take 4 days.

Monday, November 2, 2009

A/C Unit Removal Complete

As dusk fell yesterday, we were at this point in the A/C unit removal......This morning, with rain imminent, R climbed the ladder and I cut shingles and handed them through the window. We used old shingles that were removed in a demo project elsewhere on the house. We even reused that inappropriate trim piece under the window. Previously it had been installed with the thick part down and the thin part directly under the window ledge. The only reason we reinstalled it is because it will all be ripped out next summer when we install French doors and the small balcony. Plus it was raining and we needed to wrap this project up pronto.

So what's on the agenda for tomorrow......I'd like to remove one of the many doors in the game room and close that off while we are in a shingling mood.

Added November 3, 2009....This photo was shot today and gives a better view of the shingle repair that we completed yesterday in the rain. It's not perfect but will suffice until next summer. Plus the price was right.....$00.00 That's right nothing. We used old wood for framing and old shingles. As a matter of fact, R threw the old A/C unit in the scrap trailer, so we probably made 25 cents.

Sunday, November 1, 2009

Bye Bye Old A/C Unit

Finally a day without rain or wind so we removed the a/c unit from the 2ND story on the back of the house.

R wiggled, pried, pulled, and obviously used his feet to get the unit out of the wall. Once it was removed we were able to see what would be needed to close up the hole. Luckily whoever installed the unit framed the opening with 2 X 4's. We measured, cut, and installed 2 X 4's to give us a place to nail the sheathing to.But before we installed the sheathing, G showed up on his motorcycle. We used his appearance as a chance to help us turn over the cement birdbaths basins. Every winter R and I dutifully turn over the birdbath basins so that they are not damaged by ice during the winter. Normally R and I take care of this but my shoulders can no longer support the weight plus make the twisting motion to turn over the basins. Once that was completed R and G talked motorcycles as the daylight burned.

Back to the gaping hole in our bedroom wall. I rummaged through our pile of used wood that we saved from previous demos. I found some 1 X 6's and removed any old nails. We cut the old 1 X 6's to the correct length and nailed them to the 2 X 4 frame work we installed earlier.It was now too dark to start shingling. Notice the moon over the ridge of our barn.
I'll shingle tomorrow while R tends to some projects that he and G have planned (racing related).