Saturday, January 30, 2010

We're Going Back Under the House

I guess I shouldn't say 'we' because I'm not the one going under the house but I'll be there encouraging him on and handing him supplies. I thought R had had enough of being underground, but I guess not. Today he said, "Let's look under the other side of the house and see what's up under there."

My guess is he would rather work on heat ducts than cut up wood outside in the 15 degree weather. Even the lure of using his new chainsaw is diminished when he realized that would mean enduring 15 degree weather with a wind chill of about 5 degrees. Next week it is suppose to warm back up and he will be able to cut all the wood he wants. Nothing like the smell of a two stroke engine on a cold morning......it smells of......oil and gas.....what did you think I was going to say? Victory? Robert Duvall was great in Apocalypse Now and loved him in Days of Thunder, cheesy movie but the character he was portraying was classic.

http://www.youtube.com/watch?v=bPXVGQnJm0w

The house has a basement under the center portion of the house. The wings of the house, on the other hand, just have crawl spaces. The area we opened up today is under the living room and it has a much deeper crawl space. R could sit up easily everywhere and in some spots he could actually partially stand up.

We suspected that we had a disconnected run and possibly some rips in other runs because of the weak flow of heated air coming out of several registers. Sure enough, one run is completely gone and a second is badly damaged. Both of those will immediately be replaced with sheet metal round ducts like what we used under the family room/library. The rips will be repaired on the flexible ducts and this summer we will replace those runs with sheet metal ducts.

There is also trash that someone either left behind or thought "what the heck" and threw it in the crawl space. That 'stuff' will need to be thrown away, also. 'Stuff' like these tennis shoes, carpet, and Santa Claus decorations that R tossed out today. Unfortunately, there is plenty more under there.Tonight we made the first Home Depot trip to pick up supplies. I estimate three trips will be required to finish this project.

So it looks like I have to listen to sports radio for another day or two.

Thursday, January 28, 2010

Wood Cold Air Return Project Complete

The wood cold air return and new base board are installed. We are very pleased with how it looks. Of course it will look much better when the base shoe is installed and the floor is refinished in a rich dark stain. The wall color has yet to be determined but we do know the base board will be painted white. The wood outlet cover will be painted to match the wall.Installation was pretty straight forward. We used long wood screws to attach the base board to the wall. Because of the configuration, we were able to hide the screws behind the grill. The grill was then attached to the base board with four 1 and 1/4 inch wood screws. We counter sunk the wood screws so that we could hide the screws behind wood caps. We glued the caps in placed when we used these same wood caps on B & G's deck. In our application, we need the option to remove the caps to gain access to the screws if we ever need to remove the grill. I don't believe the caps will come out because I needed to use a hammer to install them.The wood outlet cover required a little modification. When I removed it from the package I found out that the back was reinforced with a steel plate. I used a sharp knife to help release the glue (rubber cement) that held the metal plate to the wood cover. R used a pneumatic grinder with a cut off wheel meant for cutting metal, to cut off the excess metal plate. While R was grinding I used the chop saw to trim the wood cover to the correct size.
Here is the wood outlet cover installed. I see I have some sanding and patching to do around the electrical outlet. This is the view as you come into the foyer from the vestibule entrance.
The wood grill looks 100% better than the ugly bent metal cold air return. I still need to fill some holes with wood putty. The base board just around the corner is missing a chunk the size of a half dollar which I will probably fill with epoxy.Here is a side by side comparison. I vote for the wood cold air return. The metal grill has been relegated to the scrap metal pile.

Wednesday, January 27, 2010

What's Taking Soooo Long???

We should have been done with the wood cold air return last Saturday or Sunday, but we both came down with a virus.

Nothing serious and not the flu. R got it first and just as he started to feel better, I started feeling kind of puny. But I think tomorrow is the day we will finish.

This was another of those joint projects. R took care of the floor and creating the opening. I made the baseboard.

The floor part of the project was completed on Friday. But before R could finish the floor we needed to break out the plaster to create an opening so air could be pulled into the cold air return.

We marked the wall with pencil. R used a chisel to break the plaster along the line and then used a small hammer to break out the plaster. After he removed the plaster I cut the wire mesh and removed it from the new opening.After he installed the oak flooring I placed the baseboard (not permanently) in place. I made the base board out of a long 1 X 8 board of poplar I purchased at Home Depot for roughly 22 bucks. Ouch!! I wish we had something in our scrap pile but I needed clear wood that would look good painted and blend with the original baseboard which I believe is clear redwood or fir.

I cut the board to the appropriate length with a 45 degree miter cut on one end and a blunt cut on the other. I then ripped a narrow piece the length of the wood grill we were installing. The grill is actually taller than the baseboard so I needed to increase the width of the baseboard in the area of the grill. I attached the narrow strip using wood glue and biscuits. Gotta love those biscuits, especially with gravy.....wrong biscuits-wrong blog. I purchased this biscuit slot cutter tool on eBay for $19.99 and I buy the biscuits at Home Depot. We have used it on B & G's deck, on the shutters that my Dad and I made for the front of the house, and now to make this base board. We have most certainly gotten our 19 bucks worth out of this tool.

I think a photo will explain better how and why I needed to make the base board the way I did.
After I was finished making the base board I sanded the edges to match the edges of the original trim in the house. All the edges are rounded over, if I left the new wood with the sharp factory edge it would have stood out like a sore thumb. There are several pieces of new trim in the house that I need to replace with popular. Sometime before we bought the house they replaced portions of baseboard with pine that has knots. It does not match and no amount of sanding will correct the knots or keep the grain from showing.

Before anyone asks..... yes, I know the outlet cover will not fit. That is why I purchased a plain wood plate so that I can trim off the bottom. I am planning to use wood outlet and switch plate covers through out the house except in the kitchen. I am hoping that by painting the covers the same color as the walls that they will disappear and blend into the wall.

You might have also have noticed the little square patch in the floor. We believe that is where a radiator was removed when they installed the forced air system. Once the floor is sanded and stained I doubt anyone will notice. Plus, as Norm would say, "It's an honest repair."

I'll admit right now that I am looking forward to finishing this project. R and I have worked on two projects in a row together and I am ready for a solo project. I'm sick of listening to sports radio and as far as I am concerned Jim Rome is the Rush Limbaugh of sports radio. The 'Huge Show' I can handle, but I wish Jim Everett (NFL QB) would have beat the crap out of Rome when he had the chance.

http://www.youtube.com/watch?v=57W05-oopNA

Tuesday, January 19, 2010

Replacing Metal with Wood

This week is filled with appointments and outings so I figured it was best to keep the next project on a smaller scale that doesn't involve any crawling under the house.

Not a thing was accomplished yesterday. I had three appointments and R spent the day working on G's sprint car. Today was similar but without the appointments or working on the sprint car.

We basically picked up all the tools that we ended up carrying down to the basement for the duct redo. It's astonishing how many items were needed to crawl under the house and screw some sheet metal together. We also tidied up the basement for the furnace guy that is scheduled to show up on Thursday.

During the tidy up, we decided to burn some scrap wood that even R determined was not worth saving. That meant it was half rotted, too small, and covered in bent nails. Every time I suggest that we throw out this or that, he will remind me of the the time he had just the right trinket needed to make a repair. He never mentions the hundred times we had to go buy something because we couldn't find the item we were looking for among all of his junk...I mean precious trinkets.

Neither one of us were overly excited about starting another project today so we just prepped the next project location. This entailed a quick run through of what will be needed and how I.....I mean 'we' wanted to do accomplish our next project.

"WHAT'S THE NEXT PROJECT?"

Oh, did I forget to mention it?

Our next project is replacing the ugly metal cold air return in the foyer. When they removed the radiators and installed the forced air system they placed a cold air return right in your sight line when you come into the foyer. We are hoping that we can improve the looks of this cold air return.

We are replacing the very ugly bent metal cold air return register with a wood cold air return. Just like the other duct work that was installed shoddy this cold air return was a hack job just as well. They over cut the opening and what they did cut is ragged. They also removed one section of the base board.The register on the top is what was installed and the wood grill is what we are installing.
We drew some reference lines to see just how crooked the opening is and how much we will need to remove to make it straight and square. The opening will need to be slightly smaller. We will use the same oak flooring that we used to repair the floor elsewhere in the house.

The new wood grill will need some wood added to three sides so that it sits away from the wall to allow for air movement. The grill will also be painted white just like the baseboard.
R found another use for a scrap piece of rigid foam insulation. It works great to kneel on to protect your knees from the hard floor.

He was able to use a chisel to square up one corner and then we called it quits for the day.

Sunday, January 17, 2010

Duct Work Complete + New Tool Purchase

Well almost. We need four 4 inch long screws to permanently secure the plywood. But R was intent on watching *** Favre whoop the Dallas Cowboys (and who could blame him) so the next time he makes a hardware run he will pick up the screws.

This is where we were at when I last posted.We next cut a piece of 2 inch thick pink foam insulation (from the scrap pile) to fit the opening. We used our table saw to cut the insulation. We get a nice edge plus it is the fastest method.We placed it in the opening and pressed the insulation into the ends of the two ducts.
This left an impression.Using a piece of duct that is the same size. We marked the insulation. We cut out the holes using a jig saw after drilling a 1 inch pilot hole for an opening to start cutting.
We ended up with this. We used the cut out insulation as a template to cut out a piece of plywood (from the scrap pile)to fit the opening and the ducts.
We removed the insulation and plywood so that we could install 2 adjustable elbows and then inserted the pink insulation back in place.This left us with a female end on the adjustable elbow and female ends in our remaining spare duct.
We anticipated this problem and purchased crimping pliers to put the ridges on the duct to make it a male end. This tool was just under 15 bucks and can also be used to put the crimped ends on downspouts. The tool does all the work and strength is not needed. Move along overlapping one ridge which will keep your spacing equal.We then moved on to attaching the remaining ducts, making sure to screw and tape each joint.
This is what it looked like after the last duct was installed. We also used strapping to support the ducts.But what about the plywood piece??? We cut the plywood into two pieces before we reinstalled it. We needed to do this because the adjustable elbows needed to be at a slight angle to line up with the existing duct. The pink foam insulation was pliable enough to get over the elbows but the plywood was not.
Here is the finished project. Keep in mind that before this the opening was basically exposed to outside temperature air which kept the basement slightly above freezing in the winter. This also was a freeway for mice, spiders, and whatever else that felt like crawling into the basement.While we were finishing up we noticed another piece of duct that was slightly askew where it attached to a floor register duct. R was unable to install a screw because of the floor joists so we opted for adjusting the duct as best we could and then taping. I can't say enough about the aluminum tape. It is less than 10 dollars for a large roll and easy to install. A quick trip around your furnace while it's running will tell you where you are leaking expensive conditioned (heated or cooled) air. Look for leaks at points where one duct attaches to another. I found numerous leaks along the trunk line because the large rectangular duct is actually made out of 2 L shaped pieces. This yields a lot of seams that could leak.

*** It was a great game and I was cheering for the Purple People Eaters (Vikings) to beat the Dallas Cowboys. Rarely will a person from Michigan cheer for a Minnesota team (never for the Twins!!!) but today was a rare occasion. So until the end of football season, the occupants of Gear Acres are Minnesota Vikings fans. Damn that was hard to say...but not as hard as this......

Gooooooo Vikings!!!!!

Thursday, January 14, 2010

Back Under the House, One Last Time

We are keeping our fingers crossed that today was the last time R will need to crawl under that portion of the house.

Today ended with the heat ducts peaking out of the opening that leads to the crawl space under the family room/library.Before anyone asks....no we did not do that hack job on the floor joist. That fine piece of work was done by the same people who installed the plastic flexible duct that fell off the registers and then proceeded to rot away. We will attempt to add bracing before we close the opening.

We made sure all sections of duct were attached to one another with 3 sheet metal screws and then wrapped with aluminum tape to ensure that none of the precious heated air leaks into the unheated crawl space.

Here is a photo of R taping one of the last seams in the crawl space.Notice the dirt on R's hand and sleeve. All the dirt in the crawl space is clay and the top layer is like pulverized clay. So unfortunately as he crawls around he is also putting up a dust cloud that he then has to breathe. As he was backing his way out of the crawl space he doubled checked to make sure he didn't leave anything behind because he doesn't want to go back into the crawl space again.

Tomorrow we start attaching the old heat ducts to the new heat ducts. A mere 2 1/2 to 3 feet but somehow I think this will take us all day and I predict at least one trip to Home Depot.
After the heat ducts are attached we will close off the opening to keep cold air from entering into the basement. Can you believe that they just left it open? No wonder their heating bills were huge during the winter.

After we bought the house we found out their utility bills ran about $800 during the winter. Well of course, not only were heat ducts not attached to the registers, the plastic duct were also ripped or torn, but the renters had something plugged into every outlet in the house. Some outlets had 3 or 4 cords plugged into them. I told R that the wiring must be OK or they would have burned down the house by the time we did our first walk through.

Sunday, January 10, 2010

Vehicle Remote Battery Update & Glidden Paint Rebate

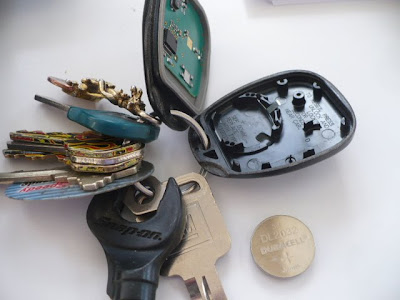
I had a small list of errands that I needed to run today so I nabbed a replacement battery for my vehicle remote.

I couldn't find a Duracell battery coupon to save my soul. Usually they are everywhere. My coupon stash was filled to the gill with Energizer coupons but not one single solitary Duracell coupon.A double pack (2) was priced at $3.99 and a single battery pack was $3.29. So it was a no brainer as to which pack to buy. I swapped out the battery in my remote with a new battery and placed the extra battery in my wallet.

The remote works great. It now locks and unlocks at a further distance. Plus it seems to work the first time you press the button, unlike before battery swap, when I would need to press several times before activation.

The almost dead battery went into my dead battery pile. Make sure you recycle your batteries. I am always surprised by the number of batteries we use in our gadgets. I wish more items came with built in solar panels. If my calculator can get by with a little solar collector why can't remotes, cell phones, and cameras have them?FYI.....if you are in need of windshield wash fluid now is the time to buy a couple of bottles. Walgreens is currently running a sale on their Peak Windshield Wash and Deicer. First clip the coupon for the wash out of the weekly ad. By using this coupon you can purchase 2 bottles for $1.29 each. I recently saw a local gas station selling a generic brand for $2.99.

Upcoming paint deal at Home Depot.......Stop by Home Depot between January 14th and January 18th and save $5 off a one-gallon can or $20 off a five-gallon pail of any color of Glidden™ paint with a mail-in rebate.

https://www.glidden.com/pdf/promotions/mlk_promo_jan_2010.pdf

Saturday, January 9, 2010

Laser Light Show & Vehicle Maintenance Tip

Last night R and I went back in time. Figuratively not literally. We attended the laser light show at the Longway Planetarium in the cultural center in Flint.The laser light show changes weekly and this week we saw the Jimi Hendrix and Led Zeppelin shows. It was great to hear all the old classic Hendrix tunes such as Voodoo Child, Cross Town Traffic, Purple Haze, Foxey Lady, and Are you Experienced?

A little trivia about Flint and Jimi Hendrix. Jimi Hendrix opened for The Monkees back in the late 60's at Flint's IMA Auditorium. Can you imagine what people who bought tickets to see The Monkees thought? They came to hear I'm a Believer and instead heard Foxey Lady. I just can't imagine who put together that pairing on the same bill.The IMA (Industrial Mutual Association) Auditorium was built in 1929. It was later incorporated into the failed AutoWorld project and eventually tore down. The land is now in use by University of Michigan Flint.The laser light show admission is quite reasonable at $5.00 a show or $8.00 for both shows for an adult. R and I opted for another deal which is an annual pass for 1 adult and 1 guest for 40.00. This pass will allow us to go to every event at the planetarium plus the Sloan Museum, The Buick Gallery and Research Center, and numerous (+250) other museums.

R wants to go to the presentation at the planetarium on Saturday called What Happened to Pluto. Pluto the planet not the Disney dog. It's rated for 5 years old and up so we should be able to understand it if we take a nap first.Vehicle Maintenance Tip....By the time we left the planetarium it was about 5 degrees when we walked to my tracker. I always use my remote key to unlock my vehicle doors. I have noticed lately that I need to get closer and closer to my vehicle so that the doors unlock. Last night the doors would not open. I'm sure you are saying "no big deal.....use the key." I would have but since I only use my remote, my key no longer will go into the door lock because of the salt and dirt that over the last five years have made their way into the lock.

To prevent this from happening to you. Periodically use your key to unlock your door. Better yet, spray your key with a little 3 in 1 oil and then insert the key. I currently cannot get my key to even begin to go into the key hole. If you live in an area where they salt the roads your driver's side door lock will see a lot of salt spray, both from your own tires but also from the vehicles passing you on the opposite side of the road.

You may want to activate your emergency brakes at the this time. This action will keep the cable lubricated and free. Failure to use your emergency brakes will eventually render them inoperative. Kill two birds with one stone. You can even yell "Key! Check! Brakes! Check!" just like at the oil change place. Just remember to release your emergency brake before you take off.

Also periodically change your remote battery. Do not wait until it no longer works. Last month Rite Aid drug store offered a rebate on any type of Duracell battery. I could have paired that with a coupon for maximum savings, but because my remote key was the last thing from my mind, I let that offer pass. Buying a replacement battery for your key remote is always the last thing on my mind until it doesn't work.I think I will run out and grab a battery or two and replace it before I get stranded somewhere. I'll place the extra battery in my wallet if I can find a double battery pack. Cheap insurance against getting stranded alone and in the cold.

My particular remote says to replace battery and reset the remote by pressing unlock and lock for seven seconds while near the car.

FYI....I ultimately got the remote key to unlock the doors but it was a tense couple of minutes.

Friday, January 8, 2010

Power Lines and Tree Trimming in Grand Blanc Township

First off let me just say, I understand the need for the trees to be trimmed to keep the current, cable, and telephone flowing uninterrupted. But there is absolutely no need to needlessly cut down large trees nor to trim large trees so that their structural integrity is compromised with an end result being a large dead tree.

Our energy provider is Consumers Energy and they are currently trimming trees around the power lines in our area. We knew this was coming because we received a letter about six months ago stating that they would be marking trees for removal and trimming. Four months ago they marked the trees. No problem either, the trees marked were the ones I thought should be trimmed or removed.

As a matter of fact, I was disappointed that they were just trimming an elm tree that was completely tangled around a utility pole and into the wires. I was ecstatic that they were going to remove several dead ash trees because we were planning on hiring Precision Tree Care to come back and cut them down. So this saved us a minimum of $250 a tree. Last year we paid $250 to have a dead elm cut down that was under the power lines and would have been removed this week.

The tree trimming company that was subcontracted to take care of tree trimming is Davey Tree Trimming. They have an arborist who marks the trees and oversees the trimming. Two days ago Davey Tree Trimming shows up and proceeds to trim a very large old pine that was not marked for trimming. They not only trim it but they over trim it. Conifers do not grow like deciduous trees. This tree had been trimmed about 8 years ago and had not grown back even an inch into the precious 10 feet zone. They broke interior branches by stepping on smaller limbs for support and they dropped the cut branches on my small rhododendrons.

My husband arrives home just as they finish the trimming on the pine. He asked them why they trimmed a tree that was not marked. The trimmer replied, "I'll cut it to the ground if I want to." When R tells me this I shoot a quick email to the Grand Blanc Township Supervisor Micki Hoffman. FYI....three days later I am still waiting for a reply. I then called the arborist who tells me that they should not have trimmed a tree that he had not marked and that "no, they do not have the authority to cut down a tree if he felt like it."

The next day the remaining trimming is completed under our constant watch. They were not happy with us standing around watching them. They prefer to hack and whack rather than trim as they were being forced to do.

R estimates we have at least a week's worth of clean up to do in the spring. He spent yesterday hauling wood away. If we were an elderly couple we would have had to hire this work done. Consumers Energy states that the wood would be cut into manageable pieces and stacked. Does this look like manageable pieces and stacked? R used his chainsaw to cut the large trunks into somewhat manageable pieces. Some were so big that he had to just drag the trunk pieces with a chain behind the lawn tractor to get them to the wood pile. This took at least 5-6 hours and was back breaking heavy work in 21 degree weather.
In the backyard we have a very large yew bush. Above the yew was a black walnut tree that needed to be trimmed. The trimmers hacked and whacked and dropped large chunks of limbs into the yew bush. The entire center of the bush is destroyed.The trimmers stepped on my hydrangeas and dragged their feet through all my hostas. They hit my fruit trees with the brush they were moving from the backyard to the front yard so it could be shredded. I just kept telling myself the damage would have been worse if we were not standing there watching their every move.

I will also have to wait until the snow melts to check for damage to our asphalt driveway. While they were removing the dead trees near our driveway I noticed that they were dropping the large limbs, cut end first from the cherry picker onto our driveway. I am hoping that we do not have any gouge marks on our driveway since we just spent $2300 having it sealed last summer.
I swear.....it's two steps forward...one step back. I am just glad it snowed last night so now the mess is covered up and I don't have to look at it.