Tuesday, July 31, 2018

Other Places to Use Solar Landscaping Lights

 Landscape lights can highlight a feature such as decorative brickwork or an ornamental tree.  It can lead your guests to the front door or keep away burglars. It can be very subtle or a flood light washing an entire wall with light.  The only limit is your imagination.

I really like landscape lighting but I don't like to pay for the electricity for those lights.  So I tried the regular solar lights several years ago and was not impressed.  Since then they have come out with solar LED lights and WOW what a difference.  BUT they were rather pricey BUT that has changed and now solar LED lights are not only brighter but less expensive.

 Right now is the time to buy your solar LED lights because most stores have them marked down on their summer clearances.  I picked up an assortment of sizes, styles, and lumens the other day while shopping for lily bulbs that were on sale.

Lumens?  Lumens equal light output.  The brighter the light, the higher the lumens.  The higher the lumens the higher the price will be for that solar LED light.
  
Sometimes you may not want to have a BRIGHT light such as in your flower pots or windows boxes.  I placed a small low lumen solar LED light ($2.59) in a potted geranium and love the slight glow that it emits when the sun went down.
See the solar light tucked in between the flowers.

So that got me thinking......why not put solar LED lights in my window boxes?  And so I did and loooovvveee it.  Window boxes are the perfect place for low lumen solar LED lights.  My house now has a little glow in front of each of the front windows.
I so need to dead head my flowers.

Does the light shine into the house? No, the lumens are low and I placed the light in front of the flowers so the light coming out of the back of the light is somewhat obscured by the flowers. The flowers also give the light a more dappled effect.

Tomorrow I am going to put a few higher lumen solar LED lights in the flower pots by my front door.  Those pots are larger so I can use the larger sized lights that have a higher lumen without the lights overpowering the flowers. You cannot even see the lights unless you know where to look.

Oh I just had a LED light bulb turn on over my head.  I usually add evergreen branches to my window boxes in the winter.  Wouldn't it look great with solar lights, evergreen branches, and snow?

Where would you put a solar LED light?

Reuse Repurpose Recycle

Don't forget to follow Gear Acres on

Pinterest

Wednesday, July 25, 2018

Moving Pavers and Making a Lumber List

Some tasks are interesting and other are just plain old boring.  Today's task was boring but it will lead to a more interesting task down the road. 
We want to remove that old flood light, strip off the old yellow paint, paint it dark grey with white trim to match the house, and install two vintage casement windows where the loft doors are located but first......
....all this stuff has to go somewhere else so we can place a ladder against the barn.  
The pavers were given to me and I plan to use them as the floor for my little greenhouse when I finally buy one.  But until then, we will stack them on pallets behind the barn.

All the garden implements need to go back inside the barn.  We have been lax and have just gotten into the habit of leaning them against the stacks of pavers.  There must be 3 snow shovels in that mess and lets hope we won't be needing those for a while.
The vintage casement windows that I bought a couple of years ago will go in the opening for the loft doors.  We will need to make the opening smaller to accommodate these vintage windows.  The original trim around the loft doors will remain in place but we will make the opening smaller and trim it out so that the existing trim looks wider.  According to my rough calculations we will need to narrow the opening 3 inches on each side and bring the sill up about 4 inches. I will finish up my lumber list after R moves old race car parts that he has stored in front of the loft window.  I currently can't get close enough to measure, so my lumber list is more a guesstimate.
I also want to add a window box to this opening just like the window boxes that we have on the house.

But first we need to move the pavers.  Today we moved one stack before we ran out of energy and our hands were so sore that we couldn't pick up any more pavers.  I was the stacker and R loaded up the pavers into wheelbarrows and brought them to me. 

It totally ruined my manicure, too.

Reuse Repurpose Recycle

Don't forget to follow Gear Acres on

Pinterest

Friday, July 20, 2018

The Power of Paint

One hot day several years ago, an insurance rep showed up at our home unannounced and told us to tear down this garden shed.
No can do because our well pressure tank lives in the basement of this shed.  So we needed to make this look good pronto and paint is the fastest way to bring new life to an old life.

One gallon of primer, 2 gallons of Behr exterior satin in Anonymous, one gallon of Behr exterior semi gloss in Ultra White, and a dry weekend to paint and we ended up with this.
We added some very inexpensive to no expense extras to make this garden shed stand out and be the asset that it is right now.

Two doors free off of Craigslist (actually got 6 but saving the 4 others for future improvements elsewhere).

Faux black hinges were free and made out of thin Hardi Board clapboards scraps found in someone's trash.

Black wrought iron Woodard chair found in the trash.

White shutters made from leftover scraps from when we made the shutters for the house.

Purchased concrete pot for $79 and black ceramic pot for $4.99.

The metal pot hangers were $7.99 each on sale at Kmart.

Bunny pot feet were purchased off of eBay, for $99.95 for two sets.

Concrete bird bath top for $49.00 but the statue and base were given to me by a friend.

3 gallons of Behr paint was $37.00 each

1 gallon of primer $20.98

Misc small hosta plants $200.00

Total $530.89

The hostas were pricey because they were ordered online and are rarer varieties than ones found in the stores.

Reuse Repurpose Recycle

Sunday, July 15, 2018

Purchased a Coca Cola Bench

...and I know what you are thinking...."another bench?"  I thought the same thing but this bench is different.  What do you think?
Need a closer look?
This isn't a new bench nor is it a reproduction of an old bench.  Instead this is a bench cast to look like an antique.  I doubt if an antique version of this bench ever existed.  It's a little froo froo for my taste but yet I am looking forward to painting it.  If anyone runs across a photo of one of these benches that is painted, please pass it along because there are just so many elements that need to be painted.
The bench itself is narrower than a traditional park bench but still sits two people quite cozy.  This is perfect for a smaller porch. 
First off we will need to disassemble.  Just like the last bench, the bolts will need to be cut off because they are very rusty.  The slats are actually 2X4's and there are only 3 of them.  So that will keep the cost down.
Next on the list is for R to grind out all of the excess flash and smooth out some of the grind marks where they quickly tried to smooth the seams.


There are some areas of porosity and even a larger spot where there is missing metal in the field of the cameo on the left side.  I proposed to fill in the small pin holes and the missing metal in the cameo with JB Weld or Certanium.  But we will wait until we are ready to paint and see if the holes really show up.

The metal bench parts are pot metal and not cast iron or cast aluminum.  Pot metal is mostly zinc but also has tin, lead, and even copper added.  It is common for pot metal to have pits from small holes to large holes.  This is caused from air getting trapped in the mold when the metal is cast.
It was hot today.  We picked up the bench at 10am and had hoped to finish top dressing the hosta bed around the garden shed.  But it was just too hot.  So we watered the pots and stayed in the shade doing nothing but drinking water.  Some days it is best to do nothing and nothing we did.

Reuse Repurpose Recycle

Monday, July 9, 2018

Cast Iron Bench Reveal

We have had two of the most beautiful days.  High 70's to low 80's with a slight breeze and low humidity.  What I would give to have that weather most of the year.  I can't imagine how much work we could get done.

Previous bench posts


Today we finished the bench and the little table.  I am going to wait to paint the wood slats because we need to move onto a few other projects along with the fact that we have yet to come to an agreement on color.  R says dark grey to match the house and I say satin black to make the entire piece look like cast iron.   
Here is a before photo just in case you forgot.
 Today R countersunk the bolt heads and rounded over the edge of the slats with the router and a round over bit.
 You can see I still need to sand the wood.  Furry edges everywhere.

Use washers or lock washers on your bolts to keep them tight.  R says he is going to switch to lock washers when we take the bench apart to paint the slats.
 What would a project at Gear Acres be if it didn't have a coffee stain on it.
We love how the bench and side table look.
 The table is a perfect place to sit your coffee......ahem......not on the bench.  The table was such a surprise and I am so happy that I bought the legs for 5 bucks before I even knew what they were for or why or when I would use them.  I just liked them and went with my gut feeling.  I am so happy that my gut remembered that I stashed them in the garden shed.
Here are a few tips if you decide to find yourself a pair of cast iron bench ends to make yourself a bench.

Before purchasing make sure that you know whether your back has a cast iron insert or uses just slats.  If it requires just slats, it will have more than two bolt holes on each side of the back.  This will determine if buying bench ends without the required insert is something you want to do because you will need to fabricate a wood insert to replace the missing cast iron insert.  You will need to make the frame like we did but instead you will add slats in the open area and they must be glued and biscuit joined.  No pocket screws because it would show from the back. 

Before painting your cast iron, use a Dremel or small grinder to grind away excess cast iron flashing (see previous post).  This is fairly easy and not time consuming but it will give your cast iron a nice finish and less likely to look like a cheap overseas casting.

  Antique and vintage cast iron is flawless.  You never see seams or grind marks.  Those are tell tale signs of a repo on cast iron banks, too.  My father was a journeyman mold maker and he always said some of the best casting can be found in Legos and vintage Tupperware.  Next time you step on a Lego while barefoot give it a quick look and I dare you to see a seam anywhere.

Prep well.  Remove all dirt and rust before painting. 

Do not use semi gloss or a high gloss finish.  It is too shiny and garish.  Vintage cast iron had a muted shine that is found with a satin finish.

Countersink all your bolt heads.  No one wants to get their clothes snagged on your bench or sit on a hard bolt head.  Plus, it looks more finished and takes very little time.

Do not use pine.  If you are going to take the time to refinish do not use a board that will not last.  Also, do not use a clear coat if you stain the wood.  Most of these benches came with oak slats that were clear coated.  Looks nice the first year and then the clear coat cracks and lifts allowing water to get under it, stain the wood, and ultimately rot the wood.  If you stain use a penetrating sealer and not a varnish or poly coating.

We used poplar because it gives a nice painted finish and our 9 year old board and batten shutters look as good as the day we hung them and they are made of poplar.  I like to use two coats of a good primer and really work it into the end grain. Then top off with two light coats of a top coat.

Most certainly pick up any cast iron bench ends that your find at the curb.  We know we have a cast iron insert in the barn somewhere that R picked up from the curb.  R is now chomping at the bit to do another bench especially if we find bench ends for 25 bucks and they can be found for that price, just be patience.

Final Cost

Bench pieces $40
Short leg pieces $5
3 cans of satin black spray paint $9
5 nine foot poplar 1X3 boards $62.96
Misc screws, bolts, washers, and nuts $11.50
$128.46

Reuse Repurpose Recycle

Wednesday, July 4, 2018

Progress on Cast Iron Bench

  I feel like I keep repeating myself but gawd was it hot today.  We had a brief downpour that caused the humidity to go through the roof.
 I don't know what we would have done had we not had this fan.

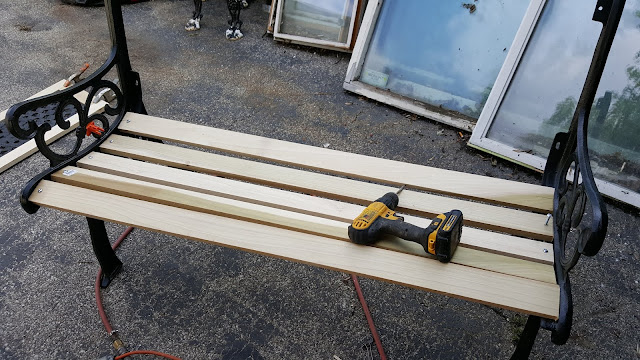
The bench progress started with the back portion because of the cast iron insert.  Once we framed out the insert, this set what the width of the bench would be when completed.

The frame around the back insert will be biscuit joined and glued.  Once they are dry, we will run the router around the outside edge with the round over bit.
We cut the slats for the seat portion.  They will also have the router with a round over bit used around the top side 4 edges.  This will make sitting on the bench a little more comfortable. 
I originally thought about painting the wood in the same grey as the house but now I think I am going to paint the wood in a black satin the same color as the cast iron.  I hope that this will make it look like a full cast iron/metal bench.  I was concerned that painting it grey would make it too country or busy looking.  R votes for dark grey.  Hmmmm this could be a battle.
After cutting all these wood pieces we had one 9 foot 1x3 poplar board left from the five that we purchased.  I needed 5 slats for the small table that we will make out of the short cast iron legs that I purchased for 5 bucks many many years ago.  I came up with the length by dividing my board into 5 pieces and rounding down to the closest whole number because it was just too hot to deal with fractions.

9 feet = 108 inches
108 inches divided by 5 = 21.6 inches

So we cut 5 boards at 21 inches and called it a day.

Cost as of 7-4-18

Bench pieces $40
Short leg pieces $5
3 cans of satin black spray paint $9
5 nine foot poplar 1X3 boards $62.96
Misc screws, bolts, washers, and nuts $11.50
$128.46

I asked R how much did he spent on screws, bolts etc. and he said "I know exactly how much I spent.  It was 11 something."
Exactly, you say?

Reuse Repurpose Recycle

Don't forget to follow Gear Acres on

Pinterest

Monday, July 2, 2018

Forgotten Cast Iron Bench Ends

Have you ever bought something and then put it away only to forget about it for years?  I have and yesterday I remembered.  I remembered not only buying them for 5 bucks but I remembered where I put them.  That is truly amazing......the remembering where I put them, not that I got them for a fiver.
The cast iron ends are low so I don't think it makes a bench.  Maybe it is a side table?  Or a low coffee table?  Who knows but when I bought them I just knew I could use them because I love wrought iron and cast iron.  

The casting is very similar to the bench that I picked up last week. Once they were painted you would think they were always a set.  That's the power of paint.  You can take like objects and with the application of a unifying coat of paint on all the pieces, they instantly become a set or a collection. 
Morrie said "You should see all the stuff she has hidden in the barn. Humans are a strange lot.  They are always painting or stripping something.  It's best if I keep my distance and sleep until the human leaves and returns with a bag of food."
Reuse Repurpose Recycle

Don't forget to follow Gear Acres on

Pinterest