Here we are just one week into the official winter season and it was 50 degrees at 5:35 in the evening. We decided to use this unseasonably warm weather to get an early start on raking out the flower beds.
Today was a rather odd day. Although it was warm by winter standards it was still a little crisp. Had the sun been able to peek through the thick clouds we might have had a stellar day. The clouds were so thick that it appeared to be twilight all afternoon.
We were able to get the flower bed in front of the living room raked out and all the perennials cut back. If the weather is rake worthy on Sunday we will continue around the north side and clear out the hosta beds around the sun room.
Early Saturday before we raked we changed out the magnetic weatherstripping on two doors at the Torrey Rd house. Each door cost $17.95 to R&R (remove and replace) the weather stripping. The magnetic weatherstripping was ineffective because of age. The old pieces were compressed and no longer blocked the cold air from coming into the house.
R also R&R the dryer vent. I purchased a unique dryer vent that is suppose to block the cold air from coming into your dryer and extending drying time and cooling off the laundry room. I'll do a blog post once I have had a chance to check out it's performance. In theory it should work great but I want to see for myself before I say anything.
I hope everyone had a great Christmas. I know, I did. Lots and lots of good food. Seriously, I can hardly move. Too many goodies. My sister out did herself in the cooking/baking category this year.
Sunday, December 28, 2014
Sunday, December 21, 2014
Monogrammed Snowflake Wreath
There were two things that I wanted to accomplish with my large wreath. #1 was that any embellishment on the wreath must be able to be seen from the road. Our house sits back from the road and any small doo dads like pine cones and bows cannot be seen. #2 it couldn't be just a Christmas or holiday wreath. The wreath had to work until the weather changed. So it had to be a winter wreath.
So in a nut shell....I needed something big and wintery like a big snowflake. But I didn't know I wanted a snowflake until I saw this one.
 What I knew I wanted was a monogram. A big old "H". So I went surfing the web for a large wood cut out of an H and landed at Unfinished Wood Co. I found this snowflake H when I searched their selection of seasonal monograms. I knew the moment I saw it that it would be perfect. For directions to making the evergreen wreath, go here.
 The snowflake arrived within 3 weeks unpainted but ready to paint. I used a emery board for acrylic nails to soften the sharp edges but that step is not needed. I then drilled a small hole at the top so I could thread a length of wire through it to attach the snowflake to the wreath.
 I brushed on three coats of white craft paint using a flat artist brush. If I was to do this again I would spray paint this snowflake because of all the little tight spots and inside corners that were really difficult to paint. I also painted both the front and back because this was hanging on the outside of my living room window and would be seen from inside of the house.
 The snowflake is large enough to be seen from the road and then there is the added surprise of when you get close enough you can see the monogram.
 I love this wreath because it will work well throughout the winter. So often by the time Christmas arrives we are already burned out on the decorations. So many stores and businesses decorate for the holidays sooooooo early that we are really ready for a decoration break by January. This snowflake and wreath are simple yet bold without a lot of busy sparkly design that scream DECEMBER. Another plus is that it is reusable not only in this application but can be used alone on the front door or even indoors. Maybe next year I will add a little glass glitter to make it sparkle like snow.
So in a nut shell....I needed something big and wintery like a big snowflake. But I didn't know I wanted a snowflake until I saw this one.
Sunday, December 7, 2014
Making Wreaths and Adding Greens to the Window Boxes
This last week I assembled a large wreath with pine boughs which I will use in the living room window and a small diamond shape wreath that I made for the small window in the front door.
Both wreaths were basically assembled in the same manner but because I used different types of greens the end result looks very different. For the large wreath, I used very floppy long needle pine with the still attached small pine cones. Using this type of pine will give you a more relaxed casual wreath.
The small diamond shape wreath was made with spruce cuttings and this gives a denser thicker more traditional wreath. I had limited available space around the window on the door so this worked perfect.
Once you buy your wreath frames, the yearly cost for making wreaths will be zero as long as you do not need to buy cuttings. In addition to the frame, you will need a paddle of floral wire. I buy green but it also comes in silver.

I cut all my greens to around 8-10 inches before I even start. This will make your wreath making go faster. If you cut your clippings to size one day and assemble the next day, make sure you store your clippings in a closed plastic bag stored outside. Warm, dry air is a no no for wreaths....ask my sister. Our first year of wreath making we made A LOT of wreaths. She made some beautiful blue spruce wreaths that she hung inside her house. Within days it was raining needles every where. So even though they look fabulous inside they are really best to use outside.
You'll need a flat surface at least a little bigger than your frame. Attach your wire to your frame....anywhere.

In your hand assemble 2 or three cuttings and place it either to the outside edge or the inside edge and wrap the wire around the greens and the frame. Now repeat the process on the remaining side. Now place your next greens over the bottoms of the previous cuttings to cover the cut ends. Repeat this process around the entire frame.


You can work in a clockwise or counterclockwise manner. Whichever works best for you. The first couple of rows will be the most difficult and slowest. Once you get your rhythm it will go faster. Do not try and be perfect. If after you are done and you find you have a few 'wild hairs' just clip them.


To hang your wreath I use a large heavy duty plastic suction cup on my windows and a little brass nail for the wreath on the door. It's also easier to add your bow and decorations before you hang your wreath. In the past I have added pine cones, bows, and small feathered birds (Michaels). White bows and white doves or red bows and red cardinals are some of my favs. There also peacocks which would look great with ribbon that looks like peacock feathers.

I've already hung my big wreath before I finished decorating it because I wasn't done painting the decoration that I am adding. My leftover greens were added to the window box. Remember to save your ribbon spools so that you can store your ribbon after you take down your wreaths. I just unwire the ribbon and roll it back on to the spool. This saves space and keeps the ribbon from getting crinkled. I need to reposition the bow on the front door wreath. The wind was blowing quite briskly and now my bow looks like a wreath hat.

Both wreaths were basically assembled in the same manner but because I used different types of greens the end result looks very different. For the large wreath, I used very floppy long needle pine with the still attached small pine cones. Using this type of pine will give you a more relaxed casual wreath.
The small diamond shape wreath was made with spruce cuttings and this gives a denser thicker more traditional wreath. I had limited available space around the window on the door so this worked perfect.
Once you buy your wreath frames, the yearly cost for making wreaths will be zero as long as you do not need to buy cuttings. In addition to the frame, you will need a paddle of floral wire. I buy green but it also comes in silver.
I cut all my greens to around 8-10 inches before I even start. This will make your wreath making go faster. If you cut your clippings to size one day and assemble the next day, make sure you store your clippings in a closed plastic bag stored outside. Warm, dry air is a no no for wreaths....ask my sister. Our first year of wreath making we made A LOT of wreaths. She made some beautiful blue spruce wreaths that she hung inside her house. Within days it was raining needles every where. So even though they look fabulous inside they are really best to use outside.
You'll need a flat surface at least a little bigger than your frame. Attach your wire to your frame....anywhere.
In your hand assemble 2 or three cuttings and place it either to the outside edge or the inside edge and wrap the wire around the greens and the frame. Now repeat the process on the remaining side. Now place your next greens over the bottoms of the previous cuttings to cover the cut ends. Repeat this process around the entire frame.
You can work in a clockwise or counterclockwise manner. Whichever works best for you. The first couple of rows will be the most difficult and slowest. Once you get your rhythm it will go faster. Do not try and be perfect. If after you are done and you find you have a few 'wild hairs' just clip them.
To hang your wreath I use a large heavy duty plastic suction cup on my windows and a little brass nail for the wreath on the door. It's also easier to add your bow and decorations before you hang your wreath. In the past I have added pine cones, bows, and small feathered birds (Michaels). White bows and white doves or red bows and red cardinals are some of my favs. There also peacocks which would look great with ribbon that looks like peacock feathers.
I've already hung my big wreath before I finished decorating it because I wasn't done painting the decoration that I am adding. My leftover greens were added to the window box. Remember to save your ribbon spools so that you can store your ribbon after you take down your wreaths. I just unwire the ribbon and roll it back on to the spool. This saves space and keeps the ribbon from getting crinkled. I need to reposition the bow on the front door wreath. The wind was blowing quite briskly and now my bow looks like a wreath hat.
Why are my photos always so crooked? It has to be the camera.
Thursday, December 4, 2014
A New Bee Hive for Gear Acres
Yesterday we received the new bee hive in the mail that I ordered several months ago off of eBay.
This bee hive is slightly different than the one we already have here at The Gear. This one is a narrower hive that has 5 frames in each box rather than 10 frames making the hive perfect for smaller yards or for the person with lifting limitations. Each box when filled with honey, should weigh roughly half of what a regular 10 frame box would weigh.
Our intention is to place this hive in the center of a flower bed on the far north side of the yard. I've seen these hives painted up in fun bright combinations and I want to give that a try. During the winter I will sand and prime the hive. I have contemplated on painting it black and then paint white lattice on it with vines and flowers growing on the lattice. But.....and you know there is always a but....I am just not a very good artist. So I am still in the planning phase.
Here is what the new hive looks like fully assembled. Notice how it is narrower than a tradition 10 frame hive.

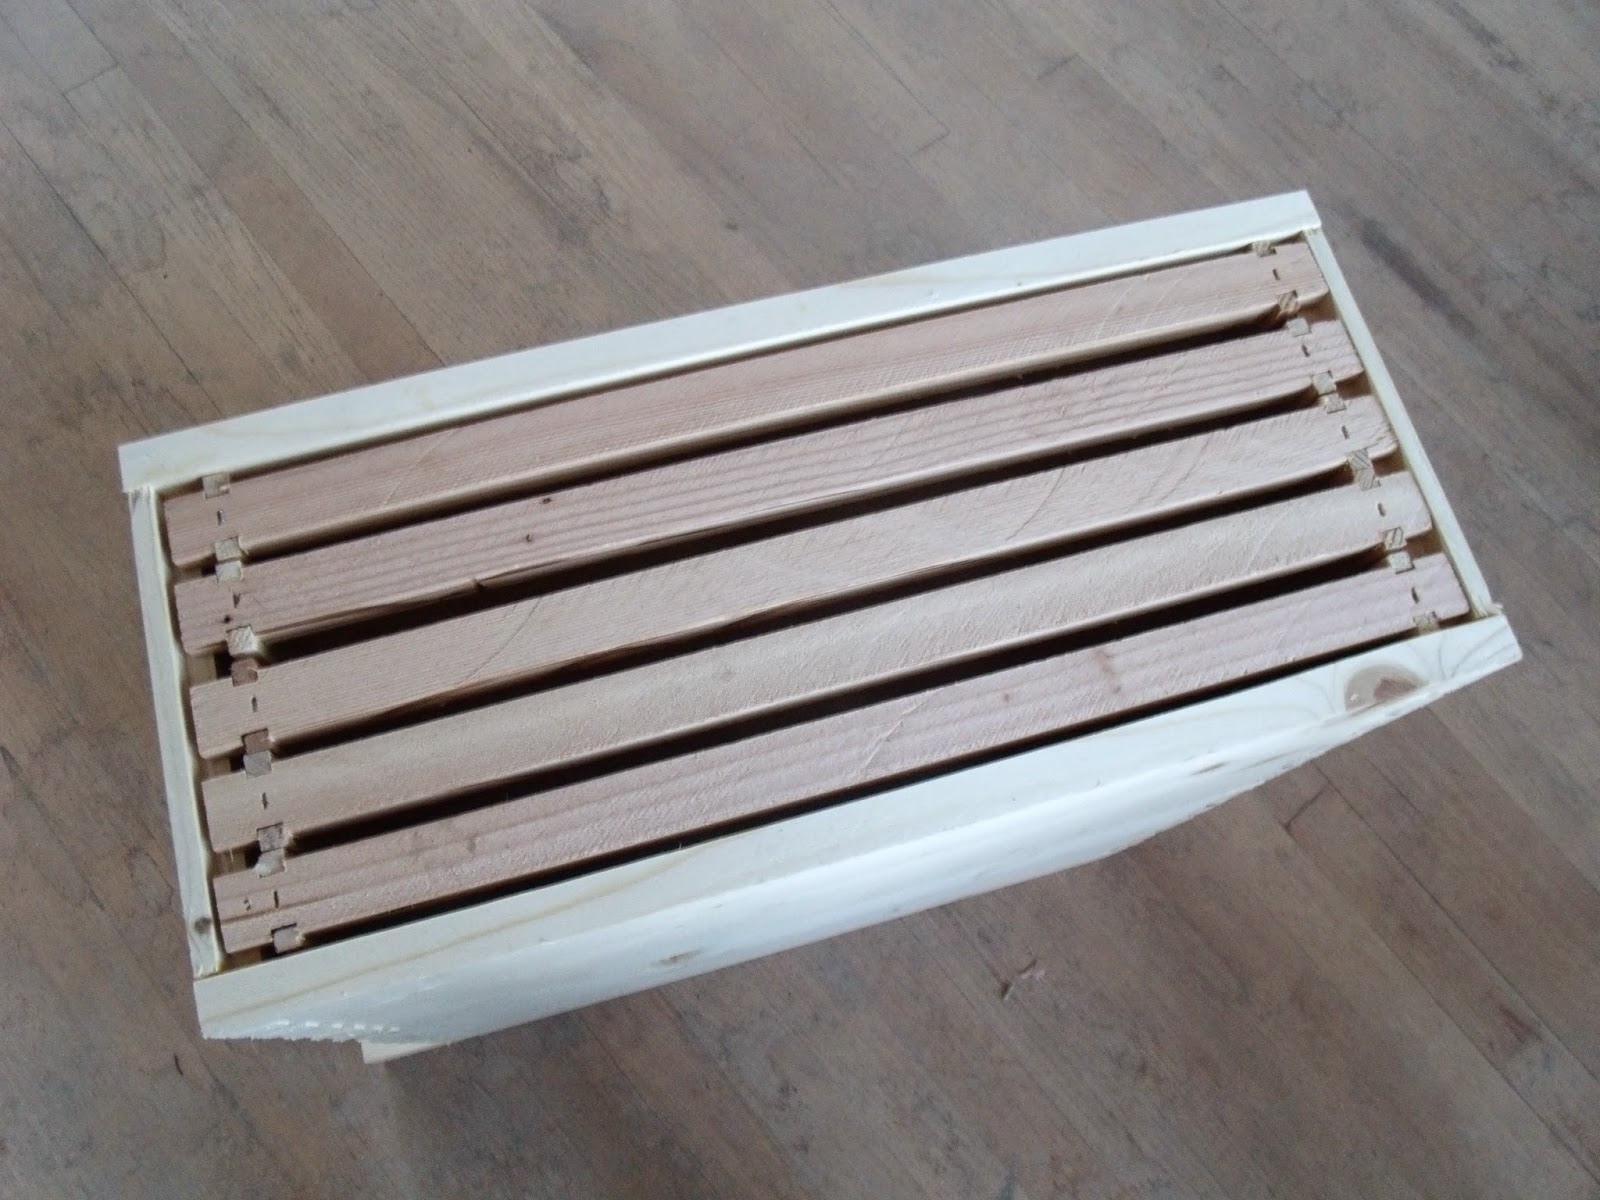

 And this is the spring and fall position or the winter position if the winter climate is milder than in the north.
 This screen piece is called a queen excluder. You place it between the brooder boxes, which are usually your two deep bottom boxes and the upper boxes. This keeps the queen in the bottom two boxes. Why keep the queen in the bottom two boxes? She lays eggs and larva is developing and you do not want that in the boxes where you will be taking the honey. The queen is larger than the rest of the bees and she cannot make it through the screen. The rest of the honey bees come and go through the screen without any problems.
 This is the inside cover and it goes on the hive before the roof.
 If you look at the first photo you can see the queen excluder and the roof.
As soon as the seller starts listing more hives I will let everyone know. The hive was packaged well and the construction of the hive was very nice. Of course we will do a little sanding before we prime it but that is to be expected. If you want to buy a hive for the upcoming summer, make sure you do it early enough so that you can prime and paint it.
Here is an interesting bee fact. Next time you put a teaspoon of honey in your tea or coffee give this fact a little thought.

This bee hive is slightly different than the one we already have here at The Gear. This one is a narrower hive that has 5 frames in each box rather than 10 frames making the hive perfect for smaller yards or for the person with lifting limitations. Each box when filled with honey, should weigh roughly half of what a regular 10 frame box would weigh.
Our intention is to place this hive in the center of a flower bed on the far north side of the yard. I've seen these hives painted up in fun bright combinations and I want to give that a try. During the winter I will sand and prime the hive. I have contemplated on painting it black and then paint white lattice on it with vines and flowers growing on the lattice. But.....and you know there is always a but....I am just not a very good artist. So I am still in the planning phase.
Here is what the new hive looks like fully assembled. Notice how it is narrower than a tradition 10 frame hive.
See the opening or entrance to the hive? This is how it is normally and the bees can come and go across the entire opening.
This is all well and good in areas where the climate is mild but here in the north where we can have brutal temps during the winter, it helps to reduce the area where cold air can enter the hive. This is especially important if your hive is located in a windy area. This hive came with a little gadget that restricts the size of the entrance. You place this piece of wood in the entrance and depending on how you have it oriented, it will vary the amount of air that can enter the hive. See the little square opening on the right? This would be the winter opening.
As soon as the seller starts listing more hives I will let everyone know. The hive was packaged well and the construction of the hive was very nice. Of course we will do a little sanding before we prime it but that is to be expected. If you want to buy a hive for the upcoming summer, make sure you do it early enough so that you can prime and paint it.
Here is an interesting bee fact. Next time you put a teaspoon of honey in your tea or coffee give this fact a little thought.
Wednesday, December 3, 2014
Evergreens for the window box and flower pot
The holidays are right around the corner and I am already behind. I'm not even going to attempt an excuse...LOL
On to what we have accomplished.....even if it was a little late.
My sister always spends most of the month of November in the U.P. (upper peninsula) so when she wasn't cooking she went outside and cut two huge bags of evergreen boughs for me. I need them for my window box, large flower pot, and to make wreaths.

I first cut the boughs into 8 or 10 inch lengths but left a few longer ones for the large flower pot. The weather was brutal. The wind was blowing and the wind chill must have been in the low teens. I was about halfway through putting greens in the window box when I could no longer feel my fingers. It was sunny but brutal......brrrrrrrrr.

 I added some fake white silk poinsettias which really made the white trim on the house pop. This has helped me to decide what kind of flowers I am going to plant in the spring. White geraniums with dark purple Wave Petunias and maybe some Dusty Miller and if there is room, a few of those chartreuse lime green sweet potato vines

Tomorrow I will make the wreaths. I'm shooting for two large and one small wreath.
We also installed the LED solar lights above the kitchen door. Installation was a breeze but I'll write more about that later.
Good news!!!! Today they released the December forecast and they are predicting warmer than normal. Please please be correct. What do you think????
On to what we have accomplished.....even if it was a little late.
My sister always spends most of the month of November in the U.P. (upper peninsula) so when she wasn't cooking she went outside and cut two huge bags of evergreen boughs for me. I need them for my window box, large flower pot, and to make wreaths.
I first cut the boughs into 8 or 10 inch lengths but left a few longer ones for the large flower pot. The weather was brutal. The wind was blowing and the wind chill must have been in the low teens. I was about halfway through putting greens in the window box when I could no longer feel my fingers. It was sunny but brutal......brrrrrrrrr.
Photo taken without the flash.
The grey looks too blue.
This photo was taken with a flash.
This is how the grey looks in person.
Tomorrow I will make the wreaths. I'm shooting for two large and one small wreath.
We also installed the LED solar lights above the kitchen door. Installation was a breeze but I'll write more about that later.
Good news!!!! Today they released the December forecast and they are predicting warmer than normal. Please please be correct. What do you think????
Thursday, November 27, 2014
Buick Claw Foot Tub and This and That
First the 'this' and 'that'.
I picked up the solar lights but haven't had a chance to install them yet. Bad weather, errands, and early sunsets are my excuses.
I purchased a small square wreath frame to make an evergreen wreath for my front door. While I was looking at photos of the front door.....it hit me. I could turn the wreath frame 90 degrees and it would form a diamond shape like the window in the front door. So I grabbed the frame and ran to the door. The diamond shape window is slightly elongated so I pulled a little here and there and before I knew it, it was the exact shape of the window. Sorry, no before photo because I started manipulating the frame without thinking.
R picked up some evergreen cuttings at Kroger. They are selling trees and wreaths and had a pile of cuttings. He asked if he could take them and they said "sure." Worked out perfect. I've cut them to the correct size and they are waiting for me to assemble the wreath.
We purchased the needed plywood and bead board plywood to finish the kitchen. But before we start the inside projects for the winter we really need to clean the back room and organize the tools. What a mess.
While we were working on the front door last month, I noticed that the bronze weatherstripping was not in the best of shape. I also wanted to strip the paint from the door jamb, prime, and repaint but the weatherstripping was in the way. So I removed it and oh my gosh it was like a razor blade. It was so thin and sharp that I had to be extra careful. Once it was removed, I folded the pieces and added them to the scrap metal pile.
So now that meant that I needed to buy new bronze weatherstripping. I researched it online......OK not so much 'researched' as I typed 'bronze weatherstripping' into the search bar and up came Kilian Hardware in Philadelphia. Since I was ordering for one door and paying for shipping I figured I would order for all five exterior doors. Long story short, weatherstripping arrived in a huge tube, huge tube is heavy, heavy huge tube is still laying on the floor by the front door.
This is the worst time of year to try and get anything accomplished so I'll just say we are prepping for the winter projects and hope like heck it doesn't snow every day.
We live in an area that was the birth place of General Motors and home to Buick or as the old timers here in Flint say "The Buick." Last year, GM purchased a brick building in downtown Flint that was Dort Carriage. This is where they built carriages and then became part of GM when Durant started General Motors. GM is in the process of doing a restoration of this building but across the street is an already restored building called the Durant-Dort office building. It is this building that is getting the Buick bath tub. Click on the bath tub link and check out the photos. Is that the remnants of adhesive decals on the inside of the tub?
 David Dunbar Buick was originally the owner of a large plumbing business in Detroit. During that time he developed a process to apply porcelain to cast iron. This revolutionized plumbing fixtures by making fixtures last longer because they no longer rusted. The process also made fixtures more sanitary and easier to clean. Along with that patent, he also patented a toilet flushing device. So every time you flush or scrub your toilet say "Thank you, David Dunbar Buick."
Buick sold his plumbing company along with his patents to Standard Sanitary which later became American Standard. With that money, he came to Flint and started Buick Manufacturing Company which eventually became part of GM with the help of Billy Durant.
I can't wait to see this tub in person. The photos are confusing but it has a sink in one end of the tub. I wonder why a sink in the tub? AND can you believe it......they bought it off of eBay!!!!
Here's the eBay listing I hope they had an Ebates account because they could have received a $156.00 rebate on their purchase.
I picked up the solar lights but haven't had a chance to install them yet. Bad weather, errands, and early sunsets are my excuses.
I purchased a small square wreath frame to make an evergreen wreath for my front door. While I was looking at photos of the front door.....it hit me. I could turn the wreath frame 90 degrees and it would form a diamond shape like the window in the front door. So I grabbed the frame and ran to the door. The diamond shape window is slightly elongated so I pulled a little here and there and before I knew it, it was the exact shape of the window. Sorry, no before photo because I started manipulating the frame without thinking.
R picked up some evergreen cuttings at Kroger. They are selling trees and wreaths and had a pile of cuttings. He asked if he could take them and they said "sure." Worked out perfect. I've cut them to the correct size and they are waiting for me to assemble the wreath.
We purchased the needed plywood and bead board plywood to finish the kitchen. But before we start the inside projects for the winter we really need to clean the back room and organize the tools. What a mess.
While we were working on the front door last month, I noticed that the bronze weatherstripping was not in the best of shape. I also wanted to strip the paint from the door jamb, prime, and repaint but the weatherstripping was in the way. So I removed it and oh my gosh it was like a razor blade. It was so thin and sharp that I had to be extra careful. Once it was removed, I folded the pieces and added them to the scrap metal pile.
So now that meant that I needed to buy new bronze weatherstripping. I researched it online......OK not so much 'researched' as I typed 'bronze weatherstripping' into the search bar and up came Kilian Hardware in Philadelphia. Since I was ordering for one door and paying for shipping I figured I would order for all five exterior doors. Long story short, weatherstripping arrived in a huge tube, huge tube is heavy, heavy huge tube is still laying on the floor by the front door.
This is the worst time of year to try and get anything accomplished so I'll just say we are prepping for the winter projects and hope like heck it doesn't snow every day.
We live in an area that was the birth place of General Motors and home to Buick or as the old timers here in Flint say "The Buick." Last year, GM purchased a brick building in downtown Flint that was Dort Carriage. This is where they built carriages and then became part of GM when Durant started General Motors. GM is in the process of doing a restoration of this building but across the street is an already restored building called the Durant-Dort office building. It is this building that is getting the Buick bath tub. Click on the bath tub link and check out the photos. Is that the remnants of adhesive decals on the inside of the tub?
Buick sold his plumbing company along with his patents to Standard Sanitary which later became American Standard. With that money, he came to Flint and started Buick Manufacturing Company which eventually became part of GM with the help of Billy Durant.
I can't wait to see this tub in person. The photos are confusing but it has a sink in one end of the tub. I wonder why a sink in the tub? AND can you believe it......they bought it off of eBay!!!!
Here's the eBay listing I hope they had an Ebates account because they could have received a $156.00 rebate on their purchase.
Thursday, November 20, 2014
Unexpected Moola and Solar Lights
Moola, payola, bucks, or cold cash is always good whether expected or not. But a while back I had to go into the bank (I'm a drive thru gal) and talk with someone about my debit card and also deposit a check from Ebates.
While I was taking care of business with a personal banker, they informed me that I had over $180 in rewards and how did I want them rewarded, cash or deposit? I asked if I could "let it ride"....LOL Good thing I didn't add "on red 7". She said "no" because they no longer offer rewards on debit cards. So I had her deposit the money in my account along with my Ebates check.
 Now the Ebates check was free money, too. I've spoke about Ebates before but with the gift giving holidays fast approaching, now is the time to sign up for Ebates. It's free and gives you % back when you purchase online as long as you go to the desire website directly from the Ebates site.
Here's an example. I'm always looking on eBay for vintage items for the house. The other day I found a black iron thumb latch door handle on eBay. It was a Buy it Now item so I added it to my watch list. I then went to Ebates and clicked on the list of stores, then clicked on eBay. It opened a ticket for me, then transferred me to eBay where I then purchased the door handle. Not only did I receive 5% back from Ebates but I also accumulated some eBay Bucks through their rewards program. The percentage is different for each store and sometimes the % changes for eBay.
My bloggy friend mentored me on the art of "playing all the angles". Yvonne and her husband even order online when they purchase items at Home Depot and then they pick the items up at the store and pay with a credit card that gives them rewards. So they get double rewards.
So last night I ordered 3 solar lights on the Home Depot website. First, I went to Ebates and clicked on stores, scrolled down to and clicked on Home Depot which opened a ticket and sent me to the Home Depot site. I added the 3 solar lights to my cart and checked out after clicking on store pick up. This will save me shipping cost.
The lights that I chose were quite inexpensive at $9.99 each. The solar lights clamp onto your eave troughs and shine down which should provide enough to illuminate the kitchen door without costing a dime of electricity. I'll let you know how they work after I install them. Fingers crossed because it's a clever idea.
 I also order online at Ace Hardware, pick up in store, and use my Ace Rewards card that gives you a $5.00 coupon for every $200 spent. Recently I used a special coupon that they sent me for 20% off my entire purchase. I've been wanting a LARGE metal mailbox and by using my coupon I saved $8.00.
With the gift giving season just around the corner, now is the time to sign up at Ebates. It's free to register and they give you a choice of $10 gift cards. When you sign up, make sure you download the toolbar widget thingy that prompts you when you happen to go to a website that is on the Ebates list.
Do you buy toys? Toys R Us is on the list and Toys R Us also has a perk program that gives you 5 bucks for every $125 you spend. Do you travel and use Travelocity? It's on the list. Home Depot, Lowe's, Macy's, and Lumber Liquidator's are just a few. Pretty much all the major stores and even some obscure stores.
When you sign up please use this link, I will get credit and you will get the gift card. You in turn can get your friends to sign up and you will get credit and they get a free gift card. Your Ebates Fat Check will be sent out quarterly.
FYI while at the bank they informed me that I should switch from using a debit card and go back to a credit card so that I can get rewards. I also found out that you have more protection coverage if your card is hacked and used illegally. A debit card can sometimes only cover up to $500 dollars and the credit card company requires that you contact them within a short amount of time. I forgot what she said because I was thinking about how I was going to spend my free money.
While I was taking care of business with a personal banker, they informed me that I had over $180 in rewards and how did I want them rewarded, cash or deposit? I asked if I could "let it ride"....LOL Good thing I didn't add "on red 7". She said "no" because they no longer offer rewards on debit cards. So I had her deposit the money in my account along with my Ebates check.
Here's an example. I'm always looking on eBay for vintage items for the house. The other day I found a black iron thumb latch door handle on eBay. It was a Buy it Now item so I added it to my watch list. I then went to Ebates and clicked on the list of stores, then clicked on eBay. It opened a ticket for me, then transferred me to eBay where I then purchased the door handle. Not only did I receive 5% back from Ebates but I also accumulated some eBay Bucks through their rewards program. The percentage is different for each store and sometimes the % changes for eBay.
My bloggy friend mentored me on the art of "playing all the angles". Yvonne and her husband even order online when they purchase items at Home Depot and then they pick the items up at the store and pay with a credit card that gives them rewards. So they get double rewards.
So last night I ordered 3 solar lights on the Home Depot website. First, I went to Ebates and clicked on stores, scrolled down to and clicked on Home Depot which opened a ticket and sent me to the Home Depot site. I added the 3 solar lights to my cart and checked out after clicking on store pick up. This will save me shipping cost.
The lights that I chose were quite inexpensive at $9.99 each. The solar lights clamp onto your eave troughs and shine down which should provide enough to illuminate the kitchen door without costing a dime of electricity. I'll let you know how they work after I install them. Fingers crossed because it's a clever idea.
With the gift giving season just around the corner, now is the time to sign up at Ebates. It's free to register and they give you a choice of $10 gift cards. When you sign up, make sure you download the toolbar widget thingy that prompts you when you happen to go to a website that is on the Ebates list.
Do you buy toys? Toys R Us is on the list and Toys R Us also has a perk program that gives you 5 bucks for every $125 you spend. Do you travel and use Travelocity? It's on the list. Home Depot, Lowe's, Macy's, and Lumber Liquidator's are just a few. Pretty much all the major stores and even some obscure stores.
When you sign up please use this link, I will get credit and you will get the gift card. You in turn can get your friends to sign up and you will get credit and they get a free gift card. Your Ebates Fat Check will be sent out quarterly.
FYI while at the bank they informed me that I should switch from using a debit card and go back to a credit card so that I can get rewards. I also found out that you have more protection coverage if your card is hacked and used illegally. A debit card can sometimes only cover up to $500 dollars and the credit card company requires that you contact them within a short amount of time. I forgot what she said because I was thinking about how I was going to spend my free money.
Saturday, November 15, 2014
Purchase your Christmas Tree Online and Save $$$$$
Do you use a fresh tree for your Christmas tree but just do not have the time to go and pick one? Thanks to the Internet, you can buy your Fraser Fir tree online and have it delivered to your door step.
But wait.....first you need to sign up for Ebates. By signing up for Ebates you will receive a $10.00 gift card and save 6% on a Groupon Coupon that will save you even more money on your fresh, home delivered, Christmas tree.
Use this link to sign up for Ebates and I will also get a bonus. Everyone saves.
Once you have signed up for Ebates go to Groupon from the Ebates site. That will save you 6% on your Groupon coupon for a Fraser Fir Christmas tree from the Five Star Christmas Tree Co.
This is the link to the Detroit area deal. If you live elsewhere, you will need to search your area Groupon.
http://www.groupon.com/deals/five-star-christmas-tree-co-1-1-detroit
Why spend more when you can save so easily. Good luck. Happy shopping and saving!!!!
But wait.....first you need to sign up for Ebates. By signing up for Ebates you will receive a $10.00 gift card and save 6% on a Groupon Coupon that will save you even more money on your fresh, home delivered, Christmas tree.
Use this link to sign up for Ebates and I will also get a bonus. Everyone saves.
Once you have signed up for Ebates go to Groupon from the Ebates site. That will save you 6% on your Groupon coupon for a Fraser Fir Christmas tree from the Five Star Christmas Tree Co.
Offer expires on November 21st and deliveries will be made the week of December 1st. with delivery information sent to you on November 28th. Easy peasey.
http://www.groupon.com/deals/five-star-christmas-tree-co-1-1-detroit
Choose from Three Options
- $59 for one 5’–6’ Fraser fir Christmas tree (a $139 value)
- $69 for one 6’–7’ Fraser fir Christmas tree (a $159 value)
- $79 for one 7’–8’ Fraser fir Christmas tree (a $179 value)
Plus....you are going to save 6% on your Groupon.
You should sign up for Ebates if you order anything online. A lot of the vintage items that I purchase for our house are purchased off of eBay.....like our vintage mail box. Right now they are offering 6% off on eBay purchases as long as you to to eBay directly from the Ebates site. I even downloaded the toolbar app so that it will prompt me when I go to a site that is covered by Ebates.
Why spend more when you can save so easily. Good luck. Happy shopping and saving!!!!
Friday, November 14, 2014
New Door Bell Button
The polar vortex has arrived. It was so bitterly cold today that what should have been an hour job took us over three hours to finish. My fingers were so numb I could hardly hold on the the large square head screws that hold the iron straps in place.
After looking at the long range forecast we decided to just reinstall the iron straps on the door and forget about priming the door this year. We also installed the door bell button and the door knocker. Now that it gets dark by 530pm I could only get a photo of the front entry because I had to use the flash on my camera.

Tomorrow I need to cut some greens to make wreaths. My sister suggested adding stag horn fern seed heads to add some color, so I will need to cut those as well. I was at Michael's last night and purchased a small square wreath frame. I am hoping that if I rotate it 45 degrees I can make a diamond shape wreath to hang around the diamond shape window on the front door.
After looking at the long range forecast we decided to just reinstall the iron straps on the door and forget about priming the door this year. We also installed the door bell button and the door knocker. Now that it gets dark by 530pm I could only get a photo of the front entry because I had to use the flash on my camera.
Tomorrow I need to cut some greens to make wreaths. My sister suggested adding stag horn fern seed heads to add some color, so I will need to cut those as well. I was at Michael's last night and purchased a small square wreath frame. I am hoping that if I rotate it 45 degrees I can make a diamond shape wreath to hang around the diamond shape window on the front door.
Tuesday, November 11, 2014
This is where we stop...for now
We are officially done with work on the outside exterior of the house.....until spring. I really dislike this time of the year. It gets dark far too early, it's cloudy, cold, and windy almost every single day. I can handle (with a little whining of course) pretty much whatever is doled out to me weather wise except for the no sunshine part. That is by far the most difficult part of winter.


Monday, November 10, 2014
Vintage Cast Iron Mail Box and Winterizing the Casa
I really wish that I had just one more week of good weather. There are so many little odds and ends that I would like to cross off my list but thanks to another polar vortex, that will probably be impossible.
Today we worked outside until it was dark, which is now just 530PM. Here in the north, we have to put away items that might crack when it freezes or winterize other items that will remain outside through the next 5-6 months of cold weather. Notice that I didn't say 'winter' and that's because cold weather arrives before the actual start of winter and will continue on even after it is still technically 'spring'.
So today I did the following in preparation for the big chill.
1. Stored the glazing balls inside. Since they are round and can roll, it is a pain to store these but I love them so I deal with it.
2. Turned over the concrete bird bath bowls so that they cannot fill with water that will freeze. When the water freezes it can cause damage to the bird bath bowl.
3. Put away the garden hoses. It is best to drain and coil them while it is still warm outside. Our yard has a lot of hills so I just stretch them out so that the water can run out of them with the help of gravity. When I lived in a house with a flat yard I had to blow the water out, Back then I had better lungs. It is best to coil up the hoses on a sunny day so that the hoses are more pliable. I use duct tape to keep them from uncoiling until I need them again in the spring. We store our hoses in the basement part of our garden shed.
4. Pull up all the annuals, rake up the leaves, twigs, and needles that are on the driveway. We can't possibly rake up all the leaves that fall in our yard. Even if we could it would be a waste of time because throughout the winter additional leaves will blow into the yard and drop from the pin oaks later in the spring.
5. Put away ladders, wood, garden tools etc.
6. Plant garlic. I'm kind of late on this chore. We planted three types this year, Cherokee Red, Homestead, and Hardy German. I also planted 3 Knockout roses that I bought last Saturday for $3.00 each. We decided to plant them in the garden in their pots so that in the spring I can relocate them permanently. Where that will be is unknown but at 3 bucks each I just had to buy them.
7. Move the snow blowers to the front of the shed by the door and move the lawnmowers to the back.
8. Drain the gas from the lawnmowers and the weed whackers. Fill the tanks of the snow blowers (2).
9. Walk around and check to make sure that the eave troughs are not plugged with twigs, leaves or walnuts.
10. Make sure that anything that can blow away or blow over is secured.
11. Turn over wrought iron chairs and remove glass tops and store in garage. Always store glass table tops on their edge, which is the strongest part of the glass.
12. Make sure the windows in the barn and garden shed are secured shut. Some have locks and others have bent nails for locks (these will be changed when we restore those windows).
We are done with painting and priming this year. Should the weather ease up a bit after the big P.V. we might prime and paint the front door. By hanging plastic and using our ceramic heater, I think we could get away with painting while it is 40 degrees outside. We still have some caulking to do and some white trim that needs a top coat but that can wait until next spring if we cannot get to it.
Once the door is painted we can install the new bronze weather stripping that we ordered. We ordered enough to do all of our exterior doors. This allowed us to save on shipping by getting it all in one shipment.
The vintage mail box is installed and has the vintage pad lock attached. We love the look and think that it really helps in recreating that 1920-1930 feel.
Friday, November 7, 2014
Mail boxes...then and now
Most people don't give a second thought to their mail boxes. As long as the door closes and opens and the mail box post is some what vertical......they call it good. I've always had a 'thing' for a good mail box and a nice mail box post.
Several years ago, we updated the mail box post and mail box with a plastic version that matched the wrought iron driveway gates. You need to be fairly close to realize that it isn't iron and we were satisfied and happy with the outcome.
In rolls the winter of 2013-2014 and the plow blasted our mail box and post three times. It's frustrating. R was able to fix it but the mail box had seen better days. I receive a lot of packages and I prefer a large mail box so when Ace hardware sent me a one day 20% off coupon, I took the chance to get the LARGEST mail box they offered. It's metal and should hold up to the force of the snow better than the plastic mail box.

R will install the mail box next year but right now we are installing a vintage mail box on the front of the house. It's a vintage Griswold mail box with the newspaper brackets still attached. Griswold is the same company that makes the cast iron frying pans.
The mail box was in pretty bad condition when I purchased it off of eBay. I have no idea how many coats of paint were on the mail box but after sand blasting it, I still needed to use an Exacto knife to get the paint out of the crevices. I then sand blasted it again, primed it, and spray painted it satin black. Then stored it away for the last 6 years until I brought it out two weeks ago covered in dust.
We marked where we wanted to hang the mail box after we finished installing the shingles. It was then that we realized that we needed to cut out a 1/2 thick piece to place under the lower portion of the mail box so that it would be vertical when installed. After tracing the outline of the bottom of the mail box on a 1/2 inch thick piece of cedar, we used a coping saw to cut out the profile.

While we had the mail box out, we noticed that it has a place to install a small pad lock to keep the mail secure. This mail box isn't intended for use because we receive our mail out at the street. But for the sake of authenticity, we thought we should look for a small vintage pad lock. All of our lock sets are Corbin so imagine my surprise when I found a small Corbin pad lock on Etsy. It has the same logo as the cylinder lock just two foot away. The pad lock even has the key. The tag on the key says 'wood chest' so that must have been it previous use. The lock currently has lacquer on it so I will remove that so it can tarnish more evenly. Eventually I will hang the key on a hook by the front door.

I was able to get half of the front entrance primed before the rain started. Even though I wasn't looking forward to the rain, it gave us the chance to see if the PVC drip edge that we installed under the bottom row of shingles, would help keep the shingles from wicking water. So far so good.
Several years ago, we updated the mail box post and mail box with a plastic version that matched the wrought iron driveway gates. You need to be fairly close to realize that it isn't iron and we were satisfied and happy with the outcome.
In rolls the winter of 2013-2014 and the plow blasted our mail box and post three times. It's frustrating. R was able to fix it but the mail box had seen better days. I receive a lot of packages and I prefer a large mail box so when Ace hardware sent me a one day 20% off coupon, I took the chance to get the LARGEST mail box they offered. It's metal and should hold up to the force of the snow better than the plastic mail box.
R will install the mail box next year but right now we are installing a vintage mail box on the front of the house. It's a vintage Griswold mail box with the newspaper brackets still attached. Griswold is the same company that makes the cast iron frying pans.
The mail box was in pretty bad condition when I purchased it off of eBay. I have no idea how many coats of paint were on the mail box but after sand blasting it, I still needed to use an Exacto knife to get the paint out of the crevices. I then sand blasted it again, primed it, and spray painted it satin black. Then stored it away for the last 6 years until I brought it out two weeks ago covered in dust.
We marked where we wanted to hang the mail box after we finished installing the shingles. It was then that we realized that we needed to cut out a 1/2 thick piece to place under the lower portion of the mail box so that it would be vertical when installed. After tracing the outline of the bottom of the mail box on a 1/2 inch thick piece of cedar, we used a coping saw to cut out the profile.
While we had the mail box out, we noticed that it has a place to install a small pad lock to keep the mail secure. This mail box isn't intended for use because we receive our mail out at the street. But for the sake of authenticity, we thought we should look for a small vintage pad lock. All of our lock sets are Corbin so imagine my surprise when I found a small Corbin pad lock on Etsy. It has the same logo as the cylinder lock just two foot away. The pad lock even has the key. The tag on the key says 'wood chest' so that must have been it previous use. The lock currently has lacquer on it so I will remove that so it can tarnish more evenly. Eventually I will hang the key on a hook by the front door.
I was able to get half of the front entrance primed before the rain started. Even though I wasn't looking forward to the rain, it gave us the chance to see if the PVC drip edge that we installed under the bottom row of shingles, would help keep the shingles from wicking water. So far so good.
Monday, October 27, 2014
New Front Door Casing
The viable outside work days are winding down fast and before we know it, it will be winter. Because of this, we are steadily working to finish the front of the house. We have removed the non original door casing on the front door and rebuilt it based on the other original exterior door casings. Those doors have 5 inch wide casings but we constructed these to be 6 inches wide so that they lined up with the edge of the concrete threshold. The casings were made of 2X8's ripped down to 6 inches wide.

The next part of the front door rebuild consisted of reshingling but first we needed to come up with a plan to keep the shingles off the concrete porch. Obviously the original set up was not ideal because rain water would flow back towards the house saturating the cedar shingles and then making it's way behind the porch and between the porch and cement block wall.
First things first, we needed to remove all the dirt and debris so that we could get a good look. This is where the air gun worked like a charm to blow out the debris. We were left with a space about 3/4 inch deep.
We fixed any missing tar paper and covered the area with metal flashing. The flashing was pushed down as far as we could and then nailed just at the top. Now what? We had to find a way to keep the shingles from wicking up moisture AND stop the water from running under the shingles. I had previously used some solid PVC drip edge over the tops of a few windows and still had some left over in my wood pile (I don't have a PVC pile).
I also had an almost full tube of clear silicone. So R filled up the void with clear silicone and then ran a bead of silicone on the bottom of the PVC drip edge. We then set the drip edge onto the silicone.
 We have no idea if this is going to keep the water from getting behind the porch but we think it will keep the moisture from getting to the shingles.


 We have 1 1/2 rows left to complete on this side of the door. The other wall will require some sheathing repair because of water damage (no eave trough when we purchased the house). Then we will repeat the the PVC drip edge/silicone process and then reshingle. Rain is in the forecast for Tuesday so we are under the gun, so to speak.
Update....the window well that we installed in front of the coal door is working like a charm. Between the well and the additional top soil that we added has kept the rain water from draining towards the house. Love it when something does work as planned.
Speaking of working......several years ago I purchased three very expensive light bulbs for the front porch light and the two lights on the brick pillars on each side of the driveway gate. Three weeks after installing them, they quit working. But because they all quit at the same time I thought we had cut a wire etc. Before R removed the porch light he tried a brand new light bulb and low and behold it worked. Really? The last three years we have gone without a light and all it was was a burnt out light bulb. So I purchased an LED bulb and we'll see how long that will last.
The next part of the front door rebuild consisted of reshingling but first we needed to come up with a plan to keep the shingles off the concrete porch. Obviously the original set up was not ideal because rain water would flow back towards the house saturating the cedar shingles and then making it's way behind the porch and between the porch and cement block wall.
First things first, we needed to remove all the dirt and debris so that we could get a good look. This is where the air gun worked like a charm to blow out the debris. We were left with a space about 3/4 inch deep.
We fixed any missing tar paper and covered the area with metal flashing. The flashing was pushed down as far as we could and then nailed just at the top. Now what? We had to find a way to keep the shingles from wicking up moisture AND stop the water from running under the shingles. I had previously used some solid PVC drip edge over the tops of a few windows and still had some left over in my wood pile (I don't have a PVC pile).
I also had an almost full tube of clear silicone. So R filled up the void with clear silicone and then ran a bead of silicone on the bottom of the PVC drip edge. We then set the drip edge onto the silicone.
Update....the window well that we installed in front of the coal door is working like a charm. Between the well and the additional top soil that we added has kept the rain water from draining towards the house. Love it when something does work as planned.
Speaking of working......several years ago I purchased three very expensive light bulbs for the front porch light and the two lights on the brick pillars on each side of the driveway gate. Three weeks after installing them, they quit working. But because they all quit at the same time I thought we had cut a wire etc. Before R removed the porch light he tried a brand new light bulb and low and behold it worked. Really? The last three years we have gone without a light and all it was was a burnt out light bulb. So I purchased an LED bulb and we'll see how long that will last.
Tuesday, October 14, 2014
Autumn Window Box Decoration
I just had to fill the window box with something after all these years of having an empty window box. These artificial flowers were purchased many many years ago on clearance at a Rite Aid drugstore.

Artificial flowers are not my thing but here in the north it is the only way to have any color after the first of October.


Sunday, October 12, 2014
Hometalk Website Curated Board
Several weeks ago I was asked to curate a board for the website Hometalk that would feature hostas. Well, I hardly need an excuse to talk about or look at photos of hostas....so I said "SURE."
Hometalk is a great website that has a wonderful forum area where you can ask any home/garden question. My favorite part though, is the numerous posts covering anything home related. There are some very creative people who post on Hometalk and I've not only learned a lot but also just enjoyed seeing how others are decorating or remodeling their homes. So very inspiring.
If you would like to view the entire board that I curated featuring hostas just click HERE.
 Now is the perfect time to divide or plant hostas. Winter is quickly approaching and I know sometimes it is difficult to get that urge to garden but just think when spring rolls around you can kick back and enjoy your hostas.
Hometalk is a great website that has a wonderful forum area where you can ask any home/garden question. My favorite part though, is the numerous posts covering anything home related. There are some very creative people who post on Hometalk and I've not only learned a lot but also just enjoyed seeing how others are decorating or remodeling their homes. So very inspiring.
If you would like to view the entire board that I curated featuring hostas just click HERE.
Saturday, October 11, 2014
Coal door upgrade
Our house has a coal door because it was originally heated with a coal fired boiler. The coal door allowed the coal delivery man to dump the coal directly into the basement near the boiler. The boiler is long gone but the coal door remains and we love the look of the original coal door on the front of our house.

The door was in very bad condition when we purchased the house. R spent a few days with a wire wheel on a grinder removing the rust and pounding out the dents He then primed and painted the door satin black. This vastly improved the coal but there was still a problem with the concrete around the door. The concrete had cracked and pulled away from the house and this was letting rain water find it's way into the basement.


Several times we tried to lift the concrete up and back towards the house. It never looked right and the ground in that area was sloped towards the house which is never good. After mulling it over for several days we decided to remove the concrete and install a window well made out of heavy grey plastic.

We were able to back fill higher up if we installed the well higher up on the wall. These come in various heights from 12 inches (ours) to 24 inches. We will never be able to back fill high enough that the foundation dirt is higher than the driveway so we will have to make a slight gully for the rain water to run into and then run down hill.
Before we could install the plastic well we needed to remove the concrete in front of the coal door. We dug around the concrete and then wrapped a heavy chain around it. R used the pick up truck to pull the concrete up onto the driveway. He then hauled out the old metal snow saucer that we use to move boulders around the yard. We pulled the concrete up onto the saucer and attached the saucer with a chain to the truck and then pulled the concrete away.


I dug out the area in front of the coal door and then held the well in place while R marked the top hole on the left side. R then used his big electric drill and a masonry bit to drill a hole to accept the lead anchor.


This allowed us to install just one bolt so that we could make sure the well was level before we marked the right side top hole. R repeated the process and we installed the anchor and bolt on the right side. Now that it was level we could mark the other four holes. We removed the bolts and R drilled the remaining holes.
After all the lead anchors were installed we poured crushed rock so that the well would sit on a bed of crushed rock. I then added a generous amount of clear silicone to the flange on both sides of the window well. We then reattached the window well and tightened all the bolts.


This is a cap I purchased at Ace Hardware that is suppose to keep the tube of caulk etc from drying out. I wish I had a nickel for every partially used tube of caulk, silicone, or Liquid Nails that I have thrown out over the years. Makes sure you wipe off any excess before putting on the cap.
To finish up, we poured the remaining crushed rock around the outside perimeter of the window well. We then back filled with the dirt that I had dug out earlier and dirt from a high spot by the garden shed. All in all it was a pretty easy deal and not too pricey, either.


I still need to bring in more dirt. FYI the window well looks like it is off center but it isn't because I've measured 3 times. R thinks it looks that way because the coal door was installed slightly crooked and unfortunately we cannot do anything to correct that problem. Bummer. Also I have no idea why the paint color looks bluish grey in some photos. It is NOT bluish at all. That was something we were very concerned with when we chose a color.
Plastic window well $16.50
6 bolts, 6 washers, 6 lead anchors $1.36 (used a $5.00 reward coupon at Ace Hardware)
2 bags of crushed rock $7.98
Tube of silicone (already had on hand) $0.00
Dirt $0.00
Total $25.84
We've also been working on the front door and with 3 days of rain in the forecast I know that it will be at least next weekend before I can paint the front door. Then we move to the back wall of the barn to prepare it to be painted and readied for the beehive to be moved behind the barn.
The door was in very bad condition when we purchased the house. R spent a few days with a wire wheel on a grinder removing the rust and pounding out the dents He then primed and painted the door satin black. This vastly improved the coal but there was still a problem with the concrete around the door. The concrete had cracked and pulled away from the house and this was letting rain water find it's way into the basement.
Several times we tried to lift the concrete up and back towards the house. It never looked right and the ground in that area was sloped towards the house which is never good. After mulling it over for several days we decided to remove the concrete and install a window well made out of heavy grey plastic.
This is the 18 inch version that we returned for the 12 inch well.
We were able to back fill higher up if we installed the well higher up on the wall. These come in various heights from 12 inches (ours) to 24 inches. We will never be able to back fill high enough that the foundation dirt is higher than the driveway so we will have to make a slight gully for the rain water to run into and then run down hill.
Before we could install the plastic well we needed to remove the concrete in front of the coal door. We dug around the concrete and then wrapped a heavy chain around it. R used the pick up truck to pull the concrete up onto the driveway. He then hauled out the old metal snow saucer that we use to move boulders around the yard. We pulled the concrete up onto the saucer and attached the saucer with a chain to the truck and then pulled the concrete away.
I dug out the area in front of the coal door and then held the well in place while R marked the top hole on the left side. R then used his big electric drill and a masonry bit to drill a hole to accept the lead anchor.
This allowed us to install just one bolt so that we could make sure the well was level before we marked the right side top hole. R repeated the process and we installed the anchor and bolt on the right side. Now that it was level we could mark the other four holes. We removed the bolts and R drilled the remaining holes.
After all the lead anchors were installed we poured crushed rock so that the well would sit on a bed of crushed rock. I then added a generous amount of clear silicone to the flange on both sides of the window well. We then reattached the window well and tightened all the bolts.
This is a cap I purchased at Ace Hardware that is suppose to keep the tube of caulk etc from drying out. I wish I had a nickel for every partially used tube of caulk, silicone, or Liquid Nails that I have thrown out over the years. Makes sure you wipe off any excess before putting on the cap.
To finish up, we poured the remaining crushed rock around the outside perimeter of the window well. We then back filled with the dirt that I had dug out earlier and dirt from a high spot by the garden shed. All in all it was a pretty easy deal and not too pricey, either.
I still need to bring in more dirt. FYI the window well looks like it is off center but it isn't because I've measured 3 times. R thinks it looks that way because the coal door was installed slightly crooked and unfortunately we cannot do anything to correct that problem. Bummer. Also I have no idea why the paint color looks bluish grey in some photos. It is NOT bluish at all. That was something we were very concerned with when we chose a color.
Plastic window well $16.50
6 bolts, 6 washers, 6 lead anchors $1.36 (used a $5.00 reward coupon at Ace Hardware)
2 bags of crushed rock $7.98
Tube of silicone (already had on hand) $0.00
Dirt $0.00
Total $25.84
We've also been working on the front door and with 3 days of rain in the forecast I know that it will be at least next weekend before I can paint the front door. Then we move to the back wall of the barn to prepare it to be painted and readied for the beehive to be moved behind the barn.
Subscribe to:
Posts (Atom)