Sunday, April 30, 2017

Mason Bee House Part 4

We finally had a weather forecast of 5 warm days in a row without rain, so I grabbed the Mason bee cocoons out of the fridge and a rubber band and headed out to the garden shed.
 Each box of cocoons has both sexes of Mason bees.  The female cocoons are larger in size than the male cocoons.   
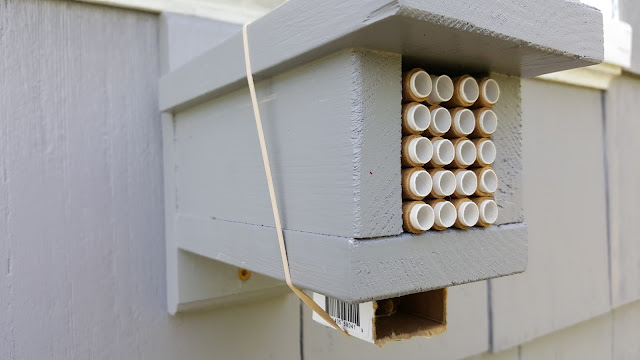
 I removed the end flaps off of one end of the box.  Then I placed the box under the bee house and secured with the rubber band.  Placing the box under the house will protect it from rain if it should rain before they hatch.  The reason for attaching the cocoons to the house is that it will imprint on the bees where they need to return to make next years cocoons.
 Two things to notice in the photo below.  First notice how there are less cocoons in the box after just one day.  Second thing to notice is the tan spots on the bee house.  The lady who taught the class mentioned that we may see this on the bee house after they hatch.  She said it is Mason bee semen.  I can't remember why this is because I guess I was too busy thinking....WHAAAT?!!!!!
After 5 days... all the cocoons have hatched except two AND there are MORE tan spots.
I wanted to learn more about Mason bees so I checked out the Internet and found some vintage books about various bees and wasps written by a Frenchman named J H Fabre, in the late 1800's.  These books were then translated to English in 1914 by Alexander Teixeira De Mattos.
I found 4 books but there are more in the series.  The ones I purchased are The Mason Bees, The Mason -Wasps, The Hunting Wasps, and Bramble Bees and Others.
Two of the books have book plates in them with the name Giulio Marchetti.  I think I need book plates for my books.  I kind of like the simple design of this one.

I wonder if Guilio Marchetti raised bees and if he did, where?  Italy perhaps. Or was he Italian by birth and immigrated to the US. The plot thickens.

Reuse Repurpose Recycle

Monday, April 10, 2017

Mason Bee House Part 3

Yesterday we hung the Mason bee house on the back of the garden shed.  This area gets morning and early afternoon sun plus it is sheltered from storms coming from the west and wind from the north.  In the class she told us not to attach it to trees and to place it around 42 inches from the ground.  We placed it higher because of the plantings under the window.
OOPS!! I need to fix that storm window screen.

The bee cocoons are still chillin in the fridge.  I don't want to wake them up until there are blooms available for them to snack on.

I also have praying mantis pods in my fridge.  They too, will wait until a little later in the spring before they make their appearance.  Last summer I saw a praying mantis on the deck so I know that we have some are out there in the yard.

The temperatures yesterday and today were in the 70's.  Love the temps but it's raining AGAIN.  The cats have been loving the warm temps.  They have been busy rolling around on the deck and hiding in the fallen willow limb.
Reuse Repurpose Recycle

Sunday, April 9, 2017

Mason Bee House Part 2

I'm really excited about the Mason bees.  I  know that they do not produce honey but they help with pollination and are fairly maintenance free.  Maintenance free is something I really like.

You can read about the Mason Bee House Part 1 HERE.

The first thing that I did when I arrived home with my newly assembled Mason bee house was I disassembled it.  Yup I took it back apart so I could glue it together.  I used wood glue and then reassembled it.  Then I used a damp cloth to wipe down all the areas where glue squished out.  I then let both the glue and wood dry completely

Next I applied two coats of exterior primer and one coat of the same exterior paint that I use on my house.  The paint is Behr exterior in a satin finish in the color Anonymous.  I want the Mason bee house to blend in and not stand out.  
I couldn't find a photo of the painted bee house but did find this weird crooked photo of my purple/blue fingernails and old ripped sweatshirt.  How lovely.

Today we put out our kinetic spinners.  We have three but my fave is the large tulip spinner I bought last year while shopping with my sister.  We love it but it has a design flaw.  The shaft is too light weight for such a heavy top AND then add the spinning and it goes all wonky and bends.  The photo below is an 'after photo'.  See how straight it is now.
The shaft is made of two pieces and is thin walled tubing.  As the kinectic spinner spins it would bend where the two pieces connect.  We decided today that we needed to add a one piece tube over the two piece shaft to add stability to the kinetic spinner.  

R found a piece of old copper pipe that he salvaged from a past demo.  The ID (inside diameter) was the same size as the OD (outside diameter) of the spinner and added rigidity to the original shaft of the spinner. We just removed the tulip part and slid the copper pipe over the two pieces of thin walled tube. Then placed the tulip part back on the original shaft.  I will spray paint the copper pipe with black paint so you will not be able to detect that it is even there. 

Best part is that this was a $0.00 cost fix.  Downside was the piece came from the scrap pile and I had to hear "this is why I do not throw anything out" ALL DAY LONG.  Yes R we know you NEVER throw out anything....LOL

The kinetic spinner came from a company called Evergreen Enterprises.  I painted mine black to match the other iron/metal objects in and around my house.  Here is the post I wrote about the kinetic spinner and the flag bracket from the same company.

Next up.....Part 3.....hanging the Mason bee house.

Reuse Repurpose Recycle

Tuesday, April 4, 2017

Mason Bee House Part 1

Today I stopped by my local wild bird supple store, J.J. Cardinal's Wild Bird and Nature Store, to buy a replacement tube for my 36 inch finch feeder and walked out with a mason bee house that I assembled myself.
The class was full but there was a last minute cancellation so I was finally in the right place at the right time.
The house was all pre cut and pre drilled.  Assembly was pretty straight forward.  The tubes and liners were supplied along with enough liners for next year.  Also included were two strips of bee attractant, a bag of mud, and a small box of mason bee cocoons to populate my new mason bee house.  These cocoons are currently chill laxing in my fridge.
Cocoon Photo courtesy of

Why mason bees?

They are excellent pollinators, they are indigenous to our area, they are easy to raise, they are docile like honeybees, and why not?

Mason bees are strictly pollinators and do not produce honey.  But don't let this deter you from installing a mason bee house.  Honeybees are important but their population numbers are currently down and if you have fruit trees like I do, but have very little fruit production, you may need help in the area of pollination.  Last year I had plenty of blooms, no late frost, but very few fruit.  So pollination was the problem.

The genus species name of the blue orchard mason bee is  Osmia lignaria.  Mason bees lays their eggs in holes or tubes and then seal them with mud....hence the mason part of their common name.

Part 2 will cover hanging the bee house and placing of the cocoons.  Stay tuned.

Reuse, Repurpose, Recycle