Saturday, November 7, 2020

What Will We Do with the Pavers

 Right after Roger told me about the free pavers, he asked me "what can we do with them?"  At that time, I really didn't know  how we would use the pavers and I really didn't have time to think about it, either.  Part of the deal was that we needed to get the pavers off site before the demo crew brought their dump truck back to fill with all the debris and that included the pavers.

Stacking pavers is very boring so I had a lot of time to think about what we could do with all those pavers.  The pavers are various shades of brown so I don't want to use them close to the house. We want an exposed aggregate concrete patio to match the existing sidewalks and the house is grey.  Then it hit me like a ton of pavers.  We could build a large round patio under the large willow tree.  That area is very shaded and cool in the summer.

The brown of the pavers will match the dirt in that area because we will not have grass due to the shade.  But will have hostas and ferns because of the shade.  Plus, I didn't buy any hostas this year and I am jonesing to buy hostas.  Lots of hostas....sorry I can't help myself.

The ground under the willow is slightly sloped so I estimate 1 layer of retaining block buried and then transitioning into 2 layers on the low side.  When we broke apart the swimming pool we kept the wide concrete bull nose coping pieces.  They are 12 inches by 24 wide and have a bull nose on one side.  They are weathered because they are from the 1930's but I like the non new look.  We will need to rent a concrete saw to cut angles so we can form a 18 edged circle using rectangular pieces. 

The bull nose concrete pieces are very close to the same thickness as the pavers so I think that our only costs will be sand, crushed stone, renting the saw, and polymeric sand.  It would be great to keep costs as low as possible because we want a pool but that can't happen until we finish the back of the house.

 I did some very rough drawings and the patio will be at least 12 feet in diameter.  We have a square gas fire pit and 2 heavy handcrafted wrought iron tables, that I purchased at auction on the cheap.  The tables have wood tops but I want to cast concrete tops for them and a concrete top for the square gas fire pit.  That will repeat the patio bull nose coping pieces.

What will we use for seating?  We love Adirondack chairs but not the plastic ones nor the wood ones.  We want to be able to leave the tables and chairs outside year round.  We already have enough 'stuff' to store every year.  So we are going to deconstruct our wood ones and trace the pieces onto solid PVC boards.  This will be pricey and but they will be heavy and not blow over in a storm.  Build them once and they should last a long time and only require periodic scrubbing.

For quick daily updates follow Gear Acres on Instagram

Gratuitous kitty photos.


So that's the plan.

And as always...

Reuse Repurpose Recycle 


Friday, October 23, 2020

A Whole Lotta Free Pavers

 In the beginning of August we had to stop work on clearing the new land to go and pick up a whole lot of free pavers.  Of course it was 90 degrees and they needed to be gone ASAP.  

It took us 3 days of working in 90 degree temperatures and sometime rainy weather to get them all removed from where they were located.  It then took us another three days to empty two trailers and two pickup trucks full of pavers.
Roger loaded up the bucket on the tractor with the pavers and then carefully dumped them on the ground behind the barn.  Then I would stack them on pallets.  We already had a small pallet of this style of pavers but with the added pavers we can do a much larger project.  More about the project in the next post.
There were several styles of pavers.  First there were the whole pavers like in the photo above.  Then there were factory half pavers that were basically a whole paver cut lengthwise.  Then there were miscellaneous cut pavers and retaining wall pieces.  Each style went on a separate pallet.
Laying down the first layer is important because you have to make sure to span the open area between the boards so that the paver doesn't fall through.  Then each layer after that is rotated 180 degrees so that you don't form tall towers of pavers that could loosen and fall away.  This way it is all held into place by the layer below and above. 
By this time, my fingers were hurting and because I do not wear gloves, except when working with sheet metal,  I found my hands were getting smooth callouses on my fingers and I also think my finger prints were ground away.
When all was said and done we have 3 large pallets of whole pavers,  one smaller pallet of half pavers and pieces, and a small pallet of retaining wall pieces.  We also have between 30 and 40 16X16 patio slabs and 30 10X16 grey concrete slabs that we plan to use to make a path through a large hosta bed planned for an area of dense trees.  

I was so happy when I laid that last paver.  When I injured my wrist last year when my flip flop fell apart and I fell on my hand, I ended up with several crooked fingers.  I am pleased to say after picking up and laying down over 2400 pavers that my fingers are now straight.  My fingernails look horrible but the fingers are straight.

The next post will be about what we are going to do with these pavers.  So until then remember to...

Reuse Repurpose Recycle

Friday, October 2, 2020

We Purchased the Empty Lot

 I am so sorry for not posting during the summer but I have a good excuse.  We were finally able to buy the empty lot next to our house.  Finally!!!  Now we can plant trees and veggies that we couldn't plant before due to the huge black walnut trees.

 
Before I talk about the lot I want to take this time to wish everyone a healthy remaining 2020.  I have had very little contact with people other than family since the news broke about the virus and it looks like that will continue until the end of the year and into 2021.  It is a trying time for everyone. 

Back in March, Roger came home and said he ran into the guy who owned the lot next to our house and that he might want to sell it.  Roger told him that we wanted it and to let us know if and when he makes up his mind.  Several weeks later we agreed on a price and by mid June we signed the papers.

We actually started mowing the long grass and picking up the large broken tree limbs about a month before we signed the papers because when the weather warmed up the grass would start to grow and I wouldn't be able to see debris as I mowed.

About half of the lot was so dense with trees and huge broken  willow limbs that it was impossible to see through this thick mess.  We knew that there was a very large willow tree in the center of the twisted saplings and broken limbs all held together by wild grape vines but we were shocked when we finally cleared away everything and were able to get a good look at it.

Once the tree was revealed we were shocked at it's hugeness.  Over 20 feet in circumference!! The ice storm from a decade ago broke off a lot of limbs that are laying across other limbs that are still attached.  We are going to hire the same tree trimmers that we have used before, to take out the dead limbs and to tidy up where the limbs originally broke off.  

We are still cleaning up the lot which is one acre in size.  There is one small stand of buckthorn that needs to be cut down but we will leave that until the end because it blocks the burner barrel and allows us to burn even if there is a breeze.  We have a lot of trees that are 2 to 3 inches in diameter that need to go through the shredder and a lot of smaller stuff that needs to be burned.

It has rained the last 2 or 3 days so once the tree debris dries out we will start to burn again.  In the mean time, we have a pile of dirt that needs removing but there are plenty of deep holes in the yard that need filling and then there is the old broken down foundation from a long ago small greenhouse.  The foundation is in a very low area and we will just fill in that entire area.

Our plan is to use a rear tine tiller attachment for our 'new to us' Kubota tractor, to go over the entire lot with the intent on seeding in the spring.  Then during the winter we will work on removing dead limbs from the two 100 year old apple trees.  These apple trees were buried in vegetation and blocked from any direct sunlight.  Because of this they are in distress but we are hoping that we can save them.

Follow Gear Acres on Instagram for a quick daily update.

Reuse Repurpose Recycle


Friday, March 20, 2020

5 Items I Buy at The Dollar Tree

These are my 5 go to items that I purchase at The Dollar Tree store.  YMMV (your mileage may vary) if you use a different dollar store.  Unfortunately, not all items are a dollar in some dollar stores.
Pillar jar candles... Don't burn that $20.00 candle you've been waiting for a special occasion to light, when the power goes out.  Six of these take up about a 6X9 inch square of space in your cupboard.  No scent, long lasting, uses all the wax up so they are efficient, glass jar candles are safer, and they are 1 buck each.  Store on the top shelf, out of the way, and you will be ready for the next power outage.  While you are there buying candles, buy one of those lighter for lighting the BBQ.  They are perfect for lighting these pillar candles and they are just a buck to buy.

Reading glasses.....$1.00 a pair.  There are serious ones
 or brightly colored ones. 
Buy a couple of each style.  One for the purse, one in the kitchen, one in the bedroom, one for the top of your head, and of course one to hang from the neck of your shirt.  I have been known to wear two on the top of my head at the same time. But I am fancy like that!! Seriously, if you are over 40, invest a buck or 2 in some of these readers.  Your older self will thank you.
I love these boxes of aluminum foil in pre cut sheets.  They are perfect for baked potatoes or making a packet of veggies or fish for the grill.  No more messing around with trying to rip off a piece that is actually square or rectangle.  Mine always wads up on the little saw blade and the only thing that gets cut are my fingers.  Buy 2 and you will never look back.  Of course you will always need a roll for when you have a large pan to cover but these sheets are perfect for those smaller items.  Your fingers will thank you. 
And  while we are talking about aluminum foil lets also talk about aluminum baking pans, the throw away kind.  If you look closely you will find pans that also have plastic (some red some clear) covers.  These usually come two to a package for $1.00.  I use them when I make cold appetizers or for appetizers that I need to cook like smokey links wrapped in bacon or dates filled with goat cheese and wrapped in bacon.  I make them ahead of time but don't fully cook them.  Then when I get to my destination I put them in the hostess's oven for a quick warm up and finish up the baking.
  Hot appetizers are so much better when they are hot.  Especially if there is bacon involved, nobody wants cold bacon.  They want bacon, just not cold.  These are also great for when you want to bring home some leftovers from your sister's house.
And finally I am going to wrap this up with the wrapping paper and bow aisle.  It is shocking what the stores that specializes in cards, wrapping paper, and bows will charge for just a bow.  At the dollar stores you buy a bow, a roll of wrapping paper, and a card for what they charge for a card at those fancy schmanzy stores.  If you sell items on the Internet and use tissue paper to wrap your item before you ship, then you need to check out the dollar store for tissue paper.

I hope this will save you some $$$.  

The next few months are going to be stressful for everyone.  If we all have a little patience and work together, we can get through this uncertain time.  Know that at the end of the day you, me, and everyone around the world will be one day closer to having this  time behind us.

In the mean time
always
Reuse Repurpose Recycle

Saturday, March 14, 2020

Dremel 3 in 1 Ultra-Saw Review

Sometimes a big circular saw just doesn't cut it and when that happens, this is the saw that you need.
Roger has been putting off fixing some of the poorly installed patches in our wood floors.  From what we can tell the patches were done when the radiators were removed and forced air was installed.  Some of the patches look like a chainsaw was used to cut the floor boards and then to make matters even worse, they filled the void with plywood.
So when Roger came home with this saw I knew our floor catastrophe would soon be a thing of the past.

According to Roger, he needed a small circular saw so that he could do plunge cuts.  A regular circular saw is too big and the small oscillating saw is too small and the blade gets too hot, too fast when cutting oak.  Kind of a Goldilocks predicament.  
The saw was a good price at 99 bucks and came with the four blades in the photo above.  He priced out those blades individually and the cost came to around 80 dollars.  Now subtract 80 from 99 and that makes the saw $19.00.  Not too shabby.
The saw also came with a nice canvas bag for storage.  Too bad I didn't get a clearer photo but the wind was blowing at a steady 20-25 mph and today it is very cloudy and windy.  But I think you can see that the bag is a convenient accessory. 

I prefer a canvas bag with a handle over a hard shell case because they are easier to carry. Please somebody tell me that they too, dropped a hard shell case full of bits and now have a case that will not stay closed. I am hoping to snag another canvas bag off of eBay and use it for my other two Dremels and all the little bits and bobs that make the tools so useful. 
Right now we are taking advantage of the no snow condition to fix some privacy fence at a house we plan to sell in the fall.  Roger used the new Dremel 3 in 1 to cut off some lengths of small fence trim.  I am looking forward to using the attachment for sanding /paint removal.  That is the bumpy blade on the right side.  I swear I am either removing paint or putting paint on.

I did do a quit search on eBay to see what the prices were for this saw and I did see some for less but then I noticed they were refurbished.  I have never had any luck buying refurbished items.

I will update the saw review after we have used it for other projects.

But in the meantime remember to 

Reuse Repurpose Recycle


Thursday, March 5, 2020

Presto Pizzazz Plus

Recently I ran across a Presto Pizzazz Plus rotating pizza oven for 5 bucks.  My sister has a rotating pizza oven and if my sister has one then I need one too, right?

The pizza oven looked like it was only used one or twice.  The pizza tray was in perfect condition without any scratches which is good.  It didn't come with a box or instructions but a quick look on the Internet and I found all the info I needed.  So I said 'sold'.
The oven has a heating element on the top and on the bottom.  This speeds up the cooking time and insures that the items (yes items because you can cook more than pizza) are cooked all the way through.
The first item I tried was a $5.00 uncooked, medium sized pepperoni and cheese pizza from the Walmart deli case.  Medium is the biggest you can cook on the Presto Pizza Plus.  Which is fine because Roger and I only buy medium pizzas. But it's not a problem for a larger family or party because you can bake the next pizza while people are munching on the first pizza.  A medium size pizza takes 16 minutes.  We have since cooked a meat lovers pizza and it was another success.
Here are the pros and cons of buying a Presto Pizzazz Plus rotating pizza oven.

PRO

It bakes a great pizza.
It is not overly large so it should fit in your pantry.
In 16 minutes you can bake a pizza.
You no longer have to leave the house to buy a pizza.
You can also bake cookies, frozen pizza rolls, taquitos, and grilled cheese sandwiches.
In the summer you can bake a pizza without turning on your oven and heating up the entire kitchen.
Saves on electricity because it is just 16 minutes of 110v versus 25 minutes of 220v.  No preheating with the Presto Pizzazz Plus.
You will love the smell of fresh baked pizza.

CON

No on/off switch.  The oven starts rotating when you plug it into the outlet.  But it doesn't start heating until you set the timer.  We might add an inline switch later if it continues to bug us.

Seriously, I am thrilled with this item.  Next up, I am going to make a pizza using pizza dough from the freezer case and my recipe for BBQ chicken pizza.  If you saw my chicken noodle soup recipe where I use leftover roasted chicken from Sam's Club, this is the same chicken that I use for the pizza.
If you have kids that have sleepovers or you have family movie night, then the Presto Pizzazz Plus is perfect for you.  You can rent a movie, buy two fresh uncooked pizzas from Walmart, buy a large bottle of soda, and pop your own popcorn all for under 16 bucks.  Compare that to taking the family out to a pizzeria, then to a movie, where have to buy sodas and popcorn and before you know it you have spent 60, 70 bucks and on top of that, you had to get out of your pajamas and put on real clothes.  Having to put real clothes on during the weekend is a deal breaker for me.

You can also bake cookies with the pizza oven.  How many times have the kids asked for fresh cookies but you really don't want them to eat 2 dozen cookies.  Buy the roll of cookie dough and only cut off enough pieces for everyone to get 2 cookies.  Place the rest of the roll in a zip loc baggie and put back in the fridge.  Portion control without the kids knowing.  

 FYI....the Presto Pizza Plus has a black tray and the original has a silver tray.  The manufacturer added the word plus when they relaunched the item and wanted consumers to know that you can bake other items with the Presto Pizzazz Plus oven.  Other than that, it is the same pizza oven.  Oh by the way, do not cut the pizza on the tray.  Move the cooked pizza back to the card board it came on and then cut it.

Reuse Repurpose Recycle

Sunday, March 1, 2020

Installing the Nest Gen 3 Learning Thermostat Part 2

If you haven't read Part 1,  click here.

Now comes the part that gives you control over your stat 24/7 no matter where you are currently located.  Installing the phone app and syncing to your WiFi allows you to lower your temperature setting on your furnace while you are away, so that you can save your hard earned cash.  But it also allows you to come home to a warm house by using your smart phone to turn the thermostat back to it's normal temp before you arrive home.

Along with changing the temperature inside your home, you can monitor how much energy you have used and get extreme temperature alerts before your home gets too cold.

  I'm sure you have read the horror story of a family on vacation in January, who arrive back home to find that their furnace had stopped working, and all the pipes had frozen and burst.  Now they have to gut their home, deal with an insurance company, buy all new furnishing, mourn the loss of non replaceable items such as photos and heirlooms all because their furnace stopped working.  If only they would have had a warning that the temperature in their house was dropping.
Let's get started.

The first step is to download the Nest app (blue logo with white house) onto your smart phone.  When the download is complete you will find the Nest logo on your phone and click to open.

Nest will walk you through the process of syncing with the WiFi.  You will need to know your password or PIN number of your WiFi.  Our PIN number is on the bottom of the Internet modem in the world's tiniest font. The most important part is giving your Nest thermostat permission to use your WiFi.  Once that happens your new Nest thermostat can start learning your family's habits and will know when to lower your home's temperature in the winter, when to rise the temperature in the summer when the air conditioning is running and no one is home, and this will also allow Nest to alert you to dangerously low inside temperatures.

Our Nest thermostat also needed to give access to Consumers Energy and permission to monitor and adjust our usage during peak use time in the summer.   This was done through an email sent from Consumers Energy and was the easiest step of the entire process.

Our Nest Gen 3 Learning Thermostat has been up and running for over a month now without any problems.  The instructions said that it could take the thermostat between 30 to 90 days to learn our habits so I have not noticed any lowering of temperature at night or while we are away.  But to be honest I really have not been monitoring that closely.  As long as the house is warm, but not too warm when we are here, then I have no compliant.

I will do an update sometime in the spring after the Nest has learned what it needs to know and by that time we will have received 3 or 4 monthly bills from the utility.  

Reuse Repurpose Recycle

Sunday, February 23, 2020

Chicken Noodle Soup Recipe

Roger loves the whole roasted cooked chickens that you can buy for 5 bucks at Sam's Club, Costco, and Kroger.  There is always a lot of small pieces of chicken left over on the carcass after we slice off large pieces for our dinner.  So rather than throw it in the trash, I throw the small pieces of chicken into a pot along with whatever else I have in the fridge.
The recipe changes from batch to batch but generally this is the recipe.

Leftover chicken pieces. Pull apart larger pieces so they are spoon size.
2 cartons of chicken broth (I prefer low sodium but you use what you like best)
2 chicken bouillon cubes to pump up the chicken flavor
celery stalks, cut lengthwise and then diced
carrots fresh, cut in diagonal thin slices or use frozen or small can (drain before using)
small can whole kernel corn (drained)
1/2 C frozen peas not can peas. Can peas are too soft
1/2 C frozen lima beans
small can of mushrooms (Roger likes this)
2 cups or 3 handfuls of large size (dumpling) egg noodles
Season to taste.  I also add just before serving, a shake or two of dill weed.  Also had salt and pepper to taste.
In a large pot pour 1 1/2 cartons of broth (save the 1/2 carton for adding to bowls of soup when you re warm the soup because the noodles will soak up a lot of broth while in the fridge). Add the 2 bouillon cubes and heat at med high.

While the broth comes up to temp add your chicken pieces, carrots, corn, lima beans, peas, celery, even green beans.  Once it comes to a boil, turn down the heat to low medium and cover.

Cook your noodles in a large sauce pan.  Once they are cooked, drain, and add to the soup.  Never add uncooked noodles to your soup because the noodles will absorb all the broth.  At this point I add the mushrooms, cover, and turn the heat down to low for 1 hour.

You can adjust this recipe depending on what your family likes and how much soup you are making.

We prefer the large dumpling size noodles but you can also use the smaller egg noodles.

When reheating the soup in individual bowls, add some of the leftover chicken broth if the broth has absorbed into the noodles.

Store in fridge in a covered container so that the noodles do not dry out.

Enjoy
and 
always remember
to 
Reuse Repurpose Recycle


Saturday, February 22, 2020

Installing the Nest Gen 3 Learning Thermostat Part 1

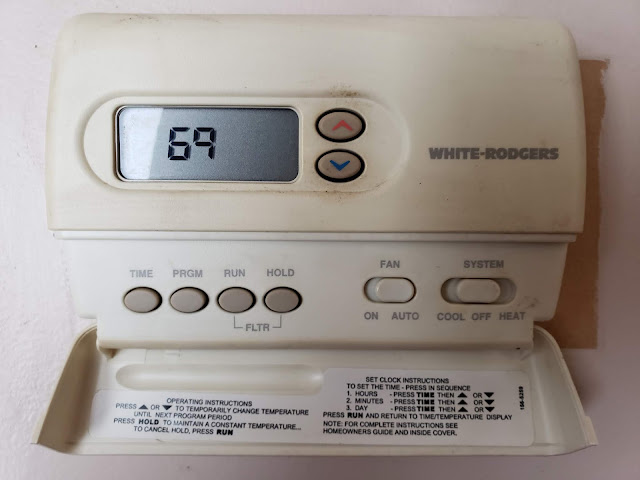
Our electric and natural gas supplier, Consumers Energy, offered a special on the Nest Learning Thermostat.  We needed a new stat because the one we have now is white and white plastic always turns yellow after a couple of years. It was nasty looking.
There are several outside ring color combinations to choose from when you place your order.  I ordered the black shiny ring version.  They say the grey ring version picks up the color of the wall.....I would have to see that in person....I'm skeptical like that.  You can also pick from several other colors.  But I stuck with basic black and shiny.

 One of the stipulations of buying the thermostat at a discounted price is that you allow the utility to monitor your stat and raise the temperature during the summer during peak hours when you have your AC running.  In return you also get a slight decrease in your rate.  You will need WiFi for the stat to work remotely.
 Let's start the installation.  Turn off the furnace at the thermostat.  It will take a minute or so for the furnace to actually turn off. Once the furnace is no longer running you can flip the furnace circuit breaker in the breaker box to the off position.  If it is summer and daylight then you can just flip the main circuit breaker to the off position.  But since it was 5PM and dark and winter I chose to just flip the circuit breaker. 
 Take a photo of the wires and the terminals that they are hooked to currently on the old thermostat. 
 The Nest Gen 3 Learning thermostat has a backing plate (where you will attach your wires) and the front display part.
Remove the display part of the thermostat from the box.  In the bottom of the box you will find the new backing plate, 2 screws, and the correct size screwdriver for the screws.
 Remove the wires from the terminals on the old backing plate and then remove the screws holding the old backing plate to the wall.  Marvel at the discoloration of your walls and comment to your spouse that you can no longer live in such filth.  Seriously, ewwwwww.  Roger said he had nothing to do with that dirt and dust.
 Pull the wires through the opening of the new backing plate.
 At the top of the new backing plate you should see a little blue area.  Look closely at it.....it's a bubble level so that when you install the backing plate you can check to make sure that it is level.  Of course you can install it in an un level fashion but then the display will be crooked. If you have OCD when it comes to level things like I do, then make sure the backing plate is level before installing the screws 
Straighten out the wires and cut off the exposed copper wire leaving only 1/4  of an inch exposed.  Refer back to your photo of the old backing plate to locate the correct connections for the wires.  EX the white wire went to W1.  So I pressed on the W1 terminal and slide the white wire into the hole until the wire bottomed out.  I then released my finger and gave the wire a little tug to make sure it was clamped in place and then moved on to the next wire.  

The only difficulty that I had was with the red wire which is the power wire.  My old backing plate only had an R terminal.  This backing plate has Rc and Rh.  When in doubt go to the Internet.  After reading around for a minute I found out that I needed to put it in the Rc location.  

When I installed a new WiFi Honeywell stat in my mother's condo before I sold it, the R wire was located in the same location as the old backing plate but I had to move a wire inside the furnace itself.  

Before attaching the display unit you will need to install the batteries.  These are rechargeable batteries and they will recharge using the power wire in the thermostat. Now attach the display part being careful to have the connectors lined up.  Do not force it on.

  Go to the breaker box and turn the power back on. It will take a moment for the furnace to come back on (if winter or in summer the AC).  If you are not running the heat or AC then you will need to set the stat to turn on whichever one you chose so you can check to make that the installation was done correctly. 
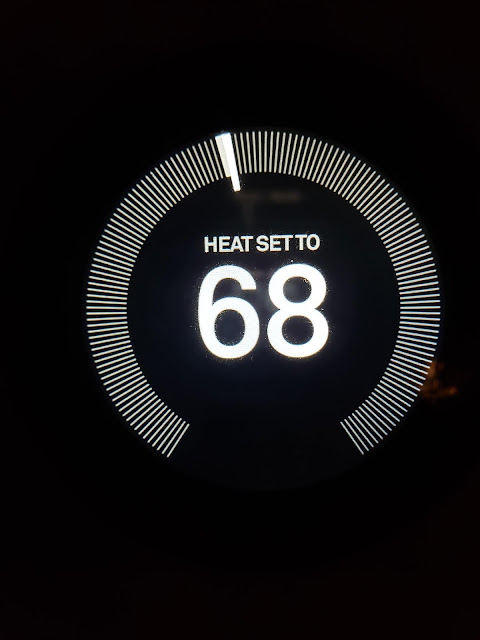
The display will show black if it isn't triggered by a person close by.  If nothing is running it will show the ambient temperature (like the photo above) of the room.  If the furnace is running it will display an orange background and the set temperature and the current temperature.  If the AC is running the background will be blue.
If you wish to see the outside temperature and weather condition just press the bottom portion of the screen.
To change the mode just turn the outside ring.  In the above photo it shows that it is in heat mode because it is orange.  The leaf is the Eco mode, next is the fan mode, next at the bottom right is the calendar where you set the date, next is time, where you set the current time and time zone, the gear symbol is for settings, and the arrow is back to the home screen.

The installation time was 40 minutes from start to finish. This included removing the old stat, install the Nest thermostat, set the mode (heat) and the desired temperature, and then finally making sure that everything was running.  This was my second WiFi programmable stat install so I knew what to expect.  Roger does not like doing this kind of work at all, so I am the designated stat installer in the house.

Tomorrow I will cover syncing up the stat to the WiFi and then setting it up so that the utility company can control our AC during peak hours in the summer.  This was a little more difficult because the pass code/PIN on the modem was sooo  tiny that I could hardly read it with a magnifying glass.  

This stat is suppose save you money by learning your habits and lowering your furnace setting when you are sleeping or away from the house.  The same for the AC. The instructions said it can take between 30 and 60 days to learn your patterns. Also with the Nest thermostat the yearly battery replacement is a thing of the past because of the rechargeable batteries.  Now if they could just make a furnace that changes it's own filter.

We keep our furnace temp fairly low already.  I studied Public Health in college and read about a study done on soldiers that compared the occurrence of head colds between the soldiers who slept in new air tight (higher temps) barracks and those who slept in old drafty (colder temps) barracks.  The occurrence of head colds were higher in the soldiers who slept in the new air tight (warmer) barracks. Our temp is set at 67 degrees in the winter. I also read an article that said you burn more calories if you sleep in colder temperatures.  I wonder just how cold the temps have to be to lose weight?  Obviously it is not 67 degrees.

FYI... I haven't suffered a cold in 9 yrs and my husband hasn't had one in about 5 yrs.  I probably just jinxed myself.

Reuse Repurpose Recycle

Wednesday, February 19, 2020

What YouTube Channels That I'm Digging Part 2

Part 2


99 Carpet  This is probably the strangest channel I watch.  There isn't any talking, just the sound of cleaning a dirty rug.  It is addictive.  Now I wonder if my rugs are that dirty. 

Brian Christopher Slots  Brian travels all over the US playing slot machines.  He also sets up group slot pulls where 20 people all put in a 1000 bucks each. They put the $20,000 in a high dollar slot machine and each player gets about 20 pulls each.  Then when everyone has had their 20 pulls they cash out and divvy up the money.  Sometimes it's less than their original $1000 and sometimes it is a little more than a 1000 bucks.  The purpose of this is to try and hit a big bonus on the slot machine that has a progressive bonus payout. This channel is fun to watch and informative for those who play slot machines at casinos.  

Post 10 This YouTuber ventures out in the rain and snow to unclog storm drains and culverts.  You will never look at a storm drain the same way again after viewing his vlogs.  

Baumgarter Restoration  This YouTuber restores old and priceless oil paintings.  Very skillful and I find this channel to be very relaxing.

Jeremy Fragrance and Fragrance Bros   Here are two YouTubers who cover everything you need to know about selecting and buying perfumes for both men and women.  There are many more but I feel that these two guys are very knowledgeable when it comes to the art of picking a scent.  Jeremy is a little out there and some days I can't get entirely through his video but he knows what he is talking about.  

Emmy made in Japan  This chick needs her own show on the Create channel.  She is based in Rhode Island and she finds weird recipes and tries to makes them.  Like ketchup ice cream.  She also buys kitchen gadgets and uses them to see if they really work.  

Nicola White Mudlark and Si-finds Thames Mudlark and Lucy's Larking Adventures and Northants Magnet Fishing  These are UK YouTubers who mudlark.  Mudlarkers search the shores of Thames for old coins, artifacts, or bits and bobs (as they say in the UK) to make original pieces of art.  Very interesting.  The magnet fishermen search the waterways leading to the Thames using powerful magnets.  They find motorcycles, bikes, trolleys (UK shopping carts), guns, WWI and WWII ammo, safes, and coins.  They take what they want and pile the scrap metal for the scrappers to come and pick it all up.  

Helen Wyatt  This sweet lady from Georgia makes some of the prettiest yard art.  Her vlogs are always uplifting and she is amazingly talented.  

Glasshoppa and Glassfusing  These are glass fusing vloggers and there are many more.  Did you know that you can fuse small pieces of glass in your microwave?    

Hydraulic Press Channel  This channel crushes everyday items in a hydraulic press.  Very interesting to watch in slow motion.

Gavin Hunyady 187 My son's racing channel.  He is currently remodeling a horse barn into his race shop.  You can follow that on his Instagram channel HighintheDirt.  The new race shop has heated floors and will have a hoist and other interesting trinkets.

Part 1 if you haven't read that one.

Enjoy
and always
remember to 
Reuse Repurpose Recycle

Monday, February 17, 2020

Easy Potato Soup Recipe + Bonus Recipe

This is the easiest and most inexpensive potato soup recipe.  I can't remember where I found it but when I run across that info I will add it to this post.
 Ingredients
5 medium size yellow potatoes (Yukon Gold)
1 lg can of creamed corn
1 lg can of evaporated milk
1/2 lb of bacon (try to get thick sliced and smoked for added flavor)
1/4 to 1/2 of a sweet onion diced into 1/2 inch cubes
Save 2 tablespoons of the bacon grease
Pre cut your bacon before you fry it.  It is much easier and you will get a more uniform size of bacon bits.  When the bacon is almost cooked, remove the bits and place on folded paper towel to remove excess grease.  Do NOT compress the paper towel to remove all the grease.  The grease has flavor.  Save 2 tablespoons of the grease.
Peel and wash your potatoes.  Cut each potato into 4 pieces to speed up the cooking process.

Add enough cold water to cover your potatoes pieces by 2 inches.  Use the pot that you are going to cook your soup in.  Cook your potatoes (med to med high) until a fork can easily go into the potato.  Do not over cook your potatoes or they will fall apart. Drain the water and remove the potatoes to cool so that you can dice them.  Cut the potatoes into 3/4 inch cubes once the potatoes have cooled slightly.  If you try to cut too soon the potatoes will fall apart. 

Into the EMPTY pot that you just used to cook the potatoes, add the evaporated milk, 2 tablespoons of the bacon grease, diced bacon, 1 can of creamed corn, diced onions, and the cubed potatoes.  Season to taste with salt and pepper.  Remember that the bacon will already have salt.  Better to go lightly with pepper.  You can always add more later.  Cook for at least 1 hr on low to low medium heat in a COVERED pot.

Tips

I made this without the bacon grease the first time.  The first time I really compressed my paper towel to remove all the grease.  This caused the soup to hardly have any bacon flavor.  The second time that I made the soup I did not compress the paper towel and I just let any excess grease collect in the paper towel.  I also added the 2 tablespoons of bacon grease when I made it the second time.  It didn't make the soup greasy but did add a lot of flavor.

Try to use a Vidalia onion if you can find one, if not make sure it is a sweet onion or the onion taste will overpower the potatoes.  

I like to dice my ingredients so I could theoretically I could get a piece of potato, bacon, and onion onto a soup spoon at the same time.  

I find that soups always taste better the next day.  So either make the soup early in the morning and then put in the fridge until time to rewarm or make it a day ahead of time.

The next time I make it I might add a small can of whole corn to get more of a corn taste. 

My husband really liked this soup and I liked how easy it was to make.

We added garlic and herb croutons just before eating.  

Enjoy
Below is my sister's potato soup recipe and basically everything that she cooks is good, no wait....really good.  She uses apple smoked, thick sliced bacon and oh my goodness is it good.  You can see by the recipe that this might have more calories....LOL  She also cooks her soup in a crock pot so there is no need to precook your potatoes. My recipe could also work in a crock pot.
Try these recipes and let me know what you think.
Enjoy
and 
always remember to
Reuse Repurpose Recycle