Showing posts with label scrap pile. Show all posts

Monday, March 4, 2019

Worked on Secret Project Inside Where it is Warm

We really wanted to hang more shingles today but it was like 14/15 degrees outside.  When it is that cold it is just brutal on the hands.  The day before yesterday we worked on installing shingles next to the door.  It was 19 degrees out and it was slow going.
 So today we stayed inside and continued working on a project we started last summer.  Most of it is scrap lumber but I did have to buy the working parts.  I am going to keep it a secret until the reveal this summer.  I can tell you that it is an outdoor wall decor piece.  That is your one clue.
 We had some cut off pieces that worked perfect for the outside frame and tomorrow we will miter the corners. Then I want to add another piece to the outside of the frame.  I haven't dug through the dwindling scrap pile lately and but if I can't find what I am looking for I will just buy a piece of pine.  Pine is cheap.
Tuesday I have several morning appointments and then I need to go to the township and pick up a dumping permit so that we can haul away all those old Andersen windows that we removed and replaced with the restoration windows and also the old patio door needs to be tossed.  We have to order 2 more restoration windows for the second story and a custom made exterior french door for the master bedroom on the second floor and that should wrap up the window situation.

I see that they are forecasting above freezing temps later this week.  The last thaw we had didn't melt all the snow before it refrozed. Now we have a lot of ice under a thin dusting of snow.  I have fallen or nearly fallen a half dozen times.  So I am looking forward to the next thaw before I don't want to start springtime with any broken bones.

Reuse Recycle Repurpose


Thursday, June 7, 2018

Removing the Flat Roof on the Back Room

I probably should have said 'Removing the Flat Roofs' instead of roof.
Before photo

Yesterday the first roof came off.  It consisted of a thin rubber membrane and an underlayment of Homasote.  That exposed another layer of rubber membrane.

Today the second layer of rubber membrane was removed and exposed ANOTHER layer of Homasote.  Under the Homasote was ANOTHER layer of rubber membrane but that layer was thick rubber.

Guess what? Yup....another layer of Homasote.

But good news.  When we stopped at 630PM, we were down to the original green cedar shakes.

We have a huge pile of debris on the deck to clean up tomorrow.  The debris will go into large trash cans and R's doctor says we can dump it in his dumpster.  Thanks Doc!!!!

The green cedar shakes will stay on until the weather forecast is for drier weather.  Right now it says rain for Friday night through Saturday afternoon.  I guess we will find out just how much that original roof leaks if it rains.
The beginning of another scrap pile.  Aluminum scrap doubled in price this past week.  It went from 55 cents a pound to $1.10 a pound.

We will get a chance to work on the secret barn project if it rains on Saturday.  

Reuse Repurpose Recycle

Don't forget to follow Gear Acres on

Pinterest


Friday, March 16, 2018

1960's Craftsman Table Saw Refurbish Part 2

We made quite a bit of progress on the table saw today.  If you are new to this project, just click on the link below to read Part 1.


  R went and picked up the electric motor from the repair shop while I met the tree trimmer for an estimate on removing storm damaged limbs and dead limbs.  

We were shocked when the repair shop called and said the motor was fixed and the charge was 60 bucks. I've read horror stories on the Internet about people who were restoring these old saws and that a new motor, if you could find them, cost a lot more than the the saw.  This refurbish could end up costing around 100 bucks.  Sounds perfect!!!
When R returned home, we ate lunch, and then got to work tearing apart the home made wooden saw base.  First item on the list was removing the two wheels.  The wheels and axle will work great on our rolling trash cans.  If you don't buy the heavy duty trash cans, the trash guys will reduce a lower quality trash can to something that resembles a sieve.  And if you have wheels on your trash can you will now have a full time job putting wheels back on your trash can.
After we removed the wheels, we needed to cut off the stub of 2X4 on each corner.  The reciprocating saw made quick work of that.  We now had a nice flat area to attach out 4 new locking castors.  We used 4 lag screws on each wheel.  After that, we flipped the base onto it's new castors and starting pulling out long nails that were sticking out of the wood base and also holding the badly damaged top to the base.
It took a while to pull the nails out but once the top was gone we could get to work on the bottom shelf.  R was unsure if his dad built the bottom without that piece of wood or if that piece got broken somewhere and sometime in the past.  No fear....we have a scrap pile and we're not afraid to use it.
The chosen board looked like it was the side of a built in pine cabinet that we removed several years ago.  Measured, marked, cut, installed, done.  
Now comes the top.  The top is flush with the back because the saw motor sticks out in that area but the sides and front can overhang the base.  I measured and figured 4 2X8 and 1 2X4 would give us just about the correct width that we were looking for but the overhang in the front is uncharted waters so we made the boards 40 inches long and once the top is glued and joined with biscuits we will decide how much of an overhang is needed.

But first we needed to go to the barn and look and see what 2X8's were available.  We found two boards rights away.  I have no idea where they came from but they are old and might be fir because they were slightly orange/tan and smelled like a Christmas tree.
We biscuit joined the boards in two pieces because our bar clamps were not long enough.  One piece had 3 pieces and the other had 2 pieces and tomorrow we will join the two pieces to make one top.  For now they will dry over night.

I haven't figured out yet if I am going to sand the top and just seal it or if I will sand, stain, and then seal.  I have several small cans of stain so that is good if we want to keep this project under 100 bucks.

Reuse Repurpose Recycle

Don't forget to follow Gear Acres on
Pinterest
Instagram
Dynochicks Treasures on Etsy

Wednesday, March 14, 2018

Next Project....Refurbishing a 1960's Craftsman Table Saw

We really need a table saw.  We had one but the the motor went out and we were too busy to fix it.  It was never a good saw to use because the work area was small. Using it always required 2 people, one to feed and one to catch.  So today we hauled out R's dad's old table saw to see if it was worth saving.
It looks bad, doesn't it?

It has arms that extends to accommodate a sheet of plywood.  The roll around base was hand built but we think we can spruce it up with the help of our scrap pile. Gotta love a good scrap pile.
This table saw also needs a new motor.  R removed that today and will take it to see about getting a new one or getting this one rebuilt.  We are hoping that a rebuild will be doable and affordable but if not we will get a new one.  But fingers crossed on the rebuild.

The top will need to be cleaned of the rust and gunk.  R says it is more gunk than rust. Then it needs a wax or polished or whatever they do to make the top very glide able.  I haven't searched the Internet yet but I vaguely remember that you do something to it.
We will change out the two tires.  They are small and hard and the set up only has a small window where the stop is off the floor and you can roll the saw around.  We think that large, lockable casters on all four corners will work better.  When we flip this over we will know for sure that casters are doable.
 This is the plate where the motor is bolted. I didn't get to see it before R removed it but I'm wondering how it works.  I just hope that it is quieter than our other saw.  It was very noisy from day 1.


Sunday, April 9, 2017

Mason Bee House Part 2

I'm really excited about the Mason bees.  I  know that they do not produce honey but they help with pollination and are fairly maintenance free.  Maintenance free is something I really like.

You can read about the Mason Bee House Part 1 HERE.

The first thing that I did when I arrived home with my newly assembled Mason bee house was I disassembled it.  Yup I took it back apart so I could glue it together.  I used wood glue and then reassembled it.  Then I used a damp cloth to wipe down all the areas where glue squished out.  I then let both the glue and wood dry completely

Next I applied two coats of exterior primer and one coat of the same exterior paint that I use on my house.  The paint is Behr exterior in a satin finish in the color Anonymous.  I want the Mason bee house to blend in and not stand out.  
I couldn't find a photo of the painted bee house but did find this weird crooked photo of my purple/blue fingernails and old ripped sweatshirt.  How lovely.

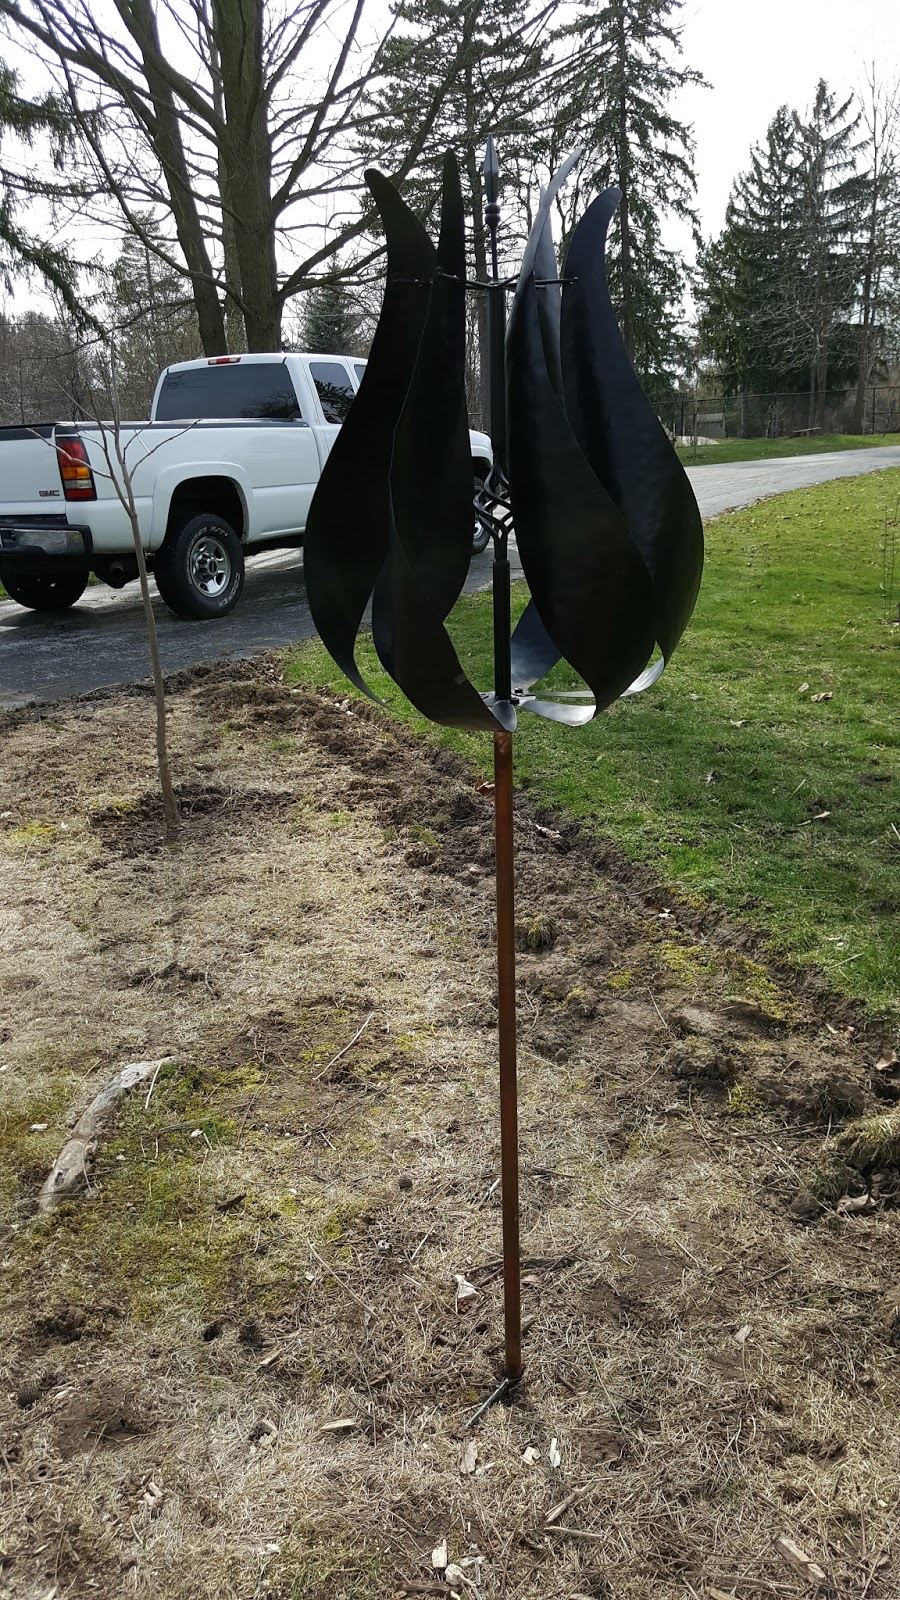
Today we put out our kinetic spinners.  We have three but my fave is the large tulip spinner I bought last year while shopping with my sister.  We love it but it has a design flaw.  The shaft is too light weight for such a heavy top AND then add the spinning and it goes all wonky and bends.  The photo below is an 'after photo'.  See how straight it is now.
The shaft is made of two pieces and is thin walled tubing.  As the kinectic spinner spins it would bend where the two pieces connect.  We decided today that we needed to add a one piece tube over the two piece shaft to add stability to the kinetic spinner.  

R found a piece of old copper pipe that he salvaged from a past demo.  The ID (inside diameter) was the same size as the OD (outside diameter) of the spinner and added rigidity to the original shaft of the spinner. We just removed the tulip part and slid the copper pipe over the two pieces of thin walled tube. Then placed the tulip part back on the original shaft.  I will spray paint the copper pipe with black paint so you will not be able to detect that it is even there. 

Best part is that this was a $0.00 cost fix.  Downside was the piece came from the scrap pile and I had to hear "this is why I do not throw anything out" ALL DAY LONG.  Yes R we know you NEVER throw out anything....LOL

The kinetic spinner came from a company called Evergreen Enterprises.  I painted mine black to match the other iron/metal objects in and around my house.  Here is the post I wrote about the kinetic spinner and the flag bracket from the same company.

Next up.....Part 3.....hanging the Mason bee house.

Reuse Repurpose Recycle