Showing posts with label French doors. Show all posts

Sunday, March 24, 2019

Southside Shingles and Exterior Lights Mounting Blocks DONE!!!!!

Believe it or not the southside re shingle project is complete.  Seriously that last row took far too long.  Photo below is R installing the last cedar shingle.
This project was more than just re shingling the southside deck area.  I will try to list all the different phases in the order of completion.
We replaced the non original windows with restoration windows.  I'll be honest and say this was quite the cost and thank heaven we could install them ourselves to help with keeping the cost down.

Next we reshingled around the new windows and primed and painted those shingles.
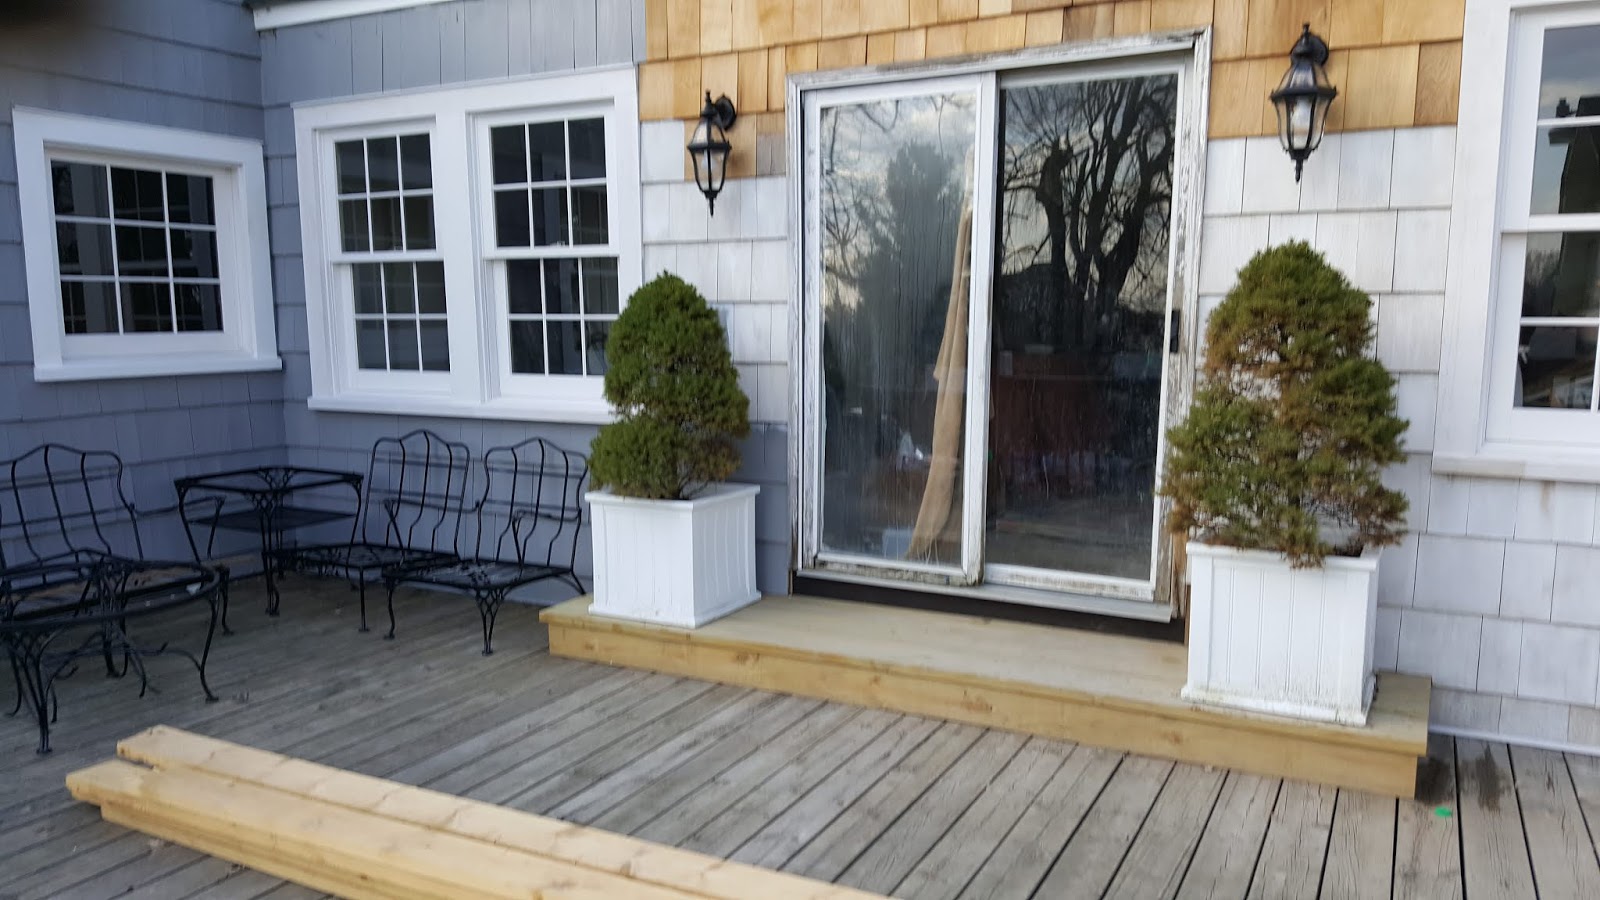
Using a mix of new and old lumber we built a large step in front of the patio door.  We wanted a deep tread so that walking in and out would be easier.  The deeper tread allows you to not break your stride.  The step is also very wide which allows me to display pots and planters.

In conjunction with the step build we also installed two new exterior lights that match the light by the front door.  

We removed the last non original window in this area and installed another double window to match the other 4 double windows.  My window guy took a lot of time doing measurements of our old windows to get these new windows to look like they have always been here.  The attached trim is identical to the original trim.  The slope of the sill is identical and the overall size and how the windows are mullioned together is also identical.  

When it comes to windows you have to take your time and do it right because inappropriate windows will look out of place and draw attention to an element not being original.  These windows looked like they were installed in 1926.  The last thing that we wanted was for someone to say "oh look, new windows."

Now came the most taxing part and that was removing all the old shingles on the east side, removing a huge picture window and two casement windows, installing studs and sheathing to close the opening, and removing 10 layers of various roofing materials off of the nearly flat roof over the game room.  
Let's start with the cedar shingles.  We started removing the old shingles and soon realised that someone had installed newer cedar shingles over the old shingles.  We wondered why they did such a thing and we soon found out. Back who knows when, someone ran electrical wires (3 to be exact) on the outside of the house and under the top layer of shingles.  
One wire goes from the second story over to the garden shed which is actually the original pump house for the well.  Currently it has our pressure tank in the basement area of the garden shed. This wire also had a nail or two driven right through it. 

Along with that wire, there was a live wire that was buried in 6 inches of tar.  We were able to pull that wire down and into the basement where it is currently coiled up, shut off at the panel, and waiting to be run through conduit and become another outlet in the basement.

Now we were down to the last wire and it was from the old security system and it too was no longer active. We pulled on the wire and the other cut end came out of the wall.

The live wire that went to the pump house needed to run from the house by way of a masthead on a 2 inch OD pipe.  R just happened to have a 6 ft length of thick walled aluminum pipe in a 2 inch OD size.  The head, tension wire clamp, and three new wire clamps cost around 25 bucks.

We were able to cut off the area where the nails had pierced the wire due to relocating the wire from where it was attached to the second story.  It now runs up from the panel in the basement, through a stud cavity, and through the first floor roof and terminates 24 inches above the roof.  The tension wire was moved from the house and clamped to the mast using a new clamp.  R then attached the hot and neutral wires to the hot and neutral wires attached to the tension wires and then finally the ground wires were attached and grounded.
Eventually the wire going to the pump house will run from the basement and underground to the pump house.  That will not be a job we will do ourselves but one that will need to be hired out probably when we get a whole house generator installed.  For now the wire running from the house to the pump house is secure and working properly.  

If a tree or ice storm was to bring down the wire, it would pose no threat of fire because the live wire is located coming out of the masthead about 10 inches and a full 14 inches from the actual roof.  The wire that would come down in a storm would be a disconnected and dead wire.  So there would be no threat of fire on the ground or to the pump house.  Running the wire underground would eliminate the threat of power loss during a storm.
We then moved on to the nearly flat roof.  Oh my what an absolutely mess.  I kid you not, there were 10 layers of multiple types of roofing.  Most were probably installed due to a leak but each layer just added to the leak problem.
Elvis just had to see for himself.  R has the "you've got to be kidding me" look on his face.

Here we go.  The top layer was a rubber roof and underneath it was a layer of Homasote.  Then another layer of rubber roofing and another layer of Homasote.  Next was a double thickness of rubber roof with yet another layer of Homasote, then a layer of asphalt shingles, and then two layers of the original cedar shake shingles.

The original planking was rotted in places and some of the ceiling rafters were undersized and the nails pulled away due to the weight.  We removed all the rafters, built up the side walls, installed 2X8 ceiling rafters in the gameroom below, 16 inch on center, and we used joist hangers to attach the rafters to the ceiling beam.
Next we salvaged what we could of the original tongue and groove planking and along with what we had salvaged from other demos so we were able to use period materials for the roof decking.  
Then came the roof rebuild.  The house has regular gable end design EXCEPT for this area which has a hip roof which was probably used to give more head room in that bedroom. We decided to go with the hip roof and then decide what we would do with the remaining 40 inches after the hip roof part was complete. 

 Originally this area was an open large back porch.  Possibly a sleeping porch.  I have no idea when they decided to enclose it but I can tell you that they obviously did not consult a professional.
We decided to build a gable end that fades into the existing hip roof.  I looked at a lot of newer houses in the area that have multiple styles of roofs on one house and decided that this was the way to go.  It was important that we kept the portions correct and not have a tall narrow peak but instead needed to be the same or close-to in portions like the other gable ends on the house.

This part took us a long time.  We used brackets to attach the gable rafters to the sheathing on the hip roof.  It was a difficult job with lots of angles and whenever we were in doubt we overbuilt.  R said he jumped up and down and no where did he feel anything.  

After the roof was sheathed, we hired a friend to roof it because we were running out of time and Christmas and snow was fast approaching.  He spent a part of 4 separate days to complete it and we are very happy with the outcome.  As with every project we do with this house, it was important that it looks original and we feel that it hits the mark.
It was now well below freezing as we started the last of the roof project which was install the 1X6 PVC fascia boards and the vinyl eavestroughs and downspouts.  We chose the 1X6 PVC boards because they are white, as is our trim and they will not rot so there is no maintenance.  Actually with the vinyl gutters the PVC board is completely covered.

We chose the larger sized gutter and downspouts (5 inch) because in some areas there was no where to add a downspout without it looking odd so the larger sized gutter helps carry away the added rain water from having less downspouts.

After the eavestrough and downspouts were installed we went back and started to fill in the missing cedar shingles on the southside while we waited for a 60X80 inch exterior french doors to arrive.  The door was ordered online but we chose to pick up at the store to say a $75 delivery fee. 
Installation of the door took several days to get it just right.  We do better with windows but doors are trickier for us.  While we cut and made the trim to match the front door using 1X6 double thickness cut down to 5 inches wide we waited for the entry door handle and deadbolt to arrive.  I was lucky and was able to use a 20% off code.  The brand was Emtek and the model was Franklin in a matte black with a glass doorknob inside.  We also ordered a dummy handle for the stationary door so that the doors would look balanced.  We haven't installed that handle yet.
Once the door trim was finished and we finished the cedar shingles around the door we decided to make wood mounting blocks for the exterior lights.  We used 1X6 scrap wood  glued together for thickness and then cut into 5x5 inch squares.  Using a router with a round over bit we dressed the edge to look a little more finished and installed them on a 90 degree angle so they looked like diamonds.
And that is where we are today.  Of course we still need to caulk, prime, and paint but the weather hasn't been warm enough for that to happen and probably won't be warm enough until the end of April.
Congratulations if you made it to the and of this post.  Sorry it was so wordy.

Tomorrow we start hanging cedar shingles on the east side.

Reuse Repurpose Recycle

Tuesday, March 5, 2019

Secret Project Work and a Few More Shingles

The high temp today was 16 degrees for about an hour in the afternoon.  R braved the bitter cold to hang more shingles.  In the meantime I stayed indoors with the cats and worked on my secret project.
A long time ago I purchased a box of offset hinges to use in the kitchen.  The price was great and at 10 bucks I purchased in haste.  When the hinges arrived I realised that I could not use them on the kitchen cabinets.
But I have since been able to use the hinges on various projects but not as hinges.  So today I again hauled out the box of hinges to use on my secret project.
I'm not using them as hinges so I cut the hinge portion off with a hacksaw.  I'm repeating a design element that has been used both inside and outside of the house.  I now have just 6 hinges left!! 
So tomorrow R and I will make a placement adjustment on the exterior lights on each side of the french doors.  One of the lights is 7/8th of an inch further from the door.  The light fixtures were in the correct spot for the other door but when we installed the new door we tried and tried to center it in the opening. Unfortunately the door just wouldn't stay plumb and level unless we moved it over 7/8ths of an inch.

It's not a big deal because we wanted to use a wood block under each light rather than have the fixture sit on the shingles.  The fixture will fit against the wood block tighter than it currently does against the cedar shingles.
I hope that everyone enjoyed their paczki today.  I had two, raspberry and lemon.  Why have only one???  R had to wait in line for almost a half hour because there were so many people buying these tasty calorie filled pastries.  It was worth it.

Reuse Repurpose Recycle


Tuesday, February 19, 2019

Gameroom French Doors Part 3


Google+ and G+ are going away so you will no longer be notified when I post.  You can follow my blog by using Bloglovin and they will notify you by email when I post.  I am also looking into using feedburner etc. as a means of notification.  Also, Bloglovin has 1000's of blogs so you might find an additional couple of blogs to follow.  Gear Acres is in the DIY/Craft category.  You can only pick one and Decor didn't seem like a good fit.

Actually, I think getting rid of the Google+/G+ will be good.  I have been told that some people wanted to comment and couldn't because they did not want to join G+.  I probably wouldn't want to subscribe and remember yet another password, either.


Gameroom French Doors Part 1 
Gameroom French Doors Part 2


Today we installed a wood threshold that we made to mimic the concrete thresholds on all the original exterior doors. I didn't want to just use the same thickness of board that make up the door trim.  The door trim was made out of a 2X6 that was ripped down to 5 inches wide.  For the threshold we used a 1X6 and a 2X6 screwed together so that the threshold was thicker.  If we had used just a 2X6 it would have looked too picture frame like.
After we finished with the threshold we measured and cut the PVC drip cap for above the door.  All windows and doors need drip cap on top of the top piece of trim.  This piece of trim hangs over the edge of the top trim board and keeps rain water from getting behind your trim and eventually rotting the trim and sheathing which ultimately lets rain water get into your house.


I have been replacing the original wood drip caps, on this house, with the PVC drip caps. Several of the wood drip caps showed the beginning of rot so why not replace now and be better safe than sorry.  It's not a design feature so I am not changing anything aesthetically about the house.  I am though changing to a better performing material that will not rot.

The PVC drip cap in the photo above shows the little groove on the bottom.  The drip cap is attached to the top trim with small finish nails and positioned so the little groove on the bottom sticks out slightly over the trim piece of wood.  The groove works like magic when a slow moving drip wicks around the front edge of the drip cap.  Rather than continuing to wick back towards the wood trim the groove breaks the surface tension and the drip falls off.
  
FYI A good concrete porch with a design where the concrete porch cap has an overhang should also have a groove incised into the underside to eliminate drips from wicking back.  Without that groove the drip continues back and will then leave the sides of your porch wet.  If you have a brick porch and live in cold climate the wet bricks can freeze and crack.  If you already have a porch without the groove you can add the groove by using a grinder with a thin masonry cut off wheel.

Notice the thin white line on top of the top trim board.  That is the drip cap installed.  Barely noticeable but very important to the long term health of my wood trim.

Tomorrow I will cover the new door handle, the install, and why we chose this style, color finish, and what measurement you will need before ordering your door handle.


  We will wait until spring before we install the dummy handle on the right side door because we will need to drill 2 large holes in the same location as the factory holes.  The only difference between the operating door handle and the dummy door handle is that the dummy does not come with a lock set or a door latch.


Winter Outdoor Projects


Hang cedar shingles

Finish adding the 1X4 trim on the peak area on the gable end of the roof
Build and install a replica of the gable vent
Build another 2 sets of shutters

Reuse Repurpose Recycle


Monday, February 18, 2019

Gameroom French Doors Part 2


Google+ and G+ are going away so you will no longer be notified when I post.  You can follow my blog by using Bloglovin and they will notify you by email when I post.  I am also looking into using feedburner etc. as a means of notification.  Also, Bloglovin has 1000's of blogs so you might find an additional couple of blogs to follow.  Gear Acres is in the DIY/Craft category.  You can only pick one and Decor didn't seem like a good fit.

Actually, I think getting rid of the Google+/G+ will be good.  I have been told that some people wanted to comment and couldn't because they did not want to join G+.  I probably wouldn't want to subscribe and remember yet another password, either.
We finally have the french doors permanently in place.  The tweaking took several days for several reasons.  One being the house is old and the opening was slightly askewed and the other is that we are not the best nor fastest door installers.

There is one thing we noticed right away that we love. It's the fact that you can open both doors and it makes carrying in and out larger items so much easier.  This opening is smaller than the standard opening for exterior patio doors.  Standard openings are 72" X 80" for your typical sliding or french door exterior opening.  Our opening is 60" X 80" which is an entire foot narrower.  

The old doors were sliders which meant that the open side was actually less than 30 inches and more like 28 inches.  That is OK for walking through but we are using this as our workroom which means we are hauling items in and out all the time. Now with the flick of a finger we can unlock the fixed side and have nearly the full 60 inches.
After screwing the door in place we could move on to the exterior trim.  We decided to trim out these doors to match the front entry door.  The front door exterior trim is a 2X6 trimmed down to 5 inches.  So the first thing we did was to take 1/4 of an inch off one side to get a nice crisp edge.  After that, we measured off 5 inches and cut.  We prepared all 3 trim boards at the same time so we didn't have to keep adjusting the table saw.
Now  that the boards were all the same width we measured and cut the side pieces first.  We attached them with 2 finish nails at the top and bottom.  Then we moved on to the other side and did the same.  I held the top piece in place while R marked it with a pencil.  The top board was nailed in place with two finishing nails at each end.  

Now that the pieces were all in place we went back and added 2 more finishing nails every foot on both sides of the boards.  In some places we needed to shim out the trim so that it would be level with the trim board that was next to it.  This house is sheathed with various 1 inch thick lumber and over the nearly 100 years some of it has bowed, cupped, and shrank so we use wood shims to make the trim boards lay nice and flat next to each other.

We finished up by countersinking all the nails.  The proper depth is to sink the nail head into the wood to the depth of the width of the nail head.  In the spring we will putty those holes but for now it is far too cold. 

Tomorrow we will install the door handles that I purchased from House of Antique Hardware.

Reuse Repurpose Recycle


Tuesday, February 5, 2019

Gameroom French Doors Install Part 1


Google+ and G+ are going away so you will no longer be notified when I post.  You can follow my blog by using Bloglovin and they will notify you by email when I post.  I am also looking into using feedburner etc. as a means of notification.  Also, Bloglovin has 1000's of blogs so you might find an additional couple of blogs to follow.  Gear Acres is in the DIY/Craft category.  You can only pick one and Decor didn't seem like a good fit.

Actually, I think getting rid of the Google+/G+ will be good.  I have been told that some people wanted to comment and couldn't because they did not want to join G+.  I probably wouldn't want to subscribe and remember yet another password, either.  

But guess what?  It wasn't snowing or raining and so we started the patio door install.
 Yesterday (Monday) R removed the old, rotted, and extremely ugly patio door.  This back room is currently our workroom but will ultimately be our gameroom.  If old school video games are your jam, stay tuned for some gaming action.

We have 4 upright videos games.  They are Tetris, Defender, plus we have an empty Stargate cabinet and a board so there will be a monitor install in the future.  We also have a Mr Do upright plus we own all the other boards including a bootleg Yankee Doodle Do who eats oil barrels and is chased by terrorists.

And finally we have Elevator Action which is sort of a rarer game.  It came to be when they converted Jungle Hunt/King into an Elevator Action by changing the graphics.  The controllers and game layout are the same.  I am guessing that they felt that there were a lot of jungle themed games and that is why they changed.

We also have a Japanese Mr Do slot machine.  We plan to add a cocktail table MAME that has 1500 games.  They still want big bucks for the cocktail table Ms Pac Man so for the same money we can get 1500 games or one or two games with the traditional cocktail table version.

We also have a 1930's era Brunswick pool table that we will restore.  In the past we shot a lot of stick but I dislike going to billiard halls because people do not know the correct etiquette and it totally throws my game off.  Looking forward to fine tuning my game.

Enough about video games.  Let's talk french doors.
And let's not forget the roof.  We are very pleased with the  results.

The french doors still need some tweaking.  We ran out of daylight and stamina. Tomorrow we will square everything up and install the new door handles.  And if everything goes along without a problem we may even start the trimout.
 I cannot wait until I can paint the shingles grey. 

Reuse Repurpose Recycle 

Monday, January 21, 2019

New Patio Doors and Repurposing the Pallet

The new french doors for the gameroom arrived a week and a half early,  just in time for a snow storm and frigid sub zero weather.
So installation will have to wait until the temps get above freezing.  But in the meantime I needed to pick out a lockset that would match the three original locksets on the house.  The original lockets are the black hammered thumb set with a cylinder lock above the handle.  If I searched long enough I might be able to find 1 handle but I have this thing with symmetry.  There is no way in the world that I would be happy with just one door handle.

I scraped the idea of looking for an old handle and decided to buy 2 new handles that would work with the look of the old handles.  I found a door handle on House of Antique Hardware.  I knew that I wanted a black handle and not a handle that I had to spray paint.  The door handle I chose comes in matte black. They also offer a choice of door knobs for the interior side and one of the choices match the glass door knobs on all the doors in the house.


Sorry about the link but I was unable to copy just the image of the door handle.

House of Antique Hardware was also offering a 15% off sale so I saved 50 bucks.  Edited 1-22-2019 I spoke with an associate on the phone to order the dummy set.  The cost of it made my total over $500.00 and that qualified my order to receive 20% off my total.  So I saved $115.54.  The associate was very helpful and my order should ship in the next 3 days.

The patio doors came on a pallet for transportation.  We picked up the doors at the store so that we could save on the shipping cost.  After R picked up the door using his truck, we removed it from the pallet and then moved it to the deck.  The pallet was originally going into the burner barrel but then we realized that it would make a great pallet for stacking the bricks from the chimney that we are removing sometime before spring.  We have three fireplaces and three chimneys but one chimney serves two fireplaces so the third chimney is useless and just a remnant for the coal fired steam boiler that serviced the house when it was built.  

That system is long gone and the chimney is eating up valuable floor space.  We might need some bricks to fix the working chimneys when they are repointed this spring. Also, in the future I would like to have the front porch rebuilt using the red brick for the sides.
The pallet had a support for each side of the door.  We removed those boards and then removes the nails and staples.  We spaced those boards to fill the gaps in the pallet.  The boards were too long so we cut them off after we screwed the boards onto the pallet.
Viola!  A new pallet and we reused and repurposed.  Win Win

Reuse Repurpose Recycle

Monday, November 19, 2018

Quick Roof Update

Finally a day without rain or snow. 
 We have one last very short rafter to install because we ran out of daylight.
Tomorrow we install the plywood.
Then the roof felt and drip edge.

Can't wait to be done with this project so we can get onto installing the vintage exterior french doors.

I told you it would be quick.

Reuse Repurpose Recycle

Thursday, November 11, 2010

French Doors are Installed

The doors are installed and we are totally pleased with how they have changed the feel of the room. The ugly solid doors blocked the view of the yard. We now have a view on three of the four sides.
Tomorrow we start cutting down the jambs so that we can trim the door and windows. We also need to trim the threshold just a tad so that it fits.

Disregard that ugly door knob. We needed to install something so we could lock the doors. I am debating on whether or not to install wood storm doors. If I do then I will just install a plain black round door knob lock set because the wood storm doors will interfere with seeing it. I can then buy a black thumb latch door handle that matches the other door lock sets in the house.
Here's a 'before' shot so you can remember all the ugliness.

Monday, April 12, 2010

Game Room/Hallway Door Installed

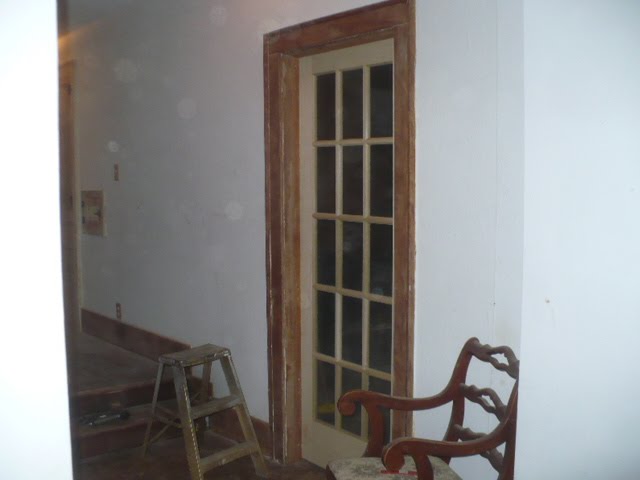
Last Friday we installed a new French door in the opening between the hallway and game room.

This opening had a door at one time. We know this because of the witness mark of long ago removed hinges. Just like the other openings that were sans their doors, this one too, had been hinged on the opposite side. Whoever hinged these doors many many moons ago, hinged them on the wrong side. Which in turn made the door awkward to use or at the very least the door was in the way. So how did they remedy that problem? Remove the doors. Of course they didn't save the doors so we are always on the lookout for replacement doors, hinges, and door knobs.I know that two of the three bedrooms upstairs have doors that swing out rather than swing into the room. When I get to the paint removal upstairs we will hinge the doors correctly on the appropriate side.

Our door installation on Friday went fairly quickly. The door did not need to be trimmed nor sanded. The only bad part was that about halfway through the installation I started to feel ill. I have spent the last three days in bed with the cold from hell. I would estimate that it has been five years since my last cold.

Having spent the last three days in bed watching TV has made me realize that there is nothing to watch on TV. Lucky for me this past week was Disaster Week on the SyFi Network. It was very informative. Did you know that the moon is going to develop a large crevice but before the space shuttle can blast off a category 5 hurricane will almost stop Stephen Baldwin from welded the moon back together again. No really.

The next disaster was an asteroid headed right towards the earth. The solution this time was to use three jet fighters equipped with lasers to blast the asteroid to pieces but...there's always a but.....one of the jets is damaged as it takes off and encounters a.....can you believe this.....a hurricane. All is well though and they blast the asteroid to smithereens only to have little asteroids rain down on Dallas.

The next disaster was right in my neck of the woods...the Midwest. Seems a large tornado producing front meets up with a large front that is over Lake Michigan. The Lake Michigan front has hurricane force winds and when it meets the tornado producing front coming from the south, it produces a Cat 6 storm over Chicago.

By this time, I have seen enough bad acting to last me a lifetime. But there's more. Another asteroid is heading for earth. This time they blow it up with a nuclear warhead. Unfortunately it breaks into 3 large pieces. Two pieces completely miss the earth but the third blows by earth so closely that it pulls the earth slightly out of orbit. This immediately causes the temperature to soar because we are now closer to the sun. I have no idea how this ended but I am sure it had something to do with a hurricane because from what I saw this weekend.....whenever you have asteroids, meteors, or comets you will have hurricanes.

Which brings me back to "The Gear". Just like where there were meteors there were hurricanes, here at "The Gear" where there were doors at one time you will find doors that were hinged on the wrong side.

Thursday, April 8, 2010

Kitchen/Hallway French Door

R asked me tonight if we can do something tomorrow that doesn't involve saw dust. Sorry R, no can do. One door down...one to go.

The kitchen/hallway French door took two days to install. We first needed to trim a tad off the top so that it would fit the out of square door opening.We then needed to sand here and there so that the door would have a consistent margin around the door. Look at all the saw dust on the floor.
We then installed the vintage hinges I purchased on eBay. We decided to wait on installing the vintage glass door knobs until later just in case we need to sand some more.

Here is a photo of the door taken from the hallway.
And the view of the new door from the kitchen. Knotty pine, anyone? Visualize the knotty pine painted white. Are you visualizing or just humoring me????
Friday's plan......start installing the door between the hallway and the game room. Saturday's plan is for R to go to the race track with G for practice and to dial in G's sprint car.

Here is a link to a U Tube video of the Michigan Traditional Sprint Car Series 2009 Year in Review. That is the series R raced with last year and won Rookie of the Year despite being one of if not the oldest driver. See if you can pick out B, G, R, and extra points for picking out R's sprint car on the track. Make sure you check out Jack Hewitt's two seat sprint car. He actually takes people for a spin around the track. I was at a race track where you had to pay to enter a raffle for a chance to ride in it. The person that won changed their mind and they had to pull another ticket. Too scary for me that's for sure.

http://www.youtube.com/watch?v=dKRY_cZQ3ik

Monday, March 8, 2010

Another Day...Another Door

We did not get as much accomplished as we intended. R sanded the baseboard and touched up some other areas with the sander. I stripped the clothes chute door and started stripping the trim around the built in cabinet.

Stripping was a slow process with a heat gun and dull scraper. Note to self....buy new scrapper tomorrow. I previously had stripped the doors and drawer fronts in the built in cabinet so I can't take credit for stripping those today. The built in cabinet is going to be quite the project because the paint is coming off in gobs.

This is what it looked like when we started today.And this is what it looked like when we quit three hours later.No, we did not install the door. Several years ago, I purchased 5 doors off of eBay from a seller in the southern part of Indiana. We drove there to pick up the doors and even though I told the seller we would not be there until 8 or 9 PM, the seller was already in his jammies and bathrobe when we arrived to pick up the doors. We just grabbed the doors and left without checking them. I did not realize until today that he gave me two doors that are too tall. I will need to sell those on eBay or craigslist. It's a bummer because the doors are new and made of poplar and look perfect except they are too tall.

We rummaged through our stack of doors in the game room and found door that we will install in the game room opening. I insisted that we just place the door in the opening so I could see what it would look like once it was installed. I just love it. The door totally changes the feel of the hallway.I now need to order a door for the kitchen doorway. I am keeping my fingers crossed that I can find the size and type I need IN STOCK at Home Depot. I am getting antsy to install the kitchen door and I really do not want to wait while they order the correct size.

In the meantime we will continue to strip and sand.